Eliminator21vdrive
Well-Known Member
- Joined
- Jul 5, 2016
- Messages
- 1,955
- Reaction score
- 3,749
Nice as always.
Do you weld the bridges/spacers to the external tube as well?
Do you weld the bridges/spacers to the external tube as well?


Thank you! Yes they are welded to the inner pipe in several sections to dam up the water and spill over on the top side to keep the entire pipe surrounded by water. I leave a small gap on the bottom to allow a little bit of the water to pass by.Nice as always.
Do you weld the bridges/spacers to the external tube as well?
Only the innerNice as always.
Do you weld the bridges/spacers to the external tube as well?
You are referring to the rings right?Thank you! Yes they are welded to the inner pipe in several sections to dam up the water and spill over on the top side to keep the entire pipe surrounded by water. I leave a small gap on the bottom to allow a little bit of the water to pass by.
Yes. I cut them to size and in half, then weld them to the inner pipe leaving a small opening on the bottom so hot water doesn't get trapped at the bottom.You are referring to the rings right?
So, you went "dry tails"? Were you concerned about possible reversion issues? They look great!Yes. I cut them to size and in half, then weld them to the inner pipe leaving a small opening on the bottom so hot water doesn't get trapped at the bottom.
Thank you!So, you went "dry tails"? Were you concerned about possible reversion issues? They look great!
R,
HAP
Thank you!how bad azzzz is this boat............love it...............

Thank you budAwesome work Nick....per usual. Your creativity and talent shine bright here.
Nice, seems you went a little heavier Guage then most? I think most of the other mfg.'s use .090". What did you use for slosh control?Started building my fuel tanks. Started with a 60" x 144" x .125 sheet of 5052 aluminum. Had my friends in the shop next to me help me bend them up on their press brake after I did my layout and used their sheer to cut the flat pattern out. These should be approximately 28 to 30 gal each. View attachment 1434888 View attachment 1434889 View attachment 1434890 View attachment 1434891 View attachment 1434892 View attachment 1434893
Thank you! I went with this thickness for durability. I used 3/16" material for the end caps which will be used to secure the tanks to my gunnel supports. I have noticed after doing welding on a lot of IMCO tanks, adding extra fitting and building new tanks to replace old belly tanks, that most of them are built using .125 thick material for larger capacity. The walls don't flex as much and you can get a really nice weld. I chose not to run a baffle in these tanks.Nice, seems you went a little heavier Guage then most? I think most of the other mfg.'s use .090". What did you use for slosh control?
Yes. Going to be a blown 548 nowWell that will help! Still using engine from the Rogers?

 . Thank you Barry for sharing your knowledge and experience with the rest of us DIY guys!
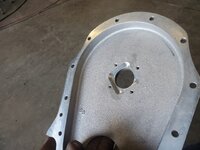
Glad it made enough sense for it to work out. You could also mill a round area, but square is how my current machinist friend prefers to do it.Bought a new billet timing cover and a new Ram Force water pump for the motor I'm going to put in the Howard. I was trying to pick some brains on how to setup the cam thrust for the new setup and also searched around on here for a topic and happened to find one that @obnoxious001 had posted a few years back. He showed a very detailed step by step process on how he did it and also provided part numbers for the items he used. I ordered those same parts, pulled out the micrometers and calipers and started on it. After measuring everything several times and also mocking things up several times I went ahead and machined the back side of my timing cover. Once that was done I put it all back in place again and double checked that I had the clearance I wanted. Came out perfect
Yeah square is easier to do on a manual machineGlad it made enough sense for it to work out. You could also mill a round area, but square is how my current machinist friend prefers to do it.
but if you rotate the square( or the timing cover) 45 degrees, you miss the bolt holes. not a big deal but something to tuck away for next time.Yeah square is easier to do on a manual machine
Yeah lol I wasn't thinking about that when I did it lolbut if you rotate the square( or the timing cover) 45 degrees, you miss the bolt holes. not a big deal but something to tuck away for next time.
BTW this project is moving faster than ANY of mine.
Very good point, mine are done that way to keep the strength intact. I didn't look at his photo that closely, I was just happy I had shared something that has worked so well for me.but if you rotate the square( or the timing cover) 45 degrees, you miss the bolt holes. not a big deal but something to tuck away for next time.
BTW this project is moving faster than ANY of mine.
Still have .350 thickness on the cover for pump mount. Didn't think that far ahead before cutting the pocketVery good point, mine are done that way to keep the strength intact. I didn't look at his photo that closely, I was just happy I had shared something that has worked so well for me.


Damn dude! looking super cool!
I still have some trailer upgrades I need you to take care of...I will be in touch soon to get on your schedule this winter.Thank you!
Sounds good budI still have some trailer upgrades I need you to take care of...I will be in touch soon to get on your schedule this winter.
Thank you!!Oh Man this is so bad ass!!!
Thank youI just cried thanks for posting! Beautiful work!
Man that sure looks good!! I have a minor critique and these details are stupid small. Feel free to ignore them!!More progress tonight on getting the pedal assembly built. View attachment 1439450 View attachment 1439451


 .
.