WELCOME TO RIVER DAVES PLACE


You sport truck guys from the late 80’s & 90’s gotta watch OBS Clash on prime
- Thread starter Tank
- Start date

BUDMAN
HAVASU BOUND
- Joined
- Jul 12, 2011
- Messages
- 11,688
- Reaction score
- 13,782
more pics of the truck please, or did i miss them on this thread somewhere?Nicely done!!!!I agree with removing the clear corners going back to amber. The clears date it into the 90s. If you are pulling the grill to make the change let me know if You want to know how to take your standard grill and debadge it with a heat gun and plastic welder and then paint it.
The front end was made from stock grill and bumpers. Sectioned the bumper moved it up to the bottom of the grill and removed the plastic between the bumper and grill. Then drenched in the license plate. Used to have a plexiglass cover the I molded to the stock bumper but got too many tickets and said F it.
View attachment 1302180
HNL2LHC
What is right and what is wrong these days!
- Joined
- Jun 25, 2018
- Messages
- 16,767
- Reaction score
- 32,574
This is my old truck that I sold when I picked up my 2013 10 years ago. I gotta grab images from old hard drives one of these days. I did just about every drop known to man on the things. LOL One of these days I want to get another OBS. That was the best time of my life.more pics of the truck please, or did i miss them on this thread somewhere?
HNL2LHC
What is right and what is wrong these days!
- Joined
- Jun 25, 2018
- Messages
- 16,767
- Reaction score
- 32,574
Post up if you need guidance/advise.I
Dig the bumper. That’s superb and I’d like to do something similar.
JJ McClure
Well-Known Member
- Joined
- Mar 9, 2022
- Messages
- 1,576
- Reaction score
- 2,734
I always liked the way Boyd tucked the front bumpers. Deleted the plastic filler pieces and fit way tighter. Personally, I wouldn’t want to shave the corner markers. Looks like you did something very much like that. I always need some sort of help. 

brianwhiteboy
Professional Lurker
- Joined
- Dec 20, 2007
- Messages
- 2,114
- Reaction score
- 6,997
Another weekend update. Unfortunately, Budnik still hasn’t finished the wheels. They keep telling us another week or two.
One of the last things was to address the stereo system. The factory head unit had a tape player in it, which was awesome back in the 80s and 90s, but not practical today.
There’s a company called 1 Factory Radio that modernizes factory head units with Bluetooth, auxiliary inputs and RCA preamp outputs. We chose to buy one of those as well as one that had the factory CD player in it. Thankfully, that was plug and play. It’s all about maintaining the stock look, but having those nice aftermarket touches.
The radio was installed a couple of weeks ago and this weekend it was time to add a subwoofer and amp along with new door and pillar speakers, with a four channel amp.
After working three solid days it’s finally done. I’m going to take it for a test drive, and hopefully rattle a few windows lol.
We went with JL amps, JL subwoofer, and Infiniti Reference speakers for the rest. I’m no audio expert, but I think it came out just dandy. It’s a mild system without any modifications to the vehicle.
The biggest pain in the nuts with these trucks is removing interior panels. The clips and plastic parts literally disintegrate in your hands. Some of them you can glue back on, but others are not salvageable.
Anyways, here’s the final product. I glued an MDF board to the back of the wall (under the carpet) so I can screw everything into that. It was important to keep the jack in its location and be able to have the seat sit normal without impinging on the amps, as well as fold down so they could be accessible for tuning. The only thing affected was not being able to fold the seat completely upright, but you can still get it up enough to access the jack.
I built a sealed sub enclosure that fits partially under the seat, but mostly in the rear floorboard. That’s only temporary as a custom box is being built that will fit completely under the rear seat and still fit with the jack. That is about three months out so my enclosure will have to do for now. It’s got plenty of base for that cab.
JJ McClure
Well-Known Member
- Joined
- Mar 9, 2022
- Messages
- 1,576
- Reaction score
- 2,734
That looks great. How much was the 1 Factory radio?Another weekend update. Unfortunately, Budnik still hasn’t finished the wheels. They keep telling us another week or two.
One of the last things was to address the stereo system. The factory head unit had a tape player in it, which was awesome back in the 80s and 90s, but not practical today.
There’s a company called 1 Factory Radio that modernizes factory head units with Bluetooth, auxiliary inputs and RCA preamp outputs. We chose to buy one of those as well as one that had the factory CD player in it. Thankfully, that was plug and play. It’s all about maintaining the stock look, but having those nice aftermarket touches.
The radio was installed a couple of weeks ago and this weekend it was time to add a subwoofer and amp along with new door and pillar speakers, with a four channel amp.
After working three solid days it’s finally done. I’m going to take it for a test drive, and hopefully rattle a few windows lol.
We went with JL amps, JL subwoofer, and Infiniti Reference speakers for the rest. I’m no audio expert, but I think it came out just dandy. It’s a mild system without any modifications to the vehicle.
The biggest pain in the nuts with these trucks is removing interior panels. The clips and plastic parts literally disintegrate in your hands. Some of them you can glue back on, but others are not salvageable.
Anyways, here’s the final product. I glued an MDF board to the back of the wall (under the carpet) so I can screw everything into that. It was important to keep the jack in its location and be able to have the seat sit normal without impinging on the amps, as well as fold down so they could be accessible for tuning. The only thing affected was not being able to fold the seat completely upright, but you can still get it up enough to access the jack.
I built a sealed sub enclosure that fits partially under the seat, but mostly in the rear floorboard. That’s only temporary as a custom box is being built that will fit completely under the rear seat and still fit with the jack. That is about three months out so my enclosure will have to do for now. It’s got plenty of base for that cab.
View attachment 1307106 View attachment 1307107 View attachment 1307108 View attachment 1307109 View attachment 1307113 View attachment 1307114
brianwhiteboy
Professional Lurker
- Joined
- Dec 20, 2007
- Messages
- 2,114
- Reaction score
- 6,997
$430. I know it’s pricey and we can get an aftermarket for cheaper, but again we wanted to keep the stock look.That looks great. How much was the 1 Factory radio?
HNL2LHC
What is right and what is wrong these days!
- Joined
- Jun 25, 2018
- Messages
- 16,767
- Reaction score
- 32,574
Tha thead unit looks great. I like to stock look. I know when we swapped out the head unit you had to use an adapter And it was not the best looking. I am with you as long as you are able to have am input Bluetooth or cable that works well.
monkeyswrench
To The Rescue!
- Joined
- Sep 7, 2018
- Messages
- 30,606
- Reaction score
- 88,765
The updated factory head unit is really cool. Filling the radiused din and a half opening always looked "off", but it was what we had. Does the new unit come with RCA/low level outputs?
brianwhiteboy
Professional Lurker
- Joined
- Dec 20, 2007
- Messages
- 2,114
- Reaction score
- 6,997
Yes sir, two pairsThe updated factory head unit is really cool. Filling the radiused din and a half opening always looked "off", but it was what we had. Does the new unit come with RCA/low level outputs?
brianwhiteboy
Professional Lurker
- Joined
- Dec 20, 2007
- Messages
- 2,114
- Reaction score
- 6,997
Wheels. Tomorrow. Stay tuned!
brianwhiteboy
Professional Lurker
- Joined
- Dec 20, 2007
- Messages
- 2,114
- Reaction score
- 6,997
Late night…. but here’s the final product! A before and after.
More pics to come this week.


More pics to come this week.
TrollerDave
Well-Known Member
- Joined
- Mar 8, 2008
- Messages
- 4,447
- Reaction score
- 9,905
Truck looks great. Thanks for taking the time to post the build.Late night…. but here’s the final product! A before and after.
More pics to come this week.
View attachment 1310147
View attachment 1310148

HNL2LHC
What is right and what is wrong these days!
- Joined
- Jun 25, 2018
- Messages
- 16,767
- Reaction score
- 32,574
Perfection!!! Nice job.Late night…. but here’s the final product! A before and after.
More pics to come this week.
View attachment 1310147
View attachment 1310148
Tank
Well-Known Member
- Joined
- Jul 12, 2008
- Messages
- 21,478
- Reaction score
- 52,299
lol. Funny. Can’t tell you how many of those I threw in the trash over the years.
BUDMAN
HAVASU BOUND
- Joined
- Jul 12, 2011
- Messages
- 11,688
- Reaction score
- 13,782
I LIKE IT!! Great jobLate night…. but here’s the final product! A before and after.
More pics to come this week.
View attachment 1310147
View attachment 1310148
brianwhiteboy
Professional Lurker
- Joined
- Dec 20, 2007
- Messages
- 2,114
- Reaction score
- 6,997
A few more for ya from last night.
The rear tires are just a hair wide so they slightly touch the inner fender lip without any air in the helper bags.
If we put some air in them we’re good but I don’t want to rely on just that, plus it adds a little height to it. So I’m going to roll the rear lips just a little.


The rear tires are just a hair wide so they slightly touch the inner fender lip without any air in the helper bags.
If we put some air in them we’re good but I don’t want to rely on just that, plus it adds a little height to it. So I’m going to roll the rear lips just a little.

LargeOrangeFont
We aren't happy until you aren't happy
- Joined
- Sep 4, 2015
- Messages
- 49,689
- Reaction score
- 76,186
A few more for ya from last night.
The rear tires are just a hair wide so they slightly touch the inner fender lip without any air in the helper bags.
If we put some air in them we’re good but I don’t want to rely on just that, plus it adds a little height to it. So I’m going to roll the rear lips just a little.
View attachment 1310424
View attachment 1310425 View attachment 1310426 View attachment 1310428 View attachment 1310427
The fender lips should roll just fine. Nice work.
JJ McClure
Well-Known Member
- Joined
- Mar 9, 2022
- Messages
- 1,576
- Reaction score
- 2,734
Looks great!
brianwhiteboy
Professional Lurker
- Joined
- Dec 20, 2007
- Messages
- 2,114
- Reaction score
- 6,997
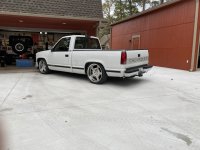
Some fresh day time pics.
Rolled the rear fender lips just enough for the rear tires to tuck perfectly without rubbing. Just going to do a few more mechanical things (bigger alternator, water pump and hoses).
Want to make her as reliable as can be while heading to the river.


Rolled the rear fender lips just enough for the rear tires to tuck perfectly without rubbing. Just going to do a few more mechanical things (bigger alternator, water pump and hoses).
Want to make her as reliable as can be while heading to the river.
BUDMAN
HAVASU BOUND
- Joined
- Jul 12, 2011
- Messages
- 11,688
- Reaction score
- 13,782
This truck turned out amazing.
brianwhiteboy
Professional Lurker
- Joined
- Dec 20, 2007
- Messages
- 2,114
- Reaction score
- 6,997
Thanks Bud. She gets a lot of looks. My son drives it almost every day.This truck turned out amazing.