WELCOME TO RIVER DAVES PLACE

F26 Restoo

Dcb.blake

Well-Known Member
Joined
Jul 25, 2021
Messages
499
Reaction score
713
Mark center lines and put a piece of plywood over it with a 2x behind sandwiching the fiberglass layout and drill, too hard to be accurate with a hole saw without something for the center bit. I would make that 1/4"? gap between the lower bezzels match the upper.
I have a 1x4 im going to cut and put behind the dash and screw into the dash in a spot where it won’t matter. Then I’m almost thinking about making some plugs that will fit in the smaller holes just for ease of using the hole saw. I’ve never used a hole saw with fiberglass. On metal if only part of the saw is grabbing it’s a monster to hold onto and keep straight like you said. The saw trying to walk is what my worry is. Going to use the biggest pilot bit possible to try and keep it from walking
 

Dcb.blake

Well-Known Member
Joined
Jul 25, 2021
Messages
499
Reaction score
713
They match so perfectly, and i personally like the bezels gives more depth on the dash.
the color is perfect. The trim card I’m not too excited about. I’ll have to post some pictures later today. Colors are great but it dosent fit as I had imagined. The trim bezel cuts off part of where it says “Drive” on the card itself.
 

lenmann

Well-Known Member
Joined
Apr 13, 2013
Messages
1,695
Reaction score
3,517
I have a 1x4 im going to cut and put behind the dash and screw into the dash in a spot where it won’t matter. Then I’m almost thinking about making some plugs that will fit in the smaller holes just for ease of using the hole saw. I’ve never used a hole saw with fiberglass. On metal if only part of the saw is grabbing it’s a monster to hold onto and keep straight like you said. The saw trying to walk is what my worry is. Going to use the biggest pilot bit possible to try and keep it from walking
Hot glue or 5 minute epoxy a snug fitting plug in the existing gage hole so you can use the pilot on the new larger hole. When you cut the new hole run the hole saw in reverse to cut through the gel and glass eliminating the tendency for it to grab and crack the gel. Once though the glass on the front of the dash you can run it in forward to get through the plywood core, but before you blow through the back reverse again to cut through the glass on the back. This will minimize the possible frayed glass damage on the back of the dash.
 

Dcb.blake

Well-Known Member
Joined
Jul 25, 2021
Messages
499
Reaction score
713
After work decided to knock some more out and I ended up doing more than I thought.
08F7C3E1-3D60-44E4-857A-AF337C44A996.jpeg
First off installed the trim card with new bezel. It looks better than I thought it was going to which I was worried about. Pretty simple just had to remove the studs from the old bezel and install into now one and run the nuts on.
02078CD4-E49E-47B8-9994-0E3784A3FAE6.jpeg
Got everything taped up and did my math for the center horizontal line which I factored in my gap that I wanted. I dida lot of measurements and determined that the only spacing I would be able to match from the smaller gauges was the center spacing. That was kinda my goal to mimic it as much as possible. It’s was definitely a happy medium working around the preexisting hole and the right up and down spacing.
66D66851-03D6-442F-908A-76A1A80F1280.jpeg
Pre drilled the glass and screwed a 1x4 into the back of dash for the pilot. After that I began to mark my lines. Didn’t get many pictures but I re did my measurement calculations a few times along with the lines to try to get it as close as I could as stated before. I didn’t have a 3 3/8 hole saw which I thought I did, figures 😂.So I just used a 3in plug which worked out great.
23A8624E-A9E2-4B05-96BD-81AE01E8F6FC.jpeg
Screwed those into the 1x4. Also I learned it was WAYY easier to see the bottom edge that I was using to measure or trying to by taping the crease. Don’t have any pictures but made all my lines for the 3rd time checked clearances, drank a couple beers for courage and went for it.
18590B3E-03E2-4653-8C8A-AC9C0E74A1BA.jpeg
Messed up a few times on my calculations LOL
 

Dcb.blake

Well-Known Member
Joined
Jul 25, 2021
Messages
499
Reaction score
713
6F8C52A2-EE39-4C33-8F41-FA6D1898E8BB.jpeg
Got everything cut out and used the method that a member told me too and it worked perfect! Ran the pilot in as far as possible then ran it backwards when the hole saw got to the gel. No chips or cracks at all. The holes are a little egged because the hole saw came into the preexisting hole by maybe a blade width which is okay I’d rather take the closer gap.Won’t be able to see with the gauge let alone bezels.
03021F36-7461-48B0-B55F-DC5931BB7312.jpeg
All in and as even as it gets! That’s what I was worried about the most was getting them level with each other.
2D10F0E9-A6E9-49D0-AC9C-A5CD9C61BE04.jpeg
Needs a good buff but all in and ready for the rest of the wiring, should be a breeze now. Gap ended up a little bit wider than I wanted but all in all it’s super close
 

Dcb.blake

Well-Known Member
Joined
Jul 25, 2021
Messages
499
Reaction score
713
Nice looks good 👍
Looks great, nicely done.
Thanks fellas, need to get the steering wheel taken care of now, sticks out like a sore thumb. Trying to get some sample material that isotta uses for the purple color to see if it’s even close. If not I guess the white wouldn’t be too bad of an option other than getting grime all over it. Had that problem with the lavey
 

Dcb.blake

Well-Known Member
Joined
Jul 25, 2021
Messages
499
Reaction score
713
Last year my fulleton Jack had failed. The gear broke in half. Okay the jacks old let’s install a new fancy one. Well it’s welded in, a lot of work for a broken gear. I had a hard time finding a replacement local to me and I’m around a big farm/equipment repair community and finding stuff is not normally an issue. Anyways if anyone needs it this is the repair kit. Comes with 2 gears 2 bushings and all the roll pins needed. I ordered a handle too which I’ll post but it wasn’t the correct one. The hole for roll pin was in the wrong spot and it was too short and didn’t go all the way through the Jack frame to the other side. So in my application it didn’t work, don’t buy it lol. All parts are from e trailer
87A6E548-0F3C-45FE-893F-A005C533894B.jpeg
F4B63261-F9C0-406F-BADC-27683B163952.jpeg
 

Jay Dub

Well-Known Member
Joined
Jun 11, 2020
Messages
1,204
Reaction score
1,391
Well started back up on the 6 month gauge install 😂. Dropped it down and realized even with a cover it’s FILTHY, minor details lol. This year it will be professionally done as I like to have it done every 2 years with a machine of it needs it. If not leave it alone! View attachment 1204271 View attachment 1204272 Got it all down and went into the mess… empty beers cans, cut wires, lights and switches strung out, sounds about right 😂 View attachment 1204273 Last I left off I got some of the wiring loosely in there with the new deutsch connectors for the gauges installed. Popped the new gauges in with out bezels. Didn’t have much time so I did some simple stuff. Just installed the o rings on the bezels which I’m glad I was able to round some up with o rings so my gel dosent get completely destroyed. View attachment 1204287 View attachment 1204289 Still undecided on the bezels. I thought I would like them more. Not too sold just yet. I think a new steering wheel will make them pop as I wanted a new one anyways. Good excuse to get one now! TBD on the bezels. View attachment 1204288 Well I was hoping to be able to just mark the center line of the existing hole and use the inside edge as a guide of where to put the hole saw. Not going to be the case because of the face of the dash. The gauge would be pushed too far down off the plane if I did that. So that being said back to the drawing board. Other than degreeing the current holes based off the center lines I’m not sure how else to mark the holes.Plan to hit it hard this weekend and knock the holes out.
bezels look great
 

Jay Dub

Well-Known Member
Joined
Jun 11, 2020
Messages
1,204
Reaction score
1,391
View attachment 1204685 Got everything cut out and used the method that a member told me too and it worked perfect! Ran the pilot in as far as possible then ran it backwards when the hole saw got to the gel. No chips or cracks at all. The holes are a little egged because the hole saw came into the preexisting hole by maybe a blade width which is okay I’d rather take the closer gap.Won’t be able to see with the gauge let alone bezels. View attachment 1204686 All in and as even as it gets! That’s what I was worried about the most was getting them level with each other. View attachment 1204687 Needs a good buff but all in and ready for the rest of the wiring, should be a breeze now. Gap ended up a little bit wider than I wanted but all in all it’s super close
Those monster gauges look awesome, thank you for sharing the progress.
 

Dcb.blake

Well-Known Member
Joined
Jul 25, 2021
Messages
499
Reaction score
713
Those monster gauges look awesome, thank you for sharing the progress.
Thanks, slow progress glad I can keep some entertained 😂

Just ordered a steering wheel so hopefully that ties everything in.

Still have a good amount of wiring to complete along with lighting and some switches possibly
 

Dcb.blake

Well-Known Member
Joined
Jul 25, 2021
Messages
499
Reaction score
713
Not too much progress tonight other than disassembly of the interior. I have to take the side pod out to run a wire for the fuel psi gauge. The prior one was a mechanical gauge so it had a hose running up to it. Well with a carb that’s alright, fairly low pressure. Efi I’m gonna go ahead and not run 60psi through that line. I would of probably ran the wire and made it look clean through the pod but I really wanted to inspect the rest of the hoses and cables that run through there. Pretty easy once you figure out where all the interior screws are.
4A7411A4-7B29-4827-B1C3-95F356C5CC21.jpeg
7AF52D13-E5B3-403E-8BC8-2D89C7AA511D.jpeg
Found this interesting it was behind and interior piece. The vin plate is like 1 foot towards the transom from this spot? Makes me wonder what kinda fuckery was going on lol! Luckily the vin plate matches The one on the transom. “Grind me”?Did sombody screw the pooch and put it a foot too far?Who knows.
C944E7A0-6C34-443B-B587-E16D8E9BCCE1.jpeg
Needs a good cleaning but not as bad as I thought. Going to try and get some wires cleaned up back here too since it’s easy to get too. I have my detail guy coming Monday to do the dash area where the gauges are.Gonna pull the gauges for him so he can actually use a buffer and not fsu! That being said I would like it to be somewhat back together for him so I’m going to try to get as much this weekend cleaned up.
4BA3F519-6888-45C2-A103-18E183FDF625.jpeg
My switch panel has regular toggles currently and sure as shit all the boots ripped taking them off so I gotta get new boots or use it as an excuse to go to these push buttons I’ve been wanting to. This one’s too big and I’m going to see if I can find one that’s a closer fit so I don’t have to open the hole up too much. I think if I use the switch pictures it will cover up the labeling because the hole will have to be opened up a good amount. All my fuses are 10a which seems correct for everything I have so I’m going to try to get a switch that can at least handle that. They also have a harness that plugs into it so there’s not a million and a half spades to disconnect if I need to remove the panel for whatever reason. The switch quality feels really solid. Impressive for Amazon! The ring lights I think I’m going to set up so that they come on whenever the switch is on. Not sure they will be bright enough to see in the daylight but I imagine it will be harder to determine if they are on or off vs a toggle.
 

Dcb.blake

Well-Known Member
Joined
Jul 25, 2021
Messages
499
Reaction score
713
Got after it this weekend and did a good amount of work. Slacked At taking pictures. Long story short all the tedious stuff that will probably go unnoticed got done. Ran a new wire for the fuel psi gauge. Removed the old fuel psi hose along with some old wires that were no longer in use.
18A9FA4C-799D-45B1-9BF8-166F048FF570.jpeg
1059C55A-0C19-4441-B4E1-F77D79E9630F.jpeg
Cleaned up some of the routing and added some mesh conduit mostly for esthetics. I like the look of that over the rainbow bundle of wires. Also added some duetsch connectors where there were spades prior. Be a lot easier next time I or somebody else has to disassemble the interior. No having to guess what goes where.
 

Dcb.blake

Well-Known Member
Joined
Jul 25, 2021
Messages
499
Reaction score
713
Changed the rigid rock lights that were red….not too sure why they were ever installed but changed those out to tbt same style fixture the rest of the boat has with a purple led. Got the gauge wiring all finalized and verified that everything worked.

Side note, does anyone know of the Holley dominator system saves the tune in the computer when the battery completely dies. Does it need to be redone? I would think there’s some sort of way that it saves but would rather not assume. It started and right up just fine but starting and running efficiently are two different horses.

Pulled off my steering parts along with the key switch bezel. The guy that does my polishing was slow and got it all knocked out in an afternoon. Looks way better than the cleared stuff.

Steering wheel is also for sale. Make a reasonable offer. Couple nicks in the pictures. Hard to tell when it’s installed.
C85DCB73-FE2E-4096-B6E7-79138F42BCCF.jpeg
B9ED5E3A-E6EC-4797-9DEB-41EE18ADA575.jpeg
46E0BDE0-5E0F-4E8F-8F2F-3EB5BE79CAA8.jpeg
 
Last edited:

Dcb.blake

Well-Known Member
Joined
Jul 25, 2021
Messages
499
Reaction score
713
Got everything back from polishing yesterday and installed. The dude does killer work. A lot more patience than I have that for sure. Detailer hit the dash area for me and everything ready to go together. Installed the steering and the gauges and locked them down. I had to trim the hold downs which was kinda a pita. It’s done now and just waiting for the steering wheel which should be here today. I’m super happy with it. Pictures don’t do the purple justice. Can’t wait to get the steering wheel installed. I’m going to keep the white gauge lights for now. The trim card I have to get new light holders because the lights are not removable. Should be a simple task when they get here.
90AAAE09-5E3F-48CA-8BFF-5AE92FF7493E.jpeg
3ADECE1B-8B76-433E-AF04-78B64328EC3D.jpeg
DDF7C91D-43B4-408F-9913-EB5172F07C2D.jpeg
 

02HoWaRd26

DCBroke
Joined
Dec 19, 2007
Messages
12,219
Reaction score
29,085
Bro those battery boxes….. so 2002. Where’s the sexy ones with the step plates? 🤣
If you haven’t ordered the deals for your trim I’ll send you some.
 

Dcb.blake

Well-Known Member
Joined
Jul 25, 2021
Messages
499
Reaction score
713
Bro those battery boxes….. so 2002. Where’s the sexy ones with the step plates? 🤣
If you haven’t ordered the deals for your trim I’ll send you some.
Waiting for you to buy me some 😂

It’s in the works just waiting for people to get back to me…..
 

Dcb.blake

Well-Known Member
Joined
Jul 25, 2021
Messages
499
Reaction score
713
93A88184-B0C9-436C-8F7D-DA63CD247198.jpeg
3AEE2B0B-B8D2-488B-B2BE-8D6AA5132E89.jpeg
Almost all back together. Got some of the stuff that was bugging me cleaned up. Need to order one more stupid boot for the tattletale. Think once I get theinterior back in I’ll like the white a lot more. Not sold on it 100% yet but I think it’s the best color choice for that wheel. Otherwise go to a powdered purple wheel.
 

Dcb.blake

Well-Known Member
Joined
Jul 25, 2021
Messages
499
Reaction score
713
E794B919-06E1-464C-85E3-8E7E0FE0B18A.jpeg
007AA583-9C19-4434-A5FA-338F64B3E304.jpeg
Got everything back together interior wise. Everything cleaned as much as possible and back together. Goes to get detailed/cut buff where it needs on Monday so I had no other option to get it ready 😂 Didn’t take to many pictures but got all the interior lights switched out to the right colors…..sombody had red Rigid rock lights half ass wired in. Some people should own any tools. Anyways switched those out for the same style light housing I have in the rest of the boat with a purple led bulbs for the mood light then white crisp leds for the interiors that match the gauge lights. Eventually I’ll put some better looking rock lights when I have the interior redone. The old light put too Mitch of a footprint and looked like a hit with the rock lights (smaller). Pretty happy with how it turned out. Purple is spot on and not overwhelming. Got everything situated then serviced the drive oil and engine. Threw in a new 51060R filter and Kendall 20-50 oil and it should be good for the season pending on how much it gets used.
7B5E4F83-A563-4683-AB64-E225E0EF291A.jpeg
Really need to start taking more pictures…. Ran It on the hose to confirm proper gauge function and check for any leaks. Gauges worked properly. Valve cover bolt said cya! To me it looks like the bolt was cut at some point? Not too sure with it being stainless other than it’s going to be a complete bitch to get out if that’s the case. I have a good amount of issues with them coming loose? Not sure why I used lock right and lock washers. Maybejust old valve covers????
C2D304D1-A0B9-4CBA-9A68-C865262460B3.jpeg
67D22CFE-A98D-4B1B-B670-5CA9EE721CCB.jpeg
 

Dcb.blake

Well-Known Member
Joined
Jul 25, 2021
Messages
499
Reaction score
713
As per request! Pretty happy with the outcome. Could be a bit brighter but overall happy. Apparently the light holders for the trim card don’t want to work anymore so I’ll have to redo that.

430CA920-5B0B-471F-A4C8-FACA340630B9.jpeg
2D4A9F1A-D2FF-4666-8E9A-B579AFD39A77.jpeg
349F6AD3-0E75-4D43-A0A8-9DB2900037A2.jpeg


Tore the valve cover off and the bolt seemed to be cut? Not sure the reason the threads looked really good. Got some new bolts and a some new high collar washers for both sides. After that we should be good to go……


Got a few more small things in store that I’m hoping to get after next month.

Next is detail then D1 is going to lake test it and tune it. Never got done and it always ran fine just felt there was some left on the table. Got a base time and ran the self learn and left it there as I was told it was good to go when I put the efi on initially. I’m hoping the lake tune will be the end of it besides some aesthetic plumbing
 

mattyc

Well-Known Member
Joined
Sep 9, 2017
Messages
496
Reaction score
604
As per request! Pretty happy with the outcome. Could be a bit brighter but overall happy. Apparently the light holders for the trim card don’t want to work anymore so I’ll have to redo that.

View attachment 1209663 View attachment 1209664 View attachment 1209665

Tore the valve cover off and the bolt seemed to be cut? Not sure the reason the threads looked really good. Got some new bolts and a some new high collar washers for both sides. After that we should be good to go……


Got a few more small things in store that I’m hoping to get after next month.

Next is detail then D1 is going to lake test it and tune it. Never got done and it always ran fine just felt there was some left on the table. Got a base time and ran the self learn and left it there as I was told it was good to go when I put the efi on initially. I’m hoping the lake tune will be the end of it besides some aesthetic plumbing
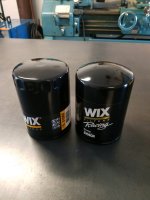
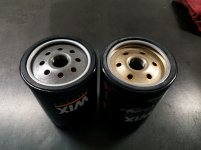
Looking good! Did you already have a 51060R filter on it? If so, do me a favor and cut it open and share a few pics. I'm curious of the construction of those
 

Dcb.blake

Well-Known Member
Joined
Jul 25, 2021
Messages
499
Reaction score
713
Looking good! Did you already have a 51060R filter on it? If so, do me a favor and cut it open and share a few pics. I'm curious of the construction of those
I can’t remember to be honest with you. I went and talked to an engine builder and that’s what he recommended. Did some research and it seemed sufficient. They have a non R filter and it flows less than the R which means it basically has a higher micron count which it filters a bit more than the R. I can’t remember off the top of my head what the R micron count was but it was a good number that I was okay with. I’ll change oil and filters twice a season, probably overkill for sure but makes me sleep better at night lol 😂

I normally cut them open for inspection so I’ll snag some pictures of it. I always thought Wix was the Fram of filters but after some research and actual inspections I would say they are on the higher side quality wise. I switched everything from Napa to wix on all of our equipment.
 

mattyc

Well-Known Member
Joined
Sep 9, 2017
Messages
496
Reaction score
604
I can’t remember to be honest with you. I went and talked to an engine builder and that’s what he recommended. Did some research and it seemed sufficient. They have a non R filter and it flows less than the R which means it basically has a higher micron count which it filters a bit more than the R. I can’t remember off the top of my head what the R micron count was but it was a good number that I was okay with. I’ll change oil and filters twice a season, probably overkill for sure but makes me sleep better at night lol 😂

I normally cut them open for inspection so I’ll snag some pictures of it. I always thought Wix was the Fram of filters but after some research and actual inspections I would say they are on the higher side quality wise. I switched everything from Napa to wix on all of our equipment.
So I'm in between the 51060 and 51060R at the moment. 51060 says 21 micron and 9-11gpm, 51060R says 61 micron and 28gpm. I dont use the factory merc filter because I cant get it local. I prefer the filtering of the 51060 but unsure if its causing a decrease in flow. I have both and it's funny, the 51060R has two less holes in the base plate? Due for an oil change so I plan on running both to see if there is a measurable oil pressure difference, my gut says there wont be. Looking inside, both filters look very very similar, just curious what I cant see.
 

Attachments

  • 93947.jpeg
    93947.jpeg
    547.1 KB · Views: 28
  • 93952.jpeg
    93952.jpeg
    507 KB · Views: 28

Dcb.blake

Well-Known Member
Joined
Jul 25, 2021
Messages
499
Reaction score
713
How
So I'm in between the 51060 and 51060R at the moment. 51060 says 21 micron and 9-11gpm, 51060R says 61 micron and 28gpm. I dont use the factory merc filter because I cant get it local. I prefer the filtering of the 51060 but unsure if its causing a decrease in flow. I have both and it's funny, the 51060R has two less holes in the base plate? Due for an oil change so I plan on running both to see if there is a measurable oil pressure difference, my gut says there wont be. Looking inside, both filters look very very similar, just curious what I cant see.
How big is your oil pan? I have a large pan around 14qt. A lot of oil to filter so that’s why I opted to roll with the higher flowing filter. Also if I have material that will get passed the micron rating of the R there may be bigger problems lol!

I’d be curious what the merc filter specs are. What motor do you have?
 

mattyc

Well-Known Member
Joined
Sep 9, 2017
Messages
496
Reaction score
604
How

How big is your oil pan? I have a large pan around 14qt. A lot of oil to filter so that’s why I opted to roll with the higher flowing filter. Also if I have material that will get passed the micron rating of the R there may be bigger problems lol!

I’d be curious what the merc filter specs are. What motor do you have?
No specs on factory filter, of course. Someone on rdp did a write up awhile back where they cut open the factory filter, some good features, a few bummers. Mine is a 500efi with a whipple. Stock 7qt pan, 8qt oil change. It has a thermostatic oil cooler and according to the parts illustration it has a filter bypass valve in the block at the filter pad, so I imagine if the regular filter does create a flow restriction at high rpm, the bypass valve should relieve it. I'm sure I'm overthinking it, like everything else.
 

Dcb.blake

Well-Known Member
Joined
Jul 25, 2021
Messages
499
Reaction score
713
No specs on factory filter, of course. Someone on rdp did a write up awhile back where they cut open the factory filter, some good features, a few bummers. Mine is a 500efi with a whipple. Stock 7qt pan, 8qt oil change. It has a thermostatic oil cooler and according to the parts illustration it has a filter bypass valve in the block at the filter pad, so I imagine if the regular filter does create a flow restriction at high rpm, the bypass valve should relieve it. I'm sure I'm overthinking it, like everything else.
I just looked up the merc spec for say a 600sci 520 565 all the way up to the big engines.

35-881126K01 is the number.​

1/1000th of an inch which converts to about 25 microns. I couldn’t find any flow numbers. The R filter also has an anti drain back valve. Keeps more oil in the filter when the engine is turned off.


Good things to over think.
 

mattyc

Well-Known Member
Joined
Sep 9, 2017
Messages
496
Reaction score
604
I just looked up the merc spec for say a 600sci 520 565 all the way up to the big engines.

35-881126K01 is the number.​

1/1000th of an inch which converts to about 25 microns. I couldn’t find any flow numbers. The R filter also has an anti drain back valve. Keeps more oil in the filter when the engine is turned off.


Good things to over think.
That is the number for my deal. So how and where did you find that information???

The 51060 also has anti drain back, I believe its silicone and the R valve is nitrile.
 

Dcb.blake

Well-Known Member
Joined
Jul 25, 2021
Messages
499
Reaction score
713
That is the number for my deal. So how and where did you find that information???

The 51060 also has anti drain back, I believe its silicone and the R valve is nitrile.
I googled the number, it was in the description on a couple different sites. Looks like legit info imo.
 

mattyc

Well-Known Member
Joined
Sep 9, 2017
Messages
496
Reaction score
604
I googled the number, it was in the description on a couple different sites. Looks like legit info imo.
Damn thanks for that. I dont bother reading some of that stuff because it is all the same sales pitch, guess I shouldn't ignore it
 

Dcb.blake

Well-Known Member
Joined
Jul 25, 2021
Messages
499
Reaction score
713
Was looking at all the dumps on the boat and I guess I never realized it but I have a dump on my sea strainer? Didn’t look like it had a relief on it. The hose that went to the dump is a little lower than the in and out ports of the main lines. Maybe a bypass of some sort? Air vent?? I would like to tie it into one of my existing dumps or move the port to the same side of the boat as the others.
 

mattyc

Well-Known Member
Joined
Sep 9, 2017
Messages
496
Reaction score
604
Was looking at all the dumps on the boat and I guess I never realized it but I have a dump on my sea strainer? Didn’t look like it had a relief on it. The hose that went to the dump is a little lower than the in and out ports of the main lines. Maybe a bypass of some sort? Air vent?? I would like to tie it into one of my existing dumps or move the port to the same side of the boat as the others.
Sounds strange. Without a relief valve on it, it acts an air leak, surprising itll pick up water on startup
 

Dcb.blake

Well-Known Member
Joined
Jul 25, 2021
Messages
499
Reaction score
713
Sounds strange. Without a relief valve on it, it acts an air leak, surprising itll pick up water on startup
I’m going to look again but it has to be a relief. I must of missed it. I think it’s the Teague brass one and I missed the adjustable part as the hose going out was covering it
 

50onRED

The Metal Lab
Joined
Jun 21, 2014
Messages
395
Reaction score
338
View attachment 1209451 View attachment 1209452 Got everything back together interior wise. Everything cleaned as much as possible and back together. Goes to get detailed/cut buff where it needs on Monday so I had no other option to get it ready 😂 Didn’t take to many pictures but got all the interior lights switched out to the right colors…..sombody had red Rigid rock lights half ass wired in. Some people should own any tools. Anyways switched those out for the same style light housing I have in the rest of the boat with a purple led bulbs for the mood light then white crisp leds for the interiors that match the gauge lights. Eventually I’ll put some better looking rock lights when I have the interior redone. The old light put too Mitch of a footprint and looked like a hit with the rock lights (smaller). Pretty happy with how it turned out. Purple is spot on and not overwhelming. Got everything situated then serviced the drive oil and engine. Threw in a new 51060R filter and Kendall 20-50 oil and it should be good for the season pending on how much it gets used. View attachment 1209453 Really need to start taking more pictures…. Ran It on the hose to confirm proper gauge function and check for any leaks. Gauges worked properly. Valve cover bolt said cya! To me it looks like the bolt was cut at some point? Not too sure with it being stainless other than it’s going to be a complete bitch to get out if that’s the case. I have a good amount of issues with them coming loose? Not sure why I used lock right and lock washers. Maybejust old valve covers???? View attachment 1209464 View attachment 1209465
Lookin good!!
 

Dcb.blake

Well-Known Member
Joined
Jul 25, 2021
Messages
499
Reaction score
713
Haven’t done much. Was lazy over winter with everything so now I gotta finish my backyard revamp now. So no boat stuff other than dreams 😂

Decided I wanted to change up the rigging and location of things to get as many things off the transom for a cleaner look. The fuel system needs to be redone anyways as the return is not the correct way. I really need to have the return go back to each tank vs back to the filter head.

That being said I’m slowly gathering parts. Going to need a block mounted fuel separator mount. I think I’ll just get the Teague one as I already have the head so I know it will mount properly. Already got a fuel pump mount from FB. Wish I had known Teague made that style mount and I would of rigged it with that mount from the get go. Scored it on FB. Also going to need the most important thing the imco 6 port fuel valve.
2B693839-1AF3-40E9-BB9A-FA2FFE68534B.jpeg


Still looking for the imco/merc its transom assembly. After than I will be satisfied. Maybe….

Had auggie tune up my prop as well. It was a 28p and I had him turn it to a 29p. Yet to try that out.

Next will be the gimbal bearing. Starting to make noise..
2B693839-1AF3-40E9-BB9A-FA2FFE68534B.jpeg
 

Dcb.blake

Well-Known Member
Joined
Jul 25, 2021
Messages
499
Reaction score
713
3CD60254-2446-46BD-B208-F9C43C844E43.png
7DC480B7-73D1-451D-8BC2-44522A6142DF.png
Couple small things. Found some battery boxs that I’ve been wanting laying around the DCB shop. The price was not as bad as I thought it was going to be at all lol! Been wanting the fancy lids for a while. Mine are the old style they had.

Also I’m doing away with the Bimini. When in the boat it functions well. It’s a lo pro hi speed Bimini which looks Bitchen. The only problem is you have to snake off the hatch in or out of the boat. It’s just not practical for me and a bigger pain than anything. It’s also not setup to be a hideaway so when not in use it sits in a bad spot for boarding and in boarding the boat. Went with this umbrella style instead. The mounts bolt into the floor and are pretty clean looking. I haven’t gotten anything yet but looking foreward to this as I never use the Bimini and it would be nice to have some shade. Went with a white base fabric with purple logos.

Plan to mount it in the center of the floor or possibly closer to the transom to give a little more shade to the back of the boat where everyone hangs out. I’ll have to see how big it is when I get it.

Hopfully the mount will be strong enough to double as a stripper pole 😂
 

papabear639

Well-Known Member
Joined
Oct 5, 2022
Messages
85
Reaction score
208
I'm interested in the umbrella deal, where did you get it? any pictures of the piece that mounts to the floor? I have a 21' Howard that I don't want to have a bimini on but want some shade when floating. iI'e seen some guys using the umbrella setup but haven't been able to get any more info.
 

Dcb.blake

Well-Known Member
Joined
Jul 25, 2021
Messages
499
Reaction score
713
I'm interested in the umbrella deal, where did you get it? any pictures of the piece that mounts to the floor? I have a 21' Howard that I don't want to have a bimini on but want some shade when floating. iI'e seen some guys using the umbrella setup but haven't been able to get any more info.
I haven’t gotten anything yet. It was described to me as it’s through bolted to the floor. Some sort of fancy system.

I’m not sure what the umbrella is. I thought a Taylor made but Online it didn’t look that big compared to what I’m getting. Dcb is doing all the embroidery. I haven’t seen anything yet I’ll keep posted.
 

papabear639

Well-Known Member
Joined
Oct 5, 2022
Messages
85
Reaction score
208
I haven’t gotten anything yet. It was described to me as it’s through bolted to the floor. Some sort of fancy system.

I’m not sure what the umbrella is. I thought a Taylor made but Online it didn’t look that big compared to what I’m getting. Dcb is doing all the embroidery. I haven’t seen anything yet I’ll keep posted.
cool thanks, looking forward to seeing it.
 

Dcb.blake

Well-Known Member
Joined
Jul 25, 2021
Messages
499
Reaction score
713
AF15CBBF-CBA9-4398-981B-E1B4E0353869.jpeg
Pulled the drive to inspect and fount a nice treat. I think it’s just oil from the drive. Seems like that’s the only thing it could be. I don’t think the bellow is leaking at all considering there’s no oil on the outside of it anywhere I’ll have to investigate more. Looks like it’s a pain to do. Good news is the u joints feel fine. No play at all. Going to grease them and call it a day. Otherhand the gimbal bearing is SHOT I think the only way it was staying alive was from the oil lubricating it. Can hear it metal on metal when spinning by hand along with wayy to much play. I think that might be where a good amount of the vibration is coming from. Glad I pulled the drive. Much longer this would of been a problem.

Looks like I’ll be doing a seal/o ring. Not sure which one the drive takes.
 

02HoWaRd26

DCBroke
Joined
Dec 19, 2007
Messages
12,219
Reaction score
29,085
View attachment 1234638 Pulled the drive to inspect and fount a nice treat. I think it’s just oil from the drive. Seems like that’s the only thing it could be. I don’t think the bellow is leaking at all considering there’s no oil on the outside of it anywhere I’ll have to investigate more. Looks like it’s a pain to do. Good news is the u joints feel fine. No play at all. Going to grease them and call it a day. Otherhand the gimbal bearing is SHOT I think the only way it was staying alive was from the oil lubricating it. Can hear it metal on metal when spinning by hand along with wayy to much play. I think that might be where a good amount of the vibration is coming from. Glad I pulled the drive. Much longer this would of been a problem.

Looks like I’ll be doing a seal/o ring. Not sure which one the drive takes.
That’s also where we talked about removing the cap and adding a zerk, that zerk greases the gimbal bearing.
 

mattyc

Well-Known Member
Joined
Sep 9, 2017
Messages
496
Reaction score
604
View attachment 1234638 Pulled the drive to inspect and fount a nice treat. I think it’s just oil from the drive. Seems like that’s the only thing it could be. I don’t think the bellow is leaking at all considering there’s no oil on the outside of it anywhere I’ll have to investigate more. Looks like it’s a pain to do. Good news is the u joints feel fine. No play at all. Going to grease them and call it a day. Otherhand the gimbal bearing is SHOT I think the only way it was staying alive was from the oil lubricating it. Can hear it metal on metal when spinning by hand along with wayy to much play. I think that might be where a good amount of the vibration is coming from. Glad I pulled the drive. Much longer this would of been a problem.

Looks like I’ll be doing a seal/o ring. Not sure which one the drive takes.
That oil sure looks brown, no water present?
 

Dcb.blake

Well-Known Member
Joined
Jul 25, 2021
Messages
499
Reaction score
713
That oil sure looks brown, no water present?
So before I pulled the drive I dropped the oil and it looked good. It was pretty fresh still and had the blue color still with no water.

Thinking the color came from when washing bilge which seems more unlikely than possible. I’m going to assume the bellow is shot and change them out.

Dosent look to be fun and words of wisdom😂 . Pull the gimbal ring? Do it with it on?
 

mattyc

Well-Known Member
Joined
Sep 9, 2017
Messages
496
Reaction score
604
So before I pulled the drive I dropped the oil and it looked good. It was pretty fresh still and had the blue color still with no water.

Thinking the color came from when washing bilge which seems more unlikely than possible. I’m going to assume the bellow is shot and change them out.

Dosent look to be fun and words of wisdom😂 . Pull the gimbal ring? Do it with it on?
I would assume the bellow is leaking. Only done it once so someone with more experience may comment, but pull the bell housing, leave the gimble ring.
 

Dcb.blake

Well-Known Member
Joined
Jul 25, 2021
Messages
499
Reaction score
713
Haven’t really had alot of time to do anything but pops wanted to go to the lake so I decided to get everything back together. Went ahead and did the gimbal bearing all bellows and hoses. Not the funnest job but it was my first time and next time will go smoothly. Everything looked good I didn’t see any rips or tears in the bellows but I did have some water intrusion. Decided f it might as well do it all. The gimbal bearing was the easiest part. It was for sure shot. One more trip out and big problema. I’m hoping that’s where some of the vibration was coming from. The u joints felt perfect. Added a good amount of grease. Pressure tested the drive as I thought it was leaking. Held 15psi all night after spinning both shafts. Didn’t take many pics. Got my prop back from auggie he turned it a little passed 28p so we will see what she does. I think I should have a lighter load people wise so hoping to get some good numbers.
36A42E9E-4E80-4916-9FD7-2C96A0FC5A93.jpeg

Also I’ve always wanted to have the canopy bottoms painted purple as they used to be. Prior owner wrapped them and I figured they sanded the paint to make the vinyl stick. Lucked out and it looked perfect! Pretty pumped about that. Looks a lot better.
EFAE638B-2917-4C11-8B12-5046770BC28D.jpeg
0036EB02-185F-47DE-9133-575C40499B63.jpeg
 

mattyc

Well-Known Member
Joined
Sep 9, 2017
Messages
496
Reaction score
604
Haven’t really had alot of time to do anything but pops wanted to go to the lake so I decided to get everything back together. Went ahead and did the gimbal bearing all bellows and hoses. Not the funnest job but it was my first time and next time will go smoothly. Everything looked good I didn’t see any rips or tears in the bellows but I did have some water intrusion. Decided f it might as well do it all. The gimbal bearing was the easiest part. It was for sure shot. One more trip out and big problema. I’m hoping that’s where some of the vibration was coming from. The u joints felt perfect. Added a good amount of grease. Pressure tested the drive as I thought it was leaking. Held 15psi all night after spinning both shafts. Didn’t take many pics. Got my prop back from auggie he turned it a little passed 28p so we will see what she does. I think I should have a lighter load people wise so hoping to get some good numbers. View attachment 1242950
Also I’ve always wanted to have the canopy bottoms painted purple as they used to be. Prior owner wrapped them and I figured they sanded the paint to make the vinyl stick. Lucked out and it looked perfect! Pretty pumped about that. Looks a lot better. View attachment 1242951 View attachment 1242952
So much better with the silver vinyl gone
 

02HoWaRd26

DCBroke
Joined
Dec 19, 2007
Messages
12,219
Reaction score
29,085
So stoked it was just hidden under that vinyl, think of that money you saved, now you can afford that new interior now….. 🤣
 
Top