WELCOME TO RIVER DAVES PLACE

DIY bathroom remodel - KERDI systems.

77charger

Well-Known Member
Joined
Dec 19, 2007
Messages
6,416
Reaction score
8,330
I’d cap off the unused valves. Skip the pex and rework the copper if you need to. Copper is easy to work with as far as sweating.
 

DarkHorseRacing

Well-Known Member
Joined
Jun 14, 2014
Messages
6,484
Reaction score
12,859
@Orange Juice

How did you get the tile floor out? Like a giant chisel?

How did you get the tub out without screwing up the plumbing? Are there rings or something that release the tub drain? how about the faucets?

I’m trying to remove a tub and I don’t know how to disconnect the plumbing. I can’t even figure out how to get the faucets off. It copper lines running to the faucets.

Do you turn the water off to the whole house to do this?
 

77charger

Well-Known Member
Joined
Dec 19, 2007
Messages
6,416
Reaction score
8,330
That drain hopefully the trap is low enough to allow for the new 2 piece shower pan drain. The ones today you will need the pipe about 2.5-3 inches below the concrete to glue on and have the flange flush with the floor.
 

Orange Juice

Well-Known Member
Joined
Oct 2, 2017
Messages
5,228
Reaction score
6,219
@Orange Juice

How did you get the tile floor out? Like a giant chisel?

How did you get the tub out without screwing up the plumbing? Are there rings or something that release the tub drain? how about the faucets?

I’m trying to remove a tub and I don’t know how to disconnect the plumbing. I can’t even figure out how to get the faucets off. It copper lines running to the faucets.

Do you turn the water off to the whole house to do this?
I turned the water off. Both my facet shut offs were seized. So I had to replace them to get water back on.

Shower valve is just a plate. Some caulking and a couple screws, and it’s off. I didn’t need to take it off. The the drain in the tub screws in. Special tool, or expect to replace it. My drain is missing the P trap. ???

For tile, I used a flat bar and hammer. Be prepared for all the trash. There’s a lot.

Watch lots of you tube videos. The pro videos are best, but some DIY’s will show you real life situations. I’m not in a hurry to get it done, if it means doing it right.
 

DarkHorseRacing

Well-Known Member
Joined
Jun 14, 2014
Messages
6,484
Reaction score
12,859
I turned the water off. Both my facet shut offs were seized. So I had to replace them to get water back on.

Shower valve is just a plate. Some caulking and a couple screws, and it’s off. I didn’t need to take it off. The the drain in the tub screws in. Special tool, or expect to replace it. My drain is missing the P trap. ???

For tile, I used a flat bar and hammer. Be prepared for all the trash. There’s a lot.

Watch lots of you tube videos. The pro videos are best, but some DIY’s will show you real life situations. I’m not in a hurry to get it done, if it means doing it right.
Thanks!
 

NicPaus

Well-Known Member
Joined
Sep 15, 2010
Messages
14,062
Reaction score
14,839
Where you located? Here in SoCal we have pin hole issues in Copper. I would replace it all and Reroute from overhead.

Bathroom I was at yesterday. It's all new adding Bathroom. But the plumbing in the wall that was opened between the existing bathroom. I changed it all while it was exposed. Around 30 years old and Type M. Put in all new type L copper. That way no old pipe between new shower wall and old bathroom with no easy access.

That block wall might have a lintel over top of window. No easy task to remove a course over the window.
 

NicPaus

Well-Known Member
Joined
Sep 15, 2010
Messages
14,062
Reaction score
14,839
Drain missing the P trap? It would stink like sewer in that bathroom. Issue going from tub to shower is it would require a 2" p trap for shower. Most tubs are 1 1/2" p trap. Got to have a p trap. Or sewer gas will come through. It might be buried in the dirt below slab. The lower the better as the drain will need to be flush with concrete for shower like mentioned. Or you will have to put a higher curb in for shower and float the pan higher.
 

77charger

Well-Known Member
Joined
Dec 19, 2007
Messages
6,416
Reaction score
8,330
Where you located? Here in SoCal we have pin hole issues in Copper. I would replace it all and Reroute from overhead.

Bathroom I was at yesterday. It's all new adding Bathroom. But the plumbing in the wall that was opened between the existing bathroom. I changed it all while it was exposed. Around 30 years old and Type M. Put in all new type L copper. That way no old pipe between new shower wall and old bathroom with no easy access.

That block wall might have a lintel over top of window. No easy task to remove a course over the window.
My moms house in laguna niguel she had it replumbed with pex house built in 85. But alot of homes in south oc had copper issues a lot on early 2000s used cheap copper but also water here was brutal on pipes too.

Current home in Phx my copper has had no issues. I had a cartridge in valve fail got stuck of course day before I had to leave capped off with shark bite til I got back then fixed the whole deal sweated new fittings etc but non of neighbors had any copper issues I talked too. That’s why I say just redo the copper.

My parents house in oc began having pinhole issues about 2000. But only a couple. Homes built in 2000 were having issues in a few years

I just helped a neighbor change his out this shower looks similar I changed his drain and hot mopped it for him. But trap wasn’t that deep barely had enough room to make drain flush I’m sure this one’s similar
 

Orange Juice

Well-Known Member
Joined
Oct 2, 2017
Messages
5,228
Reaction score
6,219
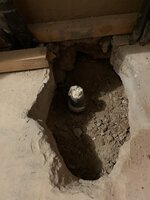
Ran into an issue. How do I vent the new shower drain? . 🫤.
4CBAAEEA-B19E-4066-9044-EA69F7E2E46E.jpeg
 

NicPaus

Well-Known Member
Joined
Sep 15, 2010
Messages
14,062
Reaction score
14,839
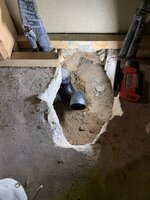
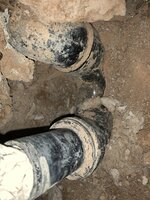
Dig up the pipe until you get the p trap exposed and post a pic.
 

Orange Juice

Well-Known Member
Joined
Oct 2, 2017
Messages
5,228
Reaction score
6,219
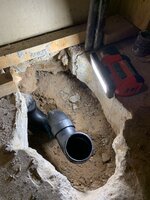
So I gave up on installing the KERDI system. My drain is not deep enough, and I’m not going to reinvent the wheel. I think the KERDI system is designed for second story homes, and not a home with a concrete slab.

I bought an slimline acrylic shower base pan. No tile. 60x32. It will be here February 20th.

I’m still using the KERDI board for the walls.
 

Orange Juice

Well-Known Member
Joined
Oct 2, 2017
Messages
5,228
Reaction score
6,219

DirtyWhiteDog

Well-Known Member
Joined
Feb 16, 2013
Messages
1,089
Reaction score
1,166
They depress the slab on new builds when using this type of system. Then build it up with it sloping to the drain. You would have had to make a water proofed dam at the open side.
 

77charger

Well-Known Member
Joined
Dec 19, 2007
Messages
6,416
Reaction score
8,330
You can get drain lower by replumbing the trap. Using an older style 3 bolt hot mop drain also helps. The newer qatey 4 bolt style you do need to cut pipe down atleast an inch lower

As for Kerdi it can be used both floors although I only know hot mops. But seen kerdi on both floors.
 

Ace in the Hole

Well-Known Member
Joined
Aug 15, 2020
Messages
6,342
Reaction score
15,016
So I gave up on installing the KERDI system. My drain is not deep enough, and I’m not going to reinvent the wheel. I think the KERDI system is designed for second story homes, and not a home with a concrete slab.

I bought an slimline acrylic shower base pan. No tile. 60x32. It will be here February 20th.

I’m still using the KERDI board for the walls.
The contractors cut the slab and moved the drain where I wanted it on mine.

The kerdi is a tall drain for sure
 

Orange Juice

Well-Known Member
Joined
Oct 2, 2017
Messages
5,228
Reaction score
6,219
Thought Id give an update since I found these pictures. I ordered a higher end shower pan. It took 5 months because the first one I waited 3 months to get, was damaged.

I ordered a new window that required an enlarged opening. I think it was September before I got the Plumbing straighten out, the pan installed. I used a bag of mud under the pan before setting it down for the last time. Ordered New 54” Vanity, in September, it took 8 weeks, and was broken beyond repair on a loading dock before I got to see it. I didn’t get it until February 2024 because of all the holidays. Along the way I got the walls shimmed straight, reenforced walls to handle the tile walls, and the KERDI board install in taped. I’m using spacers/levers for the tile, and set it up with s laser level. The spacers/levers are worth their weight in 50 inexperienced tilers.

So far so good still, a lot of work for a 63y/o one man job. Enjoy. 😁🍺
 

Attachments

  • 4BDA27E7-8BA0-4D55-8043-02ED89684797.jpeg
    4BDA27E7-8BA0-4D55-8043-02ED89684797.jpeg
    2 MB · Views: 93
  • 6E79E809-DAB0-4B39-9445-49549558A6EA.jpeg
    6E79E809-DAB0-4B39-9445-49549558A6EA.jpeg
    1,000.1 KB · Views: 94
  • 79112C12-0465-4272-8FED-A7D08E420200.jpeg
    79112C12-0465-4272-8FED-A7D08E420200.jpeg
    1.8 MB · Views: 93
  • EC3001DF-D8AF-40BE-B33F-25943D851DE1.jpeg
    EC3001DF-D8AF-40BE-B33F-25943D851DE1.jpeg
    2.1 MB · Views: 95
  • 5781DA9F-BC9D-45DE-BFF4-6AEADFCE4DBF.jpeg
    5781DA9F-BC9D-45DE-BFF4-6AEADFCE4DBF.jpeg
    2.4 MB · Views: 88
  • 0DD00C0D-95C8-433D-B71D-EC67273B3584.jpeg
    0DD00C0D-95C8-433D-B71D-EC67273B3584.jpeg
    1.6 MB · Views: 93
Last edited:

Orange Juice

Well-Known Member
Joined
Oct 2, 2017
Messages
5,228
Reaction score
6,219
Drain missing the P trap? It would stink like sewer in that bathroom. Issue going from tub to shower is it would require a 2" p trap for shower. Most tubs are 1 1/2" p trap. Got to have a p trap. Or sewer gas will come through. It might be buried in the dirt below slab. The lower the better as the drain will need to be flush with concrete for shower like mentioned. Or you will have to put a higher curb in for shower and float the pan higher.
9E0F06D8-A918-4612-AA19-8F29B4D41DCF.jpeg


Found the P-trap😁
 

lbhsbz

Putting on the brakes
Joined
Jan 11, 2010
Messages
12,998
Reaction score
33,438
you're on a slab?

Going back in with a tub?

I'd skip the kerdi stuff if doing a tub
 

Orange Juice

Well-Known Member
Joined
Oct 2, 2017
Messages
5,228
Reaction score
6,219
The bathroom walls are only 24” on center. KERDI board tile walls requires 16”. So, my 16” spacing is horizontal, and used the opportunity to straighten out the walls. I spent a lot of time straightening out these bathroom walls. I had time, so I took it. It’s also a very strong room.

The original bathroom window was a 12”x36” single pane aluminum slider. I ordered a replacement, and made it 4” taller (16”x36”). It’s w/ custom tempered glass. Also is a push out style, and dual pane.
 

Attachments

  • 4AA35CBD-DFA6-4483-8384-6DA460A4FF36.jpeg
    4AA35CBD-DFA6-4483-8384-6DA460A4FF36.jpeg
    1 MB · Views: 55
  • 52D94E8B-1DA4-435B-B99F-ACE1DA25BD1E.jpeg
    52D94E8B-1DA4-435B-B99F-ACE1DA25BD1E.jpeg
    1.9 MB · Views: 55
  • 9C03DC01-6D5C-44D5-BF10-B03FFD3A1ED4.jpeg
    9C03DC01-6D5C-44D5-BF10-B03FFD3A1ED4.jpeg
    3.8 MB · Views: 55
Last edited:

Orange Juice

Well-Known Member
Joined
Oct 2, 2017
Messages
5,228
Reaction score
6,219
Sweet, another 36 months and you'll have this puppy wrapped up!

I got two other bathrooms that work, and a tree in the backyard when I’m covered in Thinset. The kids have all moved out, and this was their bathroom. Also got a cabin in Flagstaff less than two hours away, with 2 nice bathrooms and a jacuzzi.

So far so good. Another month or two and I should be done this fall. I work 60 hours a week, so I don’t have all week when I get home at night. my main days are Saturday and Sunday. Every trip to Home Depot burns up an hour, and Lowe’s is 1 1/2 hours. It all adds up.

I re-did the ceilings and added crown molding. The texture coating was bad, and the window light showed everything. Looks great now. The white bathroom fan vent cover turned yellow white over the years, so I’m on a hunt for one in Rubbed oil bronze.

Vanity is new, with all the upgrades, including soft closing drawers and doors.

Looking for a sink, and custom stone countertop
 

Attachments

  • A6F97C12-3E98-4A3C-BF0F-6CEEC65B4683.jpeg
    A6F97C12-3E98-4A3C-BF0F-6CEEC65B4683.jpeg
    1.9 MB · Views: 44
  • B09EB4AA-FDB9-4CFE-9ED0-E58DD87BB682.jpeg
    B09EB4AA-FDB9-4CFE-9ED0-E58DD87BB682.jpeg
    1.6 MB · Views: 46
  • F86BDBD7-4A89-465D-8A4C-19ECA5DD8836.jpeg
    F86BDBD7-4A89-465D-8A4C-19ECA5DD8836.jpeg
    1.6 MB · Views: 45
  • C5A8FC2C-FC1E-4A4A-8750-3C5894A3B4EC.jpeg
    C5A8FC2C-FC1E-4A4A-8750-3C5894A3B4EC.jpeg
    1.5 MB · Views: 44
Last edited:

Orange Juice

Well-Known Member
Joined
Oct 2, 2017
Messages
5,228
Reaction score
6,219
With as many bathrooms that I have (5 including the cabin), and all the kids houses…..someone in the family needed to attempt a full remodel and figure it out.

I think I could cut it down to 1-2 months, now that I’m experienced.

Nobody wants to touch a bathroom remodel this in depth, with a shower conversions/Slab demo, window enlargement, small tiles, additional electrical, replace ceiling, etc, for under $30-40k. And the ones that you want to do the work, don’t want to touch it for less. It’s sticker shock, and confusing.

This bathroom will get little use….Thanksgiving/Christmas and maybe 4-6 weeks of winter guests. Should last 20 years, with mild up keep, and hopefully not too trendy, as to survive the ages. 🤞
 

Orange Juice

Well-Known Member
Joined
Oct 2, 2017
Messages
5,228
Reaction score
6,219
you're on a slab?

Going back in with a tub?

I'd skip the kerdi stuff if doing a tub

I wanted to tryout the KERDI board product. It was really easy to use, but was expensive. There fasteners and tape bring the cost up.

We bought a high end shower pan, because we don’t like dirty grout, and you can’t keep a shower floor clean, with grout over time. 😉
 

traquer

Well-Known Member
Joined
Nov 7, 2013
Messages
3,894
Reaction score
5,267
Wow lookin good! Yes slow, but you saved money and learned a lot and are doing it right!

Lots of people that know tile here apparently. I will post one of these threads up in the future when I do some work.
 

traquer

Well-Known Member
Joined
Nov 7, 2013
Messages
3,894
Reaction score
5,267
Before its all said and done, I'd skim coat the ceiling and remaining walls and paint it flat. Getting rid of the texture and glossy paint is a small step but really adds a premium look after all this work is done. Many don't do it and I shake my head
 

Backlash

Well-Known Member
Joined
Jan 14, 2011
Messages
14,480
Reaction score
28,123
Nice job! I'm in the same boat, but probably one that is moving more slowly than yours! 2 of our 3 bathrooms are in a state of change, so I definitely feel your pain. Like you, I refuse to pay the current going rate to have someone else do this stuff. We have a raised foundation home, and one of our bathrooms had so much water damage, it rotted out floor joists. Talk about opening up a can of worms! 😲
 

Orange Juice

Well-Known Member
Joined
Oct 2, 2017
Messages
5,228
Reaction score
6,219
Nice job! I'm in the same boat, but probably one that is moving more slowly than yours! 2 of our 3 bathrooms are in a state of change, so I definitely feel your pain. Like you, I refuse to pay the current going rate to have someone else do this stuff. We have a raised foundation home, and one of our bathrooms had so much water damage, it rotted out floor joists. Talk about opening up a can of worms! 😲

I’ve watched 100’s of hours of YouTube, to get me ready for each step.

You can’t go back an easily add something, so the plan has to come together. Can’t be rushed.

I take my work seriously 😁
“It took Michelangelo a little over four years, from July of 1508 to October of 1512, to finish the paintings. Michelangelo had never painted frescoes before and was learning the craft as he worked.”
 

Orange Juice

Well-Known Member
Joined
Oct 2, 2017
Messages
5,228
Reaction score
6,219
Too much regular work, (10-12 hour days), and I have a cabin in Flagstaff to get away from the heat, but I did manage to get a few more tiles layed in. All going to plan at this point, but the tiles are small, and I’m not the fastest tool in my toolbox. 😁🫵
 

Attachments

  • IMG_8893.jpeg
    IMG_8893.jpeg
    1.5 MB · Views: 42

Backlash

Well-Known Member
Joined
Jan 14, 2011
Messages
14,480
Reaction score
28,123
Too much regular work, (10-12 hour days), and I have a cabin in Flagstaff to get away from the heat, but I did manage to get a few more tiles layed in. All going to plan at this point, but the tiles are small, and I’m not the fastest tool in my toolbox. 😁🫵
Looking good! Man you're making me feel like a slacker with our neverending remodel! 🤣👍
 

Orange Juice

Well-Known Member
Joined
Oct 2, 2017
Messages
5,228
Reaction score
6,219
Looking good! Man you're making me feel like a slacker with our neverending remodel! 🤣👍
One of the reason I went with smaller tile was because the larger stuff is much tougher to make straight. Even my 4.25”x 13” tile has about 5% with a defect of about an 1/8” curve. I sit those aside, and am using them around the throne area.

The similar 6x18”, when I opened a box, the curve was all over the place from piece to piece, and 3 pieces were broken. (more than likely because of too much bow in the tile, and crushed during the stacking and boxing at mfg.)

The absolute key to a successful tiling, is making sure the walls are absolutely straight (laser level), everything you do from that point on relies on how straight you got it.
 
Last edited:

Backlash

Well-Known Member
Joined
Jan 14, 2011
Messages
14,480
Reaction score
28,123
One of the reason I went with smaller tile was because the larger stuff is much tougher to make straight. Even my 4.25”x 13” tile has about 5% with a defect of about an 1/8” curve. I sit those aside, and am using them around the throne area.

The similar 6x18”, when I opened a box, the curve was all over the place, from piece to piece, and 3 pieces were broken. (more than likely because of too much bow in the tile, and crushed during the stacking and boxing at mfg.)

The absolute key to a successful tiling, is making sure the walls are absolutely straight (laser level), everything you do from that point on relies on how straight you got it.
My wife and I picked out a light colored tile for our bathroom floor that has a very subtle swirl in the coloring. Imagine a very subtle marble-esque pattern. I swear, I spent two solid days laying all the tiles out in our living room, sorting them, rearranging them and looking to find the best pattern flow possible. I was mentally exhausted after doing that! I ended up finding the best possible option, labelled each and every tile, then proceeded to move them into the bathroom where I laid them out again. Just to make sure. LMAO! Looking back, plain bleach white would have saved me a ton of time! 🤣
 

Orange Juice

Well-Known Member
Joined
Oct 2, 2017
Messages
5,228
Reaction score
6,219
My wife and I picked out a light colored tile for our bathroom floor that has a very subtle swirl in the coloring. Imagine a very subtle marble-esque pattern. I swear, I spent two solid days laying all the tiles out in our living room, sorting them, rearranging them and looking to find the best pattern flow possible. I was mentally exhausted after doing that! I ended up finding the best possible option, labelled each and every tile, then proceeded to move them into the bathroom where I laid them out again. Just to make sure. LMAO! Looking back, plain bleach white would have saved me a ton of time! 🤣
Someone once told me there is an arrow on the back of the tile that tells you which way is up. I tried that and got the same results 😁 Although mine didn't have an arrow, only stamped “Mexico”. 😁🫵

I got a 4’ rub bronze grab rail that runs along the back wall, and a bronze framed Shower door, that breaks up any pattern when it's all installed anyway. The windows and niche casings are bullnose stone, to cover up the tile edges. They will match The vanity counter top. I'm amazed at all the industry knowledge I've picked up along the way.

There is something about plain No.01 white 4x4 tile that makes any job that much easier. For one thing, its always in stock. Most product I like, is out of stock, or not enough for the job. Only recently have I seen much, other than companies trying to sell their pre-COVID reject inventories. Slowly the shelves are filling back up. Prices are not dropping.😒

If you want to understand quality, go look at Home Depot, Lowes, Floor &Decor, and others showroom displays. Pay attention to quality of the product. They all look like crap. (Caulking, spacing, tiles falling off). The sales guy will tell you its a display model, don't put much into it. The installer, when you call them on it, say look at the display model, our quality is of that standards, and you end up with crap. Some installers got it together, while others will do anything to get your money, and move on. 😁
 
Last edited:

Backlash

Well-Known Member
Joined
Jan 14, 2011
Messages
14,480
Reaction score
28,123
You aren't kidding! I've been happy with DalTile as our family has somewhat of a connection with them. So, I always feel the desire to support them when I have the chance. Imagine my surprise when I flipped the tiles over over and saw an American flag with the slogan "Made in USA!" ❤️🇺🇸

I'm sure everyone has their own opinion about design, quality, colors, etc. But I am happy with their product and it suits us and our budget quite well.

Now, if that big box store with the orange letters could hire people who weren't careless, and they actually gave two shits about the merchandise they were packaging, life would be a little bit easier. None of the cashiers like it when you unpack cases of tile on their checkout counter and refuse to pay for broken tiles. Yes, I'm "That guy." 🤣
 

Orange Juice

Well-Known Member
Joined
Oct 2, 2017
Messages
5,228
Reaction score
6,219
You aren't kidding! I've been happy with DalTile as our family has somewhat of a connection with them. So, I always feel the desire to support them when I have the chance. Imagine my surprise when I flipped the tiles over over and saw an American flag with the slogan "Made in USA!" ❤️🇺🇸

I'm sure everyone has their own opinion about design, quality, colors, etc. But I am happy with their product and it suits us and our budget quite well.

Now, if that big box store with the orange letters could hire people who weren't careless, and they actually gave two shits about the merchandise they were packaging, life would be a little bit easier. None of the cashiers like it when you unpack cases of tile on their checkout counter and refuse to pay for broken tiles. Yes, I'm "That guy." 🤣

I ended up at Lowe's for tile. They have an easy return policy for tiles. “Bring back what you didn’t use, including the broken ones.”

The small tile stores didn’t carry inventory, always “checking the warehouse” I want to see what Im buying. Floor & Deco was impressive, but when you dig in, they don’t have a big selection, just warehouse inventory.

The Tile Shop didn’t have inventory, but had some great displays.
 
Last edited:

Desert Whaler

Well-Known Member
Joined
Oct 28, 2020
Messages
4,864
Reaction score
17,911
Here's a 'Tile Horror Story From Hell , that Ended Well'.

I had 'One of Those' homewners watching over me the ENTIRE time on a tub surround.
Retired folks and she was as crazy as they come.
After I floated the walls, I drew out with a pencil / level EXACTLY where every tile was going to go on the walls so there wouldn't be any questions.
I balanced everything top to bottom and left ot right.

This lady would pop her head in no exaggeration every 10 minutes & it would drive me crazy.
So somewhere along the line during the layout of the 1st course, (the most important one) . . . I missed something.

I was installing 12" x 24" tiles and I had it layed out where all I was taking off the cuts at the lid was enough to compensate for the drywall being out of level.
So it was to look like it was full tiles at the top.

But when I got to the last course, I was 3/8" SHORT !!!!!
That damn lady hovering over me the entire time must've junked my head into a brain fade !!! :mad:
I was using some nuclear adhesive thinset, and with all the cuts going around the 2 recessed soap dishes etc. , the only way to correctly handle the problem was to rip down all the tile, scrape the thinset, and start over. F-Me.

I instantly got that 'sick to my stomach' feeling.
Then I had an idea . . . . I called the store where I bought the tile and asked the guy, "Hey, . . . by chance do they make this exact tile in 24" x24" ???
He replies, "They sure do" . . . . . . there was hope.

I had him do an inventory check, and to triple check that the dye-lie was the exact same . . . . and it was.
I asked if i could will-call it directly from the warehouse, then I immediately BOLTED directly from Newport to Ontario to pick it up ! 😆 🤣

The sketchiest part of the whole thing was that the lady homeowner was such a busy-body that I had to 'sneak' the 24" tiles into the house when she wasn't looking because she would've immediately said, "What are those for"?!?!?!?!?

Cutting them was a whole other fiasco . . . because again I had to do it when she wasn't around and watching.
--- I ended up cutting the 24" sqaure tiles down to 12 3/8" x 24" . . .instead of 12" x 24" to compensate for my F-Up----

So I got everything cut in, and you couldn't even tell. Gawd I was relieved !!!
My GC buddy who got me the job was there, I told him , "I made a MAJOR mistake on this job, if you can find the mistake before I grout it, I'll give you $500". He never found it, but when I told him he laughed his ass off !!!!

Got LUCKYYYYYY on that one . . . .

Here's where it all went wrong . . . 😆

IMG_2487.jpeg


Worked my way upo to the window . . . no problem right???
IMG_2527.jpeg


. . . and here is where I shit my pants ! 🤣 . . . I was 3/8" too short and there was NO WAY the lady would let a 1/2"grout joint fly at the lid.
IMG_2534.jpeg


(My buddy said that he could've easily sheeted the lid with 1/4" drywall . . . but I'm glad we didn't)

Here it is all buttoned up . . . you really couldn't tell . . . . that one prob. took a few days off my life in the stress.


IMG_2565.jpeg
 
Last edited:

Desert Whaler

Well-Known Member
Joined
Oct 28, 2020
Messages
4,864
Reaction score
17,911
That lady was so neurotic it was insane.
In her early 70's . . . at one point, I kid you not . . . she got a ladder and pushed a regualtion shop-vac up into the ceiling / attic crawl space.
Then she climbed up there in a full respirator mask and vacuumed the entire attic for like 3 days !!! . . . I kid you not. 😳

She had me tile a few of these little recessed alcoves with some fancy hand painted tiles.
When we got the tiles, she wasn't happy with how much 'variation' there was from one to the next.
I tried to tell her that was the whole idea and maybe she should look at something more 'mediteranean' style .
Nope . . . she wasn't having it.
She side, "Oh I'll just buy more boxes to get the ones I want" . . . 'But Nancy, you can't return them, and they are $300 / box' . . . "That's ok". 🤯

(Later when her husband asked why there were so many boxes of tile left over & found out the price, he completely blew a head gasket) !!! 😄😆😅😂🤣

IMG_2724.jpeg


IMG_2726.jpeg


IMG_3043.jpeg
 

Orange Juice

Well-Known Member
Joined
Oct 2, 2017
Messages
5,228
Reaction score
6,219
Here's a 'Tile Horror Story From Hell , that Ended Well'.

I had 'One of Those' homewners watching over me the ENTIRE time on a tub surround.
Retired folks and she was as crazy as they come.
After I floated the walls, I drew out with a pencil / level EXACTLY where every tile was going to go on the walls so there wouldn't be any questions.
I balanced everything top to bottom and left ot right.

This lady would pop her head in no exaggeration every 10 minutes & it would drive me crazy.
So somewhere along the line during the layout of the 1st course, (the most important one) . . . I missed something.

I was installing 12" x 24" tiles and I had it layed out where all I was taking off the cuts at the lid was enough to compensate for the drywall being out of level.
So it was to look like it was full tiles at the top.

But when I got to the last course, I was 3/8" SHORT !!!!!
That damn lady hovering over me the entire time must've junked my head into a brain fade !!! :mad:
I was using some nuclear adhesive thinset, and with all the cuts going around the 2 recessed soap dishes etc. , the only way to correctly handle the problem was to rip down all the tile, scrape the thinset, and start over. F-Me.

I instantly got that 'sick to my stomach' feeling.
Then I had an idea . . . . I called the store where I bought the tile and asked the guy, "Hey, . . . by chance do they make this exact tile in 24" x24" ???
He replies, "They sure do" . . . . . . there was hope.

I had him do an inventory check, and to triple check that the dye-lie was the exact same . . . . and it was.
I asked if i could will-call it directly from the warehouse, then I immediately BOLTED directly from Newport to Ontario to pick it up ! 😆 🤣

The sketchiest part of the whole thing was that the lady homeowner was such a busy-body that I had to 'sneak' the 24" tiles into the house when she wasn't looking because she would've immediately said, "What are those for"?!?!?!?!?

Cutting them was a whole other fiasco . . . because again I had to do it when she wasn't around and watching.
--- I ended up cutting the 24" sqaure tiles down to 12 3/8" x 24" . . .instead of 12" x 24" to compensate for my F-Up----

So I got everything cut in, and you couldn't even tell. Gawd I was relieved !!!
My GC buddy who got me the job was there, I told him , "I made a MAJOR mistake on this job, if you can find the mistake before I grout it, I'll give you $500". He never found it, but when I told him he laughed his ass off !!!!

Got LUCKYYYYYY on that one . . . .

Here's where it all went wrong . . . 😆

View attachment 1389187

Worked my way upo to the window . . . no problem right???
View attachment 1389188

. . . and here is where I shit my pants ! 🤣 . . . I was 3/8" too short and there was NO WAY the lady would let a 1/2"grout joint fly at the lid.
View attachment 1389189

(My buddy said that he could've easily sheeted the lid with 1/4" drywall . . . but I'm glad we didn't)

Here it is all buttoned up . . . you really couldn't tell . . . . that one prob. took a few days off my life in the stress.


View attachment 1389190

the hardest part for some is understanding how to get the tile to fit right.

I laid my tile on a shop table, including the spacers between tile, to get actual measurements, so I could plan out enough to prevent slivers (mission accomplished).

They make a 6x18 tile in the same finish and dye lot, that I’m using for the pan to floor transition on the walls, and will cut to match the floor line.
 
Last edited:

Orange Juice

Well-Known Member
Joined
Oct 2, 2017
Messages
5,228
Reaction score
6,219
Update:

Three walls have been tiled, ready for a little clean up and grouting.

I’m starting today replacing the 28” bathroom door with a 30” door. Since I replaced my bathroom Vanity, it is 2” shallower, so I could widen the bathroom door to 30”, making it more or less handicapped accessible to some degree. The home was built in 1980, and back then, your typical 5x10 bathroom layout was not designed with ADA in mine.

All the other interior doors are 32”, but the bathrooms are 28”. I’d like to do a 32” inch door, but it’s just not enough room to do it. I asked my niece (who’s in a chair) about going 30”, and her answer was it’s much better than 28”. 🥹

Only other way was to remove the vanity all together😦
7DA16DAA-E9D6-4D46-BFF5-62F0BA3FAE33.jpeg

Hoping 8 weeks I’ll have it done for Thanksgiving crowds😂
 
Last edited:
Top