X Hoser
Well-Known Member
- Joined
- Nov 2, 2011
- Messages
- 1,818
- Reaction score
- 2,061
I know nothing about the angle and function but I have always been warned about reversion. Maybe the angled helps drain whatever water gets into the tails?


Yeah, you're right. I am making my own rings and seals so getting the silicone lasered to an elliptical shape isn't a problem. I drew the whole deal on the hull CAD model today and the inside ring gets pretty funky looking. The ellipse ends up off center to the OD because the holes through the transom are normal. Its on the inside so not all that visible.Option 2 although the seal that’s in there that keeps the water out of the boat will now be gripping around an ellipse instead of a circle. It probably doesn’t matter but that’s the only thought I had.
Thanks man, this is at least the second or third time you have stopped me from making a mistake, thank you. I had planned on fully welding up the inner tubes, I will just tack them.I like option 1. It's probably personal preference, but it looks right to me.
I was taught that part of the reason to angle them like option 1 was to help the water run out as well as keep the surge from rushing up the pipe when you come off plane. Racey and his pops have been installing tips like option 2 for many years and don't seem to have any issues with that set up so go with whichever one you like best. You're the one who has to look at it.
As you fabricate the inner tubes make sure that Imco will be able to slide the outer tube over everything you create. These are typically laid out and welded in sections with outer over inner in steps to ensure bends fit over bends as you go.
Only cause I've made plenty of mistakes myself.Thanks man, this is at least the second or third time you have stopped me from making a mistake, thank you. I had planned on fully welding up the inner tubes, I will just tack them.
Beautiful work.Classic it is! I appreciate everyones input, it helps a lot when I find myself on the fence with aesthetic stuff like this.
The decider was of course the wifey. She liked Option #1 best and reminded me that the theme of a the boat was traditional aesthetics with modern running gear.
I fabbed up some turbo flanges from laser cut rings and some tubing to provide a clean landing spot for the inner and outer tubes on the exhaust tails. Once again the pulse feature on the Miller Dynasty offset my marginal torch control abilities, technology to the rescue.
View attachment 1126215
View attachment 1126214
View attachment 1126213
One benefit of the traditional angled down tubes is there are half as many bends, pie cuts and welds.
View attachment 1126216
Tubes not cut to length yet.
View attachment 1126217
Hillbilly tube clamp provides access to the joint for tacking while holding both pieces firmly in place. If I did a lot of this stuff I would be tempted to buy the high zoot professional units. This worked well, I only tacked the clamp to the tube once.
View attachment 1126218
View attachment 1126219
Headed to Fred at Imco for finish fab and polish.
View attachment 1126220
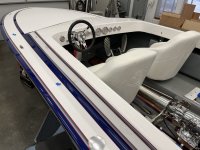
Control cables and power steering hoses are in so time to dive into the plumbing, cables and wiring.
Great idea, I will have them incorporated into the build.Beautiful work.
One more suggestion is to add (or have IMCO add) O2 bungs in both. It’s nearly impossible to add them in the future on the jacketed pipes. O2 sensors are a fantastic tuning tool for carbs as well as EFI. If you move to EFI you will definitely need them.

Next up: Driveline guard.
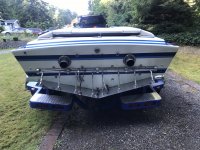
My boat came with this driveline guard, basically two pieces of steel tubing that were chrome plated, one sliding into the other. It was hacked up a bit on the trans end with a cutting torch to clear the tail shaft bushing lube line and the chrome was peeling pretty bad from rust. Regardless, because of the new strut angle the v-drive was much further forward now making the original guard too short, so off to the scrap yard.
View attachment 1144621
I picked up a more contemporary stainless steel guard from @025 a couple of years back but it turned out to be too short as well. I was going to simply buy a longer inner tube but I got to looking at some of the Brummett and @Racey setups that used machined collars on both ends of the tube eliminating the pinch clamp piece shown in the pictures and decided to go that way.
View attachment 1144693
View attachment 1144707
@Toolman machined up these really nice end collars that capture the stainless tube and secure it to the trans and v-drive. The longer collar slides back on the tube when un-bolted from the v-drive to access the flange bolts on the driveline making both the guard and driveline removable. I sanded the tube with 320 grit as prep for polishing but will leave it as is for now because I need to get this damn boat done before the rapidly approaching end of summer. Over the winter I can pull it back out and send it out for polish and get the collars anodized.
View attachment 1144696 View attachment 1144698
View attachment 1144695
View attachment 1144694 View attachment 1144697 View attachment 1144699
Happy with the way it turned out. Ultimately the boat with have full interior so this will be hidden from view with a removable center floor cover, so maybe not the most efficient use of capital but it looks cool and works good. With any luck I will never have to test its primary function.

Great idea! I'm on it boss.Turn some o-ring grooves into the mating parts to dampen vibration.
Exactly!Turn some o-ring grooves into the mating parts to dampen vibration.