WELCOME TO RIVER DAVES PLACE

Toy hauler Reno! Again. Input welcomed/needed

DoughBallin14

Well-Known Member
Joined
Apr 22, 2014
Messages
1,080
Reaction score
1,380
On a rainy day we are now inside working on what i can.
Next issue i came across that i saw when the main slide was in all the way. As you can see the front half on both sides are basically not attached anymore.
Lucky when i barely start to send the slide back out it closes that gap tight.
So best solution i could think of at the moment was put some construction adhesive in the gap, open the slide some so it squeezes it back together, add this 2x2 angle iron i had which should help brace it all together.
Not worried about it being exposed as i am going to be framing in some u - shape dinette’s that will hide all that.
Of course little man is inspecting my idea.
EC22C104-FE8E-4B7B-8FAD-53C2B7374D9B.jpeg
1C7FD9F5-040A-401B-8BF7-0482D3B9E355.jpeg
5F032103-FB49-4B46-8C95-FD6C20221AF3.jpeg
89B4ABA7-6805-4BB9-AC76-D45024DB1169.jpeg
123CCE66-8E8B-4713-B061-344398210856.jpeg
D1422895-9E79-4A55-AAF4-20D4E9CA554E.jpeg
 
Last edited:

King295

Well-Known Inmate #20225
Joined
Aug 8, 2017
Messages
1,915
Reaction score
2,950
Ratchet straps for the win. Coming along great. I forget my 5th wheel slide where my dining table is has some bow in it (flexes when you step on it). Based on this thread I'm gonna pretend I don't remember that.
 

DoughBallin14

Well-Known Member
Joined
Apr 22, 2014
Messages
1,080
Reaction score
1,380
Ratchet straps for the win. Coming along great. I forget my 5th wheel slide where my dining table is has some bow in it (flexes when you step on it). Based on this thread I'm gonna pretend I don't remember that.
Haha dont think about it and you never saw it!!

Ratchet strap’s definitely for peace of mind when i went to take the slide out of the rig earlier in this party.
Also by accident it seemed to help bring the sides of the slide back inwards so i could do this.

Ill see if i can get to it tomorrow but this floor flexes a lot in the middle now that its empty. My slide floor is only 5/8(19/32) plywood.
Basically it involves penetrating epoxy, 1/2 inch plywood and lots of screws. Goal is to stiffen, waterproof, and preserve / increase the structural integrity of the original plywood, along with fusing the 1/2 inch to the original 5/8.
Also giving me more thickness to attach my booth dinettes ill be building.
 

King295

Well-Known Inmate #20225
Joined
Aug 8, 2017
Messages
1,915
Reaction score
2,950
Haha dont think about it and you never saw it!!

Ratchet strap’s definitely for peace of mind when i went to take the slide out of the rig earlier in this party.
Also by accident it seemed to help bring the sides of the slide back inwards so i could do this.

Ill see if i can get to it tomorrow but this floor flexes a lot in the middle now that its empty. My slide floor is only 5/8(19/32) plywood.
Basically it involves penetrating epoxy, 1/2 inch plywood and lots of screws. Goal is to stiffen, waterproof, and preserve / increase the structural integrity of the original plywood, along with fusing the 1/2 inch to the original 5/8.
Also giving me more thickness to attach my booth dinettes ill be building.
My dining table that is mounted to the floor rocks a bit which drives me nuts. I've yet to tear into it to see if I can tighten things up. Based on that and going out on a limb I'd assume having a thicker floor to tie in the dinettes will be helpful. Looking forward to more progress, good luck.
 

LakeMead Boater

Well-Known Member
Joined
Mar 1, 2014
Messages
983
Reaction score
1,687
My dining table that is mounted to the floor rocks a bit which drives me nuts. I've yet to tear into it to see if I can tighten things up. Based on that and going out on a limb I'd assume having a thicker floor to tie in the dinettes will be helpful. Looking forward to more progress, good luck.
Can you please fix everything in your trailer before selling it to me, I’d appreciate it.
 

DoughBallin14

Well-Known Member
Joined
Apr 22, 2014
Messages
1,080
Reaction score
1,380
Haha appreciate it guys! Cant say i do it the best way or the right way in the rv service shop eyes but i can usually dive in and figure it out or call someone who can give some ideas.

Anyone wanna buy this one when i am done 😂 i might actually hold on to this one finally. I think i did a mild refresh on my old mini toyhauler and had it for maybe 8-9 months then sold it 🤷🏽‍♂️
 

DoughBallin14

Well-Known Member
Joined
Apr 22, 2014
Messages
1,080
Reaction score
1,380
Here we are main slide is officially done and locked in. Its firm and solid feeling now.
Last thing it needs new wiper seals and closed edge seal. Thats another story but i found them finally from AP products.

So i was talking to a buddy who does some wood work and ocean boat repair stuff and he mentioned i pilot drill holes in the existing plywood using a fat step drill bit to create a cone ish shape and use penetrating epoxy so it seeps into the layers of wood. Then puddle it and spread it out then lay the new sheet on top, screw it off so it sandwiches the two pieces together. Now that is done and this has zero bounce to it. Final thickness is about an inch. Here is a link to the epoxy i used from polymer composites in Ontario CA. I have used it in the past for wood rot control and delaminating siding.

https://theepoxyexperts.com/max-gpe-clear/

I was on a time crunch so didnt get a pic of the epoxy spread out completely but it’s all attached and here it is all opened up so i can get the rest of the old linoleum up. Maybe there will be more surprises!!
FEAD2640-FBE7-43DA-A989-85892417B67F.jpeg
AAA431B3-DA52-403D-AAC0-4460AE464720.jpeg
91D50C14-1F60-4E41-89D2-7F8CFB7E4860.jpeg
1ABB1828-12A7-4D67-B5DE-121ABE5859F6.jpeg
AEBD2D53-CD67-4943-957F-B176B96F8278.jpeg
14F1E86E-6C0B-4B2A-92C3-2AB30132D61E.jpeg
5B018DAC-1DE0-4CF6-9C8A-54898DB2C38F.jpeg
 

DoughBallin14

Well-Known Member
Joined
Apr 22, 2014
Messages
1,080
Reaction score
1,380
Not much going on this weekend! Pretty much the same as you all have seen but this was the final bit of the garage structure sill support stud and will finish fully attaching the new garage plywood floor.
Kind of nice having so much exposed with all this rain! I was able to find another spot of water intrusion in the garage and narrowed it down to the garage windows needing to be re-sealed. I found some fresh minor water spots even on my new wood framing along the walls.

This piece was definitely soaked and flaking apart in pieces.
61A6D6EA-6C31-4756-94D7-81B255171109.jpeg
74AFB1EC-5F61-4494-BD6D-EE0310D234DB.jpeg
CB94FADA-6AE5-4751-A018-139D859DDD18.jpeg
8F85B47F-A6B5-41C0-80C5-58368E4AE708.jpeg
4DE3F3C9-A9BB-4F34-AC3F-1DDF14E56ABC.jpeg
7EF9B4AE-90F1-4F13-86F4-821B61A34298.jpeg
 

DoughBallin14

Well-Known Member
Joined
Apr 22, 2014
Messages
1,080
Reaction score
1,380
Continued on from yesterday and ended up taking up the new half of the garage subfloor and took out all that old yellow fiber insulation. That crap just soaked in water and probably never let go of it. Probably contributed to some of the black wood and rotted sections. I replaced it all with r13 ish 2 inch thick eps board insulation which should help insulate better and also not soak up water if any were to get in again.
Also painted on some more of the penetrating epoxy from theepeoxyexperts, coated all studs and outside edges of the garage area. Not really any pictures but we are getting close to it being sound and solid then on to the shimmer and lipstick stuff!
 

DoughBallin14

Well-Known Member
Joined
Apr 22, 2014
Messages
1,080
Reaction score
1,380
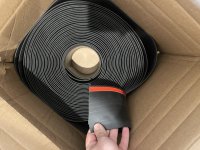
Well got some goodies show up today. Finally got my new slide wiper seal. Definitely out of the ordinary how its used and the size of it according to a couple rv seal manufacturers i talked to.
This is the closest to the original i could get.
This should be the next project along with replacing the actual single side bulb seal that goes against this one when closed. Also replacing the broken/missing slide corner caps.
You guys will notice i am replacing most white plastic items with black and will be going with a black white contrast updated look and most likely no new graphics once I get these old ones off and polish it up.
 

Attachments

  • B4C50AC0-DF4B-42D2-B950-0C0B01179C6C.jpeg
    B4C50AC0-DF4B-42D2-B950-0C0B01179C6C.jpeg
    943.7 KB · Views: 35

DoughBallin14

Well-Known Member
Joined
Apr 22, 2014
Messages
1,080
Reaction score
1,380
Another addition made its way into the bed of the truck. Took the wife and kids to floor and decor to look at colors and styles of lvp flooring. Took our paint samples for the upper and lower cabs, cushion vinyl color, and a black stained wiod piece sample for trim to help match flooring to.

Definitely didnt plan on buying any flooring for the trailer yet but hard to pass on a clearance item we liked.

Had to take a quick educated guess on how much i needed so hopefully i have enough. It is returnable at least.
Plus I had some credit left over to make it even more of a good deal. I got 220sqft of it, they mentioned they have a ton of it still in the warehouses.
Another item checked off the list for the remodel.

I have this same brand and product line as my garage floor and so far its been holding up great with her parking on it even on rainy days. Its slate core and foam backed with a 22mil wear layer.

What do you guys think? Trailer will be white upper cabinets black hardware, lower cabs same hardware but a shade of light grey/beige, cushion vinyl matches almost identical as a toffee ish color.

8DACBC50-8BF6-4523-96AC-0EF77498205E.jpeg
C0996C4A-C6B3-4ADE-B84B-5C1FA0350678.jpeg
9FD5EE5D-7758-4E89-AB34-21CA3A3D1B20.jpeg
 

DoughBallin14

Well-Known Member
Joined
Apr 22, 2014
Messages
1,080
Reaction score
1,380
Managed to do some small stuff on the project this weekend. Small gains help for the finish line. Couldnt get enough time strung together to really deep dive into a task. Kids, wife, family swinging by etc.

1 -started to remove some decals on the sides to see what works and scope out my polish procedure

2 -remove edging aluminum and resealing with fresh thick butyl tape and beads of silicone. Should have the new insert vinyl for the channel aluminum by Wednesday to cover the screw heads.

3 -took off the awning on the side and re sealed the top gutter piece that was holding the awning material as it had pulled off the siding halfway on one side. Injected those old holes with my penetrating epoxy. Filled with gelcoat patch mix. Butyl tape and silicone new screws and holes. Super sealed now.

If anyone wants for free my awning tube or arms let me know. Material is trash but all hardware is solid ! Just pm me in. Located in so cal.
4C344096-4751-4A20-9673-A6B6E78E3F27.jpeg
8A47B9D2-574C-44AA-B056-C98A6384E9BA.jpeg
8FAB55A9-9DD1-4E81-99A0-1CBFEB9B2F9A.jpeg
857E85FF-9FD9-46A0-8D1D-125DE6A19774.jpeg
795C10FD-663B-4599-BF72-A01C6EB87A6C.jpeg
CF7530AB-61DA-4874-A3EA-4D2D43065900.jpeg
0D150527-6A4C-41BC-B47B-DD4B6D45C639.jpeg
539B0AD1-B286-4887-84AD-5076F947545B.jpeg
 

Attachments

  • A7B5B537-2908-4495-BF12-FDA6E0B9710E.jpeg
    A7B5B537-2908-4495-BF12-FDA6E0B9710E.jpeg
    785 KB · Views: 31
  • 20C28313-33D8-4FE1-B375-B9D95F98C44C.jpeg
    20C28313-33D8-4FE1-B375-B9D95F98C44C.jpeg
    672.5 KB · Views: 30
  • E80F0DE3-F376-44E9-AB39-E9E6EB687356.jpeg
    E80F0DE3-F376-44E9-AB39-E9E6EB687356.jpeg
    382.6 KB · Views: 31
  • C4F76750-457A-4D90-AFE3-95DB2187A7A6.jpeg
    C4F76750-457A-4D90-AFE3-95DB2187A7A6.jpeg
    1.1 MB · Views: 32
Last edited:

DoughBallin14

Well-Known Member
Joined
Apr 22, 2014
Messages
1,080
Reaction score
1,380
Another weekend with my head in the trailer game!

So far today managed to get started on the slide out seals and what not. I managed to get one done. Lots of scraping, cleaning, butyl tape, silicone, screw out and screw in. There are still miles of insert trim i need to replace but its looking better already and sealing so nice!

-New 5 inch wide x 3/16 wiper seal
-New side bulb push on edge seal
-my idea of 3/8 foam backer rod insert for the side bulb seal to make it a bit more rigid and compress harder when it closes, at least in my mind it should help 🤷🏽‍♂️
-new 1 inch trim insert black
-new 3/4 inch trim insert black i still need to do
-ordered black square corner caps instead of the small arrow looking ones. Should help update it better looks wise also.

Got all edges sealed and extra screws on. Slide out seals even and closes smoothly now. More fun tomorrow and have two more slides to do.
B60856A7-1E59-49EC-AECC-A452C537C2DF.jpeg
E4183AB5-8872-478D-9880-973180370EA3.jpeg
B9F81AD1-144E-41E3-97CC-E10CEB4392D0.jpeg
B671DA84-D648-4291-8018-2CA0FDE00EAC.jpeg
E382C822-2EBE-4336-9212-83BE0624DC9C.jpeg
54013DEB-77FC-4FC6-B714-5E219C41167A.jpeg
8A832374-86C6-4AE8-97A6-A2C61049CCD1.jpeg
E7EDFD57-9163-4D33-94E6-26FF52F399D0.jpeg
70EF1C5F-43A3-4090-8550-C9C1DF7FE4C3.jpeg
960D2E92-4AD1-4B84-A0A1-C372BA032CA2.jpeg
710C5E63-2320-455C-B132-99CED4E484DD.jpeg
C862EE02-6E73-4815-B87D-E5B63E61E23C.jpeg
87816BC6-F51A-4949-B4AF-88E0EC5314EA.jpeg
C6698472-28D5-4CCA-913D-B058379C1380.jpeg
F0615368-6DEA-47C0-AFD8-E0E1C8D212C5.jpeg
 

DoughBallin14

Well-Known Member
Joined
Apr 22, 2014
Messages
1,080
Reaction score
1,380
Another slow weekend that felt like no progress but definitely finding so many issues.
Hard to say if it left the factory this way or shops / owner touching it. Leaning more towards factory but been going around removing gutters and aluminum corner trims etc, finding most never had sealant or butyl tape along with a screw about every 3rd hole ha. Definitely sources for water intrusion especially the back corners by the garage opening.
Added new seals for the garage door and created a flap with left over slide wiper seal to protect the corners from rain just in case, wrapped up the slide out seals and extrusions insert trims of course with all new screws rated for outdoors. Small wins! Getting closer every weekend!
D7BF02EE-4B0D-4C24-A7E4-D9021815761A.jpeg
ECEF9EAC-2730-4BF2-B084-380C79C5713C.jpeg
AB2C412C-7CDC-41F9-BEFE-30344B2DCA67.jpeg
DD686100-76EC-45CF-A9B2-8FB3FE584815.jpeg
87737A5B-D02C-4666-A87E-00DDBF2F1817.jpeg
D1D0EC21-033C-4CCD-87D9-9BC12A8A6667.jpeg
 

boatnam2

Well-Known Member
Joined
Sep 20, 2007
Messages
13,777
Reaction score
7,383
Going to be more solid than a new one when you get finished.
 

DoughBallin14

Well-Known Member
Joined
Apr 22, 2014
Messages
1,080
Reaction score
1,380
Going to be more solid than a new one when you get finished.
Thanks i think i might actually be keeping this one for awhile so figure go the extra mile to avoid headaches later. 👍🏽

Lots of rain coming this weekend so ill be inside finally working on paint prep, also need to investigate a popping breaker for some outlets. Kinda noticed once i removed a tv mount in the kitchen area that this breaker was popped and pops right away when i reset it. Yay!
 

boatnam2

Well-Known Member
Joined
Sep 20, 2007
Messages
13,777
Reaction score
7,383
Thanks i think i might actually be keeping this one for awhile so figure go the extra mile to avoid headaches later. 👍🏽

Lots of rain coming this weekend so ill be inside finally working on paint prep, also need to investigate a popping breaker for some outlets. Kinda noticed once i removed a tv mount in the kitchen area that this breaker was popped and pops right away when i reset it. Yay!
I look forward to more progress.
 

NicPaus

Well-Known Member
Joined
Sep 15, 2010
Messages
14,237
Reaction score
15,220
Might be a bad breaker! Doing a great job.
 

DoughBallin14

Well-Known Member
Joined
Apr 22, 2014
Messages
1,080
Reaction score
1,380
Might be a bad breaker! Doing a great job.
Thank you. That did cross my mind to look at also. I wasnt able to see if it worked fine prior to me starting to demo the tv entertainment area.. so nothing to compare before and after. Also nice that the previous owner doesnt know what breaker or 12v fuse controls what. All labels are missing on it so i need to investall of that and label accordingly

79F1F270-B817-4A5F-B22F-D1B5E3CEC465.jpeg
 

Ladsm

Well-Known Member
Joined
May 30, 2017
Messages
1,291
Reaction score
3,091
Absolutely fantastic work. I have been looking at used RVs and yours pops up in my head everytime I find one with a soft wall or floor.
 

DoughBallin14

Well-Known Member
Joined
Apr 22, 2014
Messages
1,080
Reaction score
1,380
Absolutely fantastic work. I have been looking at used RVs and yours pops up in my head everytime I find one with a soft wall or floor.
Thank you. I will keep it coming for you guys! Ah man ya the mystery with these things is always out there! If i could have found one at a good price, condition, and layout i would go with an aluminum framed toy hauler like a fuzion or cyclone etc. I have heard of some of the aluminum weld bracing cracking near slide outs but thats been minimal from what i heard. Good luck out there
 

DoughBallin14

Well-Known Member
Joined
Apr 22, 2014
Messages
1,080
Reaction score
1,380
All the hard work paid off so far! After our multi day rain and cold temps and a smidge of frosty slush. I opened the trailer to start removing old blinds and such to get closer to painting.
I could not see any indications of water intrusion. Garage lower 10 inches if wall paneling on the inside was bone dry and no signs of moisture around the slide outs.

The list continues but we are getting there!

- batteries
- tires
- shackle wet bolts
- paint
- flooring
- finish hardware
- line x garage floor
- bed mattresses
- replace capacitors on both A/Cs and keep the old ones as spares, clean condenser etc.
- build dinette and table
- cushions for dinette
- wrap valence covers with black vinyl and slide out fascia boards.
- sticker removal and gel polish
- find my electrical short or bad breaker
- understand how the solar was done and why the inverter was not tied into any circuits
- see about relocating the breaker for the solar or adding another ats switch so i dont have to go outside into a storage compartment to flip it off if i run the generator or plugged into shore power ( thats what the owner told me)


That’s probably it haha goal is before the first river trip may 4th weekend set up at big river for the season! Ill work on some pics for the boys when it gets more interesting again
 

DoughBallin14

Well-Known Member
Joined
Apr 22, 2014
Messages
1,080
Reaction score
1,380
Ok electrical gremlin narrowed down. This breaker is a 15/20amp dual breaker

So basically the reason why i think 3 of my outlets didnt work and seemed to cause the 15 amp breaker to trip every time i reset it was that the outgoing romex lead from the breaker terminal was being shared with the built in acdc inverter/charger.

I think that wire was accidentally landed there instead of the other 20amp breaker terminal that controls the ceiling fan and 2 garage outlets.

This particular breaker has a date code on it for january 2020 so its been replaced. Same time the solar was added ironically,
What i found was the built in charger inverter had a blown glass fuse 250v15amp on its circuit board.
So i moved the wire leads and now the charger inverter is on its own 15amp breaker, taking a guess that the breaker amp rating (15) and the inverter fuse rating(15) should match.

Moved the romex wire for the 3 outlets to the 20amp breaker terminal to share with the ceiling fan and 2 garage outlets.
Now all my outlets work and fan etc etc so now i am happy i dont have to take any walls apart to search for a bad wire or a screw through a wire where the tv used to be.

Next Replaced the glass fuse on inverter that is now on it’s dedicated circuit. I flipped the breaker and it popped and reset, so i reset it and flicked it on and this time it stayed on but the inverter never turned on and the glass fuse blew.
Now took the inverter out and its dusty and smells like burnt electrical. My guess is its fried and i need to upgrade and replace it , and i recall the old owner saying you have to flip the solar disconnect when on generator or shore power so that voltage doesnt go back and burn the built in inverter. I bet thats what happened before he sold it to me not knowing it got fried because he always had the solar on to charge that batteries and he mostly dry camped he said.

I know lengthy post just trying to provide the most info and troubleshooting i could haha


1BFCE540-7E0A-4B1E-A831-C7AE9FEAD64C.jpeg
2AEC9008-7EEF-45C5-B0A1-1094CA1FC3B5.jpeg
ADA61DF5-85C2-46A9-9561-CDB3BC14E75B.jpeg
 

crzy2bealive

Well-Known Member
Joined
Aug 16, 2013
Messages
4,282
Reaction score
2,866
Great work, had to replace a lot of rot on my old weekend warrior.
 

DoughBallin14

Well-Known Member
Joined
Apr 22, 2014
Messages
1,080
Reaction score
1,380
Ok well decided to take a suggestion from my dad i heard growing up and went with Keep It Simple Stupid and just got a good 75amp rv converter charger to replace the old 50amp built in one.
I will mount is in the open void beneath my power control panel and fire it up and hopefully it charges properly. Nice that this can charge in 3 stage for acid/agm or fixed for lithium.

I realize i just need to get this done and enjoy it this season and save a few upgrades for down the road i will probably upgrade the old inverter the previous owner put in and get a pure sine wave one and wire it in to the important circuits i want.
Also probably add a shunt so i know my status for the batts.

C6AF82CD-578A-49CE-AEFF-09F9FE6BC261.jpeg
E9CE42DF-D10E-4C63-8FB2-1E9C2FBCAC83.jpeg
 

DoughBallin14

Well-Known Member
Joined
Apr 22, 2014
Messages
1,080
Reaction score
1,380
Charge converter installed and working good!
Added a receptacle off the dedicated breaker, the old factory one was built in to the power center and direct wired to the breaker. New one has a plug and is bigger and lithium programmable so got her mounted up and she charges just fine, set bulk charge voltage at 14.5 for my agm batts and set my solar charge controller at 14.3 just so that one shuts off sooner. Idk if it matters just read it online haha.

Actually watched the charge controller go into idle once the setpoint was hit and the converter switched off of bulk charge.

Confirmed with Outback that my Flexmax 80 mppt and my charger converter can be used in unison if i am plugged into shore power.

Next is clean up the wire mess thats driving me crazy, picked up some buss bars and will just have one one wire on each battery terminal instead of 12 basically.

Also the wife got down today on the rubber eraser wheel and RapidTAC adhesive remover while the kids napped. About 60 percent of decals removed. Definitely looks cleaner to me. Check the b4 and after.

Hoping for paint prep on walls next weekend !
3F153148-D997-4819-A111-AF1B8F8FFEB9.jpeg
38F258C0-50B4-4F3C-A88A-26C8F5C0E4FA.jpeg
C9F1D801-C7C7-4E73-8998-B7A46FBE5C54.jpeg
440C787D-5E3D-42A8-A008-E7F78B622CED.jpeg
7BE6AE17-A7B5-4B7D-8A48-7450CE0F128E.jpeg
87F1E103-0E49-4B0B-93C9-39D05DC1DD47.jpeg
6B0ADE3D-2716-4B2E-89C8-8605CFBD91FA.jpeg
5DFA2506-59A2-47C2-A278-72890336D1D8.jpeg
4BFD7FC2-2279-4751-827F-678D55AFAE76.jpeg
 

DoughBallin14

Well-Known Member
Joined
Apr 22, 2014
Messages
1,080
Reaction score
1,380
Well gents had an earlier start day at work and managed to get home before noon so grabbed the trailer and managed to knock out some hole patching and masking off areas to get ready for paint!! Finally going to look cleaner and fresh inside.
Doing walls first then cabinets eventually. Also another good check and not seeing water marks or drips anywhere inside the trailer after the rains we have had!
55E422E5-B579-4D99-96B1-42A7F5FF1CC5.jpeg
330B339F-840E-4AEF-9B34-2DC283DDF1FC.jpeg
E84E4F38-64AC-4B7F-BB30-401BB920C685.jpeg
 

DoughBallin14

Well-Known Member
Joined
Apr 22, 2014
Messages
1,080
Reaction score
1,380
Next up got some spray down and so far so good. Learned from my last trailer that many light coats with time in between work really well for getting it to stick good! Got everything cleaned and scuffed and went for it. Basic eggshell white trim interior/ exterior paint from behr. Easy touch up no tints etc etc. Its bright inside i must say but it feels newer and cleaner already. You can see the color difference from the old wall where i hadnt painted. This will be an accent wall so yes i know i missed a spot haha. Also in main slide the lower section is spotted because i was testing my spray settings, also that is getting covered once i build my wrap around booth dinette.

D17E3A12-5364-4387-8103-0441B31F5548.jpeg
4F1E2447-DA63-4396-8402-63A95D79FC17.jpeg
0E4A5D88-CE04-4FF2-BE70-FCA2662EC8A1.jpeg
C07FF9D1-8A0C-4CE8-90FA-016159B2F9E5.jpeg
 

DoughBallin14

Well-Known Member
Joined
Apr 22, 2014
Messages
1,080
Reaction score
1,380
Cleaned up and unmasked stuff and a small bit of touch up. Got cooking on the garage area and will look into knocking out more next weekend! Hopefully wrap up painting walls completely and start cabs soon. Dinette booth. And flooring!

032614EB-9E8E-4633-BD68-08F7A808B211.jpeg
2F846693-4BCC-47B6-82BA-EDE2493E2476.jpeg
4AFABFD8-B0FE-4938-B67C-A5F2F47C2FF4.jpeg
 

NicPaus

Well-Known Member
Joined
Sep 15, 2010
Messages
14,237
Reaction score
15,220
Light sand on the cabinets and Prime with BIN primer. Is what I have found to work best.
 

DoughBallin14

Well-Known Member
Joined
Apr 22, 2014
Messages
1,080
Reaction score
1,380
Light sand on the cabinets and Prime with BIN primer. Is what I have found to work best.
Yep exactly what i used on the last trailer. Original BIN primer and some light sanding.

Going to try a different style this time.
Some light sanding with an alcohol rub down and satin spray paint.
Wife found a color she liked. Going to cost more on paint but so far so good on the test spot of the island i did about to weeks ago. No chipping or peeling so far. 👍🏽
 

Icky

Well-Known Member
Joined
Jan 11, 2015
Messages
8,218
Reaction score
9,926
Great job, and a lot of work. I'm over here dreading recaulking the rest of my trailer, and you have a complete remodel going on
 

DoughBallin14

Well-Known Member
Joined
Apr 22, 2014
Messages
1,080
Reaction score
1,380
Great job, and a lot of work. I'm over here dreading recaulking the rest of my trailer, and you have a complete remodel going on
Ha i feel your pain there thats something i still havent completed yet and need to do. Peel off all the old caulking edges and re do it as well. One step at a time! Thanks for the support
 

DoughBallin14

Well-Known Member
Joined
Apr 22, 2014
Messages
1,080
Reaction score
1,380
Productive day today. Paint day again!
But the home stretch is near for that project. Its been honestly the biggest undertaking yet. Just so much small detail work just glad i am spraying it and not roller/brushing it. Trying to be slow and mask off well. Should be done with all walls of paint tomorrow and possibly move onto cabinets next!

Amazon showed up with some new ceiling lights for me as well! Nice size good color and pretty bright. My old lights were those i think t5 dual fluorescent lights and pretty much out of the 7 i had i think 2 worked. Out with the old in with the new. Waiting on 4 more.

Also happen to dawn on me that i needed to take the shower apart because its blocking the wall from being painted and the vanity sink cabinet and upper cabinet! Dang it. Learned how to do that and now its all cleared out. Of course there was barely a skim of silicone around all the pieces so i will definitely be sealing that up.

E43CCB8E-D6A4-477C-93C4-621AFCB2E379.jpeg
95F21E91-9837-41EE-B7E9-DDCAC4CAF355.jpeg
F6B0AB42-45F3-4FEB-8E57-9058F37E9CE7.jpeg
6DF77FB7-3E3D-496D-B2BC-E844D6188708.jpeg
D29DB79F-7B89-4B01-A1E4-55D6598DC658.jpeg
A8797487-045A-402C-A05A-666516899C8C.jpeg
EF45B527-8B79-438D-A39B-7A96170201CE.jpeg
8F8AFF7A-EE00-4056-A6A3-FCC25F8A8BC2.jpeg
FFD0B0FE-14A0-4DDD-84A8-C8165F778129.jpeg
 

DoughBallin14

Well-Known Member
Joined
Apr 22, 2014
Messages
1,080
Reaction score
1,380
Had a weekend away with the family and extended family up in Lake Arrowhead for the weekend but managed to get home early today grab the trailer and knock out some cabinet painting! Any time is valuable time for me right now. Easter weekend coming up and may 4th right around the corner.

So here you go, got to masking again, did some caulking and got my trigger finger going on the spray cans and here is where we ended up at. Also amazon dropped off some cabinet hardware and got one door set up for a little test to make sure its what we wanted. So far we agree.
What do you guys think!???

Buddy just let me know he got my faucets for the kitchen, bathroom, and shower and stuff in at his house in arizona since they wouldnt ship them to california! Thanks newsome. Should have those by Tuesday! Lots to detail next weekend.

5D5FF7E4-77C5-46C3-A783-DFA0FD71DA80.jpeg
F299368E-DF31-4CBD-9FAF-007CEE58C06D.jpeg
6C3CDD81-22C8-4D4D-9FE3-AF1BE7685920.jpeg
5583A952-9DCD-4AF7-A6B9-512EFAC0C35F.png
323B1AF6-1260-47D1-AEFB-57DC6475257F.jpeg
9E9CA411-B44C-4F40-8005-46FE708BCD0E.jpeg
D6BB3407-96BA-43CD-B5BA-439CD1E2B3DD.jpeg
7F190080-68D7-42A3-99C9-97D82D2C4E29.jpeg
E63AF43B-D158-4A7F-A297-0750D6951946.jpeg
508149C3-CBE5-45B6-A053-42EE5C81DE69.jpeg
 

DoughBallin14

Well-Known Member
Joined
Apr 22, 2014
Messages
1,080
Reaction score
1,380
Paint continued!! A long with re installing a few cab doors and hardware! Good think i didnt finish the garage. Had to turn it into a small spray booth to avoid the breeze. Making good progress. Worked friday so i get monday off for easter, hopefully knock out more and get to the finish line soon soon.
IMG_4335.jpeg
IMG_4336.jpeg
IMG_4337.jpeg
IMG_4333.jpeg
IMG_4332.jpeg
IMG_4340.jpeg
IMG_4343.jpeg
IMG_4341.jpeg
IMG_4342.jpeg
 

DoughBallin14

Well-Known Member
Joined
Apr 22, 2014
Messages
1,080
Reaction score
1,380
A lot of work. But it's looking great! That gold is in style.
Thanks the wife hated gold and brass with a passion and i never cared for it. We had lots of options when out house was being built and we kept everything white black grey stainless touches of copper.

This just came to us as a suggested for handles and we gave it a shot with a few hints of the brushed gold. I think it will be just right, trying to avoid that hipster boho model overland bus look.
 

DoughBallin14

Well-Known Member
Joined
Apr 22, 2014
Messages
1,080
Reaction score
1,380
Alright i dusted off the old upholstery hat and got the fascia boards for the sliders done. Cut some left over 3/4 ply from the flooring. Got some new black button caps from Pro-Dec products for the mounting screws.
Caught hobby lobby on there fabric sale so got 12 yards of black faux leather for like 40 bucks. This will also be the material we wrap the old valence covers in. Also some 1/4 inch foam batting to make it a little more cushion feeling.


IMG_4344.jpeg
IMG_4346.jpeg
IMG_4345.jpeg
IMG_4348.jpeg
IMG_4350.jpeg
IMG_4352.jpeg
IMG_4354.jpeg
IMG_4353.jpeg
IMG_4355.jpeg
IMG_4356.jpeg
 

DoughBallin14

Well-Known Member
Joined
Apr 22, 2014
Messages
1,080
Reaction score
1,380
Just working along! Have about 2 weekends left of the major stuff then off to the river.

Managed to get the dinette mostly framed out with storage ottoman underneath since this will be our main seating as well figured why not make the table removable and have a place for your feet.
Still need to add some supports and build the backs and wrap it up in ply and call it good.
Take it easy on the framing haha i am an steel stud framer in the past lol so i am sure there were some other ways to build it buy i can say it’s solid plumb and square so we are good so far.
Also got some more vinyl wrapped pieces up and painted the fridge and island as well as the rest of the cabinet pulls and such.
IMG_4377.jpeg
IMG_4378.jpeg
IMG_4379.jpeg
IMG_4381.jpeg
IMG_4382.jpeg
IMG_4383.jpeg
IMG_4384.jpeg
IMG_4380.jpeg
 

King295

Well-Known Inmate #20225
Joined
Aug 8, 2017
Messages
1,915
Reaction score
2,950
Coming a long great man. Did I read correctly you will be in BR? If so, I'll find ya and check this out in person and give a proper RDP review.
 

DoughBallin14

Well-Known Member
Joined
Apr 22, 2014
Messages
1,080
Reaction score
1,380
Coming a long great man. Did I read correctly you will be in BR? If so, I'll find ya and check this out in person and give a proper RDP review.
Thanks much appreciated. Yes been going to big river rv park for at least 10+ years. We have about two weekends a month set up there starting may 4th,


Definitely have the goal now to just get it livable for the river season and then get back on it in the winter and touch up small stuff and buff out the fiberglass, wheels, under coat the frame, update exterior lights etc etc
 

DoughBallin14

Well-Known Member
Joined
Apr 22, 2014
Messages
1,080
Reaction score
1,380
More progress. Sink faucets are set and leak free! Painted doors are in and more bench dinette work done. Really getting close and running short on time.
I have to truly make time the next two weekends to do my shackles and equalizers. Pretty sure the old factory ones are on here and they are toasted and loose etc.
If any one is looking for normal basic wet bolts and original shackle links or classic equalizers then definitely reach out to this awesome family business in Illinois R&P carriages.


I was looking for a solution to replace parts and go to wet bolts but mainly lower my trailer about 2 - 3 inches. Previous owner flipped axles properly at least and went from 15s to 16s and its just to high for my truck and the garage door is super vertical haha.

Told him what i was looking for and he set me up with slightly longer shackle links, lower top point equalizers, bronze bushing, wet bolts and suggested going down a tire size to gain another half inch. Cheapest by far i could find compared to etrailer and amazon once i called him on the phone.
Wasnt ready to just dump money yet into the fancy morryde cushion or dexter equalizers just need to make a few safe trips here and there and maybe upgrade down the road. Check them out though if you need small parts. Came in 2 days usps 👍🏽
IMG_4390.jpeg
IMG_4391.jpeg
IMG_4392.jpeg
IMG_4387.jpeg
IMG_4385.jpeg
IMG_4159.jpeg
IMG_4160.jpeg
IMG_4161.jpeg
IMG_4165.jpeg
image.jpg
 

DoughBallin14

Well-Known Member
Joined
Apr 22, 2014
Messages
1,080
Reaction score
1,380
And out with the old and in with the new! Figured tires were in need as well. Dont want to chance anything for the first long haul as the old good years had a pro date of 2016 on them. Also went with the next size smaller just for the extra half inch to help with the lower equalizers and straps.

More to go this weekend! Changing tires made me find that my middle axle on one side all the backer plate bolts for the drum came loose and the nuts are rolling around like marbles and since the backer plate is free it pulled my brake wires apart ha yay!

IMG_4417.jpeg
IMG_4418.jpeg
IMG_4419.jpeg
 
Top