WELCOME TO RIVER DAVES PLACE

Spectra 20 Resto

Flat Broke

Well-Known Member
Joined
Oct 17, 2007
Messages
985
Reaction score
10
I haven't started a thread on this build because up until recently I wasn't doing any work on it. You can catch some of the back story on the what was done to the boat in the old articles from Family and Performance Boating Magazine. In a nutshell, we flipped the boat, ground off all the gel on the bottom, then lengthened the strakes and did some minor repairs. The boat sat like that for a long time as I lost interest in the project and re-focused my energies on working towards my MBA. After just having our second daughter on May 1st, I decided to get back to work on the Spectra.

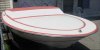
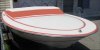
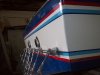
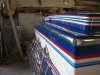
Last weekend, we laid down all the white gel on the bottom and side of the hull. We started with a straight gel basecoat, then finished off with 2 coats of prestec clear mixed with gel at a ratio of 60 parts prestec/40 parts gel. If we were shooting in a booth, and I was better with the spray gun, we would have had a "walk away" finish that only required buffing. As it sits now, I'll have to go through a complete color sand, but that's cake compared to the sanding/grinding/laminating that led up to shooting the gel. Before I start sanding, I need to shoot the orange stripe. We masked off the stripe area and let the white build up around the tape rather than shooting all white and laying a line over the white. In theory, when I spray the orange into the void left by the masking tape, the result should be a smooth blend of color with no step once the hull is color sanded.

I only had my camera phone with me, but I thought I'd share some progress with those of you who figgured I may have given up on this hull

4552_1047420355807_1534638730_30113790_4911002_n.jpg


n1534638730_30113791_2531102.jpg


It's hard to tell in the pics, but all of the white gel you see is brand spankin new.

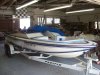
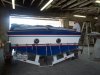
The updates to this thread will be sporadic, but as I get the rest of the gel sorted out and get the boat flipped back onto the trailer, the pictures will be of better quality and more frequent.

Chris
 

RiverDave

In it to win it
Joined
Sep 13, 2007
Messages
125,940
Reaction score
163,463
I was starting to wonder if this deal went the way of SuperDave's Schiada. :D

I'm glad to see your back on it! Welcome back Chris!

RD
 

Flat Broke

Well-Known Member
Joined
Oct 17, 2007
Messages
985
Reaction score
10
I was starting to wonder if this deal went the way of SuperDave's Schiada. :D

I'm glad to see your back on it! Welcome back Chris!

RD

It is going the way of Dave's Schiada... it will get done when it gets done ;) I hate to disapoint, but no matter what I do with mine, I doubt it will come out as nice as Dave's rig will eventually be.

It might be a good thing I've been away from the project for so long. There was a long time where i was seriously considering cuting it for an open bow.

Right now my biggest dilema is what to do with the pacalon. I'm torn on keeping it and re-clearing it, or changing it to white and doing an orange cap around it, or orange lines bordering it like what you see on many Schiadas, or swapping the pacalon for orange and keeping the cap above it white.

Chris
 

RiverDave

In it to win it
Joined
Sep 13, 2007
Messages
125,940
Reaction score
163,463
It is going the way of Dave's Schiada... it will get done when it gets done ;) I hate to disapoint, but no matter what I do with mine, I doubt it will come out as nice as Dave's rig will eventually be.

It might be a good thing I've been away from the project for so long. There was a long time where i was seriously considering cuting it for an open bow.

Right now my biggest dilema is what to do with the pacalon. I'm torn on keeping it and re-clearing it, or changing it to white and doing an orange cap around it, or orange lines bordering it like what you see on many Schiadas, or swapping the pacalon for orange and keeping the cap above it white.

Chris

If the pacalon is in good shape then keep it. :) If it's even a little bit rough then gel over it. (seems simple enough?)

RD
 

Cos

Active Member
Joined
May 29, 2009
Messages
26
Reaction score
0
RD,

Forgive me for my ignorance as I have been off all of the forums for probably 6-7 years now, but what exactly is the status of Superdave's Schiada?
 

Riverbound

Banned
Joined
Sep 26, 2007
Messages
26,918
Reaction score
19,788
Keep the Pacalon if its in decent shape. when I bought my 18 the pacalon was in good shape but the clear was very cloudy. after the regel the boat looked great and I have received many compliments on it.

miscpictures015.jpg
 

RiverDave

In it to win it
Joined
Sep 13, 2007
Messages
125,940
Reaction score
163,463
RD,

Forgive me for my ignorance as I have been off all of the forums for probably 6-7 years now, but what exactly is the status of Superdave's Schiada?

About the same as it was 6 - 7 years ago.. :D Still taken apart and in peaces. :D

He has the turbos on the motor, the boat has been regelled, v-drive is in I believe, and the hole drilled in the bottom for the prop shaft etc..

He's on the home stretch, but it just sits... and sits.. and sits. :D

RD
 

Flat Broke

Well-Known Member
Joined
Oct 17, 2007
Messages
985
Reaction score
10
Riverbound,

My 20 has the same exact color scheme as your 18. When I first got into Spectras I hated the pacalon. Now it has grown on me, so I'm not opposed to keeping it. A previous owner had painted over the pacalon, but from what I've wet sanded off, it appears to be saveable with an application of prestec clear. I hear what you're saying about getting the "thumbs up" from folks etc. but I might be throwing a major wrench in the works with regard to the color scheme...

So to those that love cruisers and have an eye for that kind of style, has anyone ever seen a properly done open bow Spectra 20? I remember seeing a blown one at the Bluewater once, but that was it. After spending 3 days at the river with 2 toddlers in my brother's closed bow 20, I'm seriously thinking about doing an open bow. I can live with the looks of a DCM/Howard, or Schiada 21 open bow, but with the Spectra's taller dash, I'm just not sure how it'd look. Just to be clear, it wouldn't be a shade-tree half assed job. I'd take it to DS, Stratton, or possibly Stitchcraft, but I'm having a hard time getting my head around the asthetics.

So assuming I cut the hull, I'd have mixed emotions about the pacalon. To me, the "old school" look afforded by the pacalon might conflict with an open bow. It'd be one of those things that would either work or would look train-wreck. If you use Riverbounds boat as an example, how about changing the pacalon to the orange with a width of white around the bottom to match the thickness of the white on the top? Or shoot the pacalon white and do a orange top like the pics below.

For that matter, if anyone with mad photoshop skills wants to do a rendition of a Spectra 20 open bow, I'd love to see it.

Any input from the peanut gallery is welcomed and invited.

With the weather being damp, I haven't been able to finish the bottom, but with any luck, I'll be able to bang that out over the weekend, and start focusing my energy on the deck.
 

Attachments

  • Spectra4orange.jpg
    Spectra4orange.jpg
    44.5 KB · Views: 712
  • Spectra5orange.jpg
    Spectra5orange.jpg
    45.8 KB · Views: 708

RiverDave

In it to win it
Joined
Sep 13, 2007
Messages
125,940
Reaction score
163,463
I've seen a walk thru and a crawl thru.. There was a crawl thru in the normal classifieds on here for awhile.. I'd find it for you but it's a bitch to search etc... On an iPhone

RD
 

Flat Broke

Well-Known Member
Joined
Oct 17, 2007
Messages
985
Reaction score
10
Dave,

I've seen the crawl thru one in the classifieds. I can say for sure that's not a look I'd be happy with. If you happen to have any pics of the blown one we saw tied up in the marina at the Bluewater years ago, I'd love to see em. I want to say that was from a Thanksgiving weekend if I recall. For that matter, if you have any pics of other walk through versions that'd be cool too.

Chris
 

74 spectra20 v-drive

74 spectra20 v-drive
Joined
Nov 27, 2008
Messages
2,080
Reaction score
2,969
There will be an 87 Howard cruiser walk through open bow at Parker this weekend. This is an exact splash of a spectra20 as you know and this is prior to them changing the top deck mold. The boat is white with blue and red should be across and down river from emerald cove on the AZ side. The boat used to belong to my brother and was a small block outdrivre????? now it is a big block v-drive!!! This is the first trip to the river, the new owner is Felix Reyes he has an El Cid flat bottom as well with a 428 Ford with and cross ram set up pretty unique so if you know where that boat is the Howard will be there too. If anyone is out there can they snap soem pics and post. I have a few of the boat but just the transom. I will look for some others for you but I thought the boat looked nice.
 
Last edited:

74 spectra20 v-drive

74 spectra20 v-drive
Joined
Nov 27, 2008
Messages
2,080
Reaction score
2,969
Found the pictures!!!
 

Attachments

  • 100_0101.jpg
    100_0101.jpg
    100.2 KB · Views: 631
  • 100_0097.jpg
    100_0097.jpg
    112.6 KB · Views: 628
  • 100_0103.jpg
    100_0103.jpg
    94 KB · Views: 606
  • 100_0102.jpg
    100_0102.jpg
    86.6 KB · Views: 609

Flat Broke

Well-Known Member
Joined
Oct 17, 2007
Messages
985
Reaction score
10
Thanks a ton for the pictures. That looks a lot better than I was thinking it might come out. I'm still a little bit away from pulling out the sawzall to do the deed, but it's definitely nice to know that it wouldn't look like a total abortion if I went that route.

If anyone else is going to be out at Parker this weekend and wants to snap a few more of the interior, front, etc. it'd be greatly appreciated.

Thanks,
Chris
 

74 spectra20 v-drive

74 spectra20 v-drive
Joined
Nov 27, 2008
Messages
2,080
Reaction score
2,969
The biggest issue would be the bracing and assuring that the deck still stays stiff. This was an original open bow done by Howard, the conversion to v-drive was done at B&K Boat repair in Bellflower, these guys no how to do this and do it right.
 

Flat Broke

Well-Known Member
Joined
Oct 17, 2007
Messages
985
Reaction score
10
I was thinking the standard 3/4" marine ply for the walkthrough siding, with the same for the area that forms the back of the open bow lounges. This should actually make the two remainging dash areas stronger than they were when it was a unified piece. To start the work, I'd cut the walkthrough except the dash pannel, that way the rise in the deck would stay suspended while I glassed in support structure. Then I'd glass in the walkthrough side and back pannels. After that was cured, I could cut the remaining center portion of the dash out to complete the walkthrough. From there I'd probably glass in a series of small triangular wedges/ribs around the perimeter of the remaining deck, then hand it off to the interior guys.

All this is a little bit down the road though as I still have plenty of work to get the boat rightside up again.

Anyone have any input on the color schemes posted earlier in the thread?

Chris
 

Flat Broke

Well-Known Member
Joined
Oct 17, 2007
Messages
985
Reaction score
10
flat black with some nice flat black pin stripes. :skull

If I wasn't planning on using it in the summer, it would have been shot in DP90 a long time ago ;) That would be a bitchen look on a less family orriented ride like a Schiada/Howard 19 rigged as a no nonsense race type deal.
 

Flat Broke

Well-Known Member
Joined
Oct 17, 2007
Messages
985
Reaction score
10
I'm without pics at the moment, but the bottom and sides are done, color sanded, and buffed. It's dirty now (outside and still upside down), but when my dad called me over to tell me he had buffed it out, I was really surprised.

Now that Christmas is over, I need/want to repaint the trailer, so I can flip the boat back over in an effort to have it done for this summer. Can anyone recommend a good tough paint that shoots well for lametards? :) I want something that will last a while and is somewhat chip resistant. I'm doing it in white, so a large color pallete isn't a concern.

If I get down to my Dad's this weekend, Ill hose off the bottom and snap a few pics.

Chris
 

74 spectra20 v-drive

74 spectra20 v-drive
Joined
Nov 27, 2008
Messages
2,080
Reaction score
2,969
Chris, I shot my trailer with Ellis paint, two part enamel you can get it at Smith Paint in Signal Hill, they are on Cherry just about two blocks south of the 405 between Willow and Spring. Kenny at B&K turned me onto this paint for the trailer, two gallons, hardner, and thinner under $150. We shot the trailer in a garage, black and it looks good. The only issue I had was that it seemed to take a long time to really set up.
 

Attachments

  • 39.jpg
    39.jpg
    93.6 KB · Views: 379
  • 41.jpg
    41.jpg
    24.9 KB · Views: 359

74 spectra20 v-drive

74 spectra20 v-drive
Joined
Nov 27, 2008
Messages
2,080
Reaction score
2,969
Chris, how far back did you extend the strakes? The bottom looks great by the way, you did a nice job, and I know how much effort it took to get that done. Funny your boat and mine look very similar now, but you have color on yours.
 

Flat Broke

Well-Known Member
Joined
Oct 17, 2007
Messages
985
Reaction score
10
Chris, how far back did you extend the strakes? The bottom looks great by the way, you did a nice job, and I know how much effort it took to get that done. Funny your boat and mine look very similar now, but you have color on yours.

I'll measure the strakes tomorrow when I'm at my Dad's. If I recall it's somewhere around 18" from the transom. I initially did it just looking for free speed. I know they end right at the middle of the pump I take fins because I wanted to shield any potential cavitation sources from the intake.

Thanks for the compliments, but I'm sure yours will turn out nicer. There are a couple little spots on mine that I'd like to work on, but I want this boat in the water this summer and I'm not going to stress asthetics on the under side of the boat ;) I also have to thank my Dad for a ton of help with the sanding. Anytime I got fed up or didn't have free time, he'd plug away at it.

Chris, I shot my trailer with Ellis paint, two part enamel you can get it at Smith Paint in Signal Hill, they are on Cherry just about two blocks south of the 405 between Willow and Spring. Kenny at B&K turned me onto this paint for the trailer, two gallons, hardner, and thinner under $150. We shot the trailer in a garage, black and it looks good. The only issue I had was that it seemed to take a long time to really set up.

Thanks for the tip on the paint. I know right where that is, and it's close to home to boot! How much of the 2 gals did you use? What primer did you use under that paint? I want to make sure I lay a compatible base down to shoot on.

As far as the long setup time, that is a little bit of a concern becaus we'll be shooting outside in a temporary enclosure. What was the temperature when you were shooting, and can you tailor the catalyst ratio to ambient temp within reason?

Thanks,
Chris
 

74 spectra20 v-drive

74 spectra20 v-drive
Joined
Nov 27, 2008
Messages
2,080
Reaction score
2,969
Chris, the long set up time in my mind was for a full cure, not being able to put a finger nail in it. As far as drying time that was fine, we started shooting around midnight and finished close to 3am, so it was cool as well, the trailer was dry to the touch the next afternoon, I wouldn't want to climb around on it for a couple of days though.
I used a dp80 compatible primer, I couldn't find any DP products around Long Beach everything was water based now. The primer worked great, shoot and paint no sanding if you shoot right away. I cannot remember the name of the primer but I got it at a shop in North LB, on Artesia just west of Cherry on the North side of Artesia, I believe it's colorcraft? I paid more for a gallon of primer and thinner than all of the paint, I blelieve total cost was just over $350, not too bad, the Ellis paint was a huge cost saver.
We used just about 3/4 of a gallon of primer and a gallon and a 1/4 of paint. I have a ton of crossmembers as well and I also painted 6 wheels.
 
Last edited:

Flat Broke

Well-Known Member
Joined
Oct 17, 2007
Messages
985
Reaction score
10
I got busy grinding and sanding on the trailer, and forgot to measure my strakes. I'll be in the area tomorrow, and will grab a quick measurement for you. FWIW, they were abritrary decisions, and my hull is a jet so don't put too much credence in my dimensions as they haven't been tested... yet ;)

Chris
 

Maw

Dont re Member
Joined
Jun 9, 2008
Messages
1,727
Reaction score
1,953
Hi Chris,

How much power will you be putting into this boat?

Cheers, Mark
 

Flat Broke

Well-Known Member
Joined
Oct 17, 2007
Messages
985
Reaction score
10
Mark,

821 :) I ran the engine in a different Spectra 20 with a different pump setup, but I couldn't break 85mph. The boat handled well, but could have used a bit more lift, so when I ground the gel away to fix the poc marks on the bottom of this hull, I decided I would lengthen the strakes.

The inner strakes now end 18.75" from the transom, and the outer strakes end 5.75" from the transom. My only worry is that I added too much lift and the boat doesn't settle down quickly on abrupt deceleration. That's one of the things I don't like about my brother's 20' Dana. The full length strakes let it ride flat and dry, but the extra lift in the rear doesn't let the ass end of the boat settle much faster than the bow which can make comming out of the thottle quickly in lumpy water a little nerve racking. Not instantly dangerous, but nowhere near as predictable as a stock-bottom Spectra 20. Of course his boat also runs just as fast with almost 90 less hp.

I'm excited to see what the bottom work does.

Chris
 
Last edited:

vdcruiser

Well-Known Member
Joined
Dec 15, 2009
Messages
503
Reaction score
194
Flat Broke, do you have any pictures or could you elaborate on extending the strakes? Nice job by the way. What I mean is how did you extend them?
 
Last edited:

Flat Broke

Well-Known Member
Joined
Oct 17, 2007
Messages
985
Reaction score
10
I actually did a really complete writeup in Family and Performance Boating on that back when that mag was still in business. I can't copy-paste that here because of copyright issues, but the basic gist of it is as follows:

I prepped the hull for the area where I was going to build new strake by grinding with 60 grit. I also cut back into the existing strake at a shallow angle so I could fare the new strake into the old one as a unified piece. I masked off the entire area surrounding the repair with tape and heavy paper and got to work.

I can't remeber the weight of glass I used off the top of my head, but it basically went mat/cloth/mat, then that would kick off, then another lamination of mat/cloth/mat. I went for thinner laminations so that I could manage the heat from the exothermic reaction of the resin and catalyst. I want to say the strips I used to make the inner strakes were around 69". I staggered between strips the full width of the strake, and strips half the width of the strake. This allowed me to build the edge of the strake faster and create the angular rise from the hull.

Once the general structure of the strake was laminated (larger than the finished dimension), various sanders were used to shape the strake. I made a profile gauge out of plywood from the factory strake that would tell me when I had shaped the new glass properly. This part of the work sucked ass, and much of that was attributed to trying/using different tools to get the job done. An air powered inline sander was a logical choice because it was straight and flat, but it took FOREVER. The air powered DA on the other hand was aggressive, and somewhat uniform once you got used to it. After doing the process, it would go quicker a second time... Which I hope there will never be :D

Masked and ready to go
IC2.jpg


Mat strips cut to dimension
IC3.jpg


Wetting it out before using a weenie roller to get the excess resin off
IC4.jpg


Mound o' glass that will be shapped down to a strake
ic1.jpg


Profile gauge to ensure uniform dimension
IC6.jpg


Mostly completed strakes
IC5.jpg

I am sure there are better/easier ways to do this, and I think we'll see them comming out of B&K on 74's hull. I toyed around with the idea of doing a wood strake laminated in glass, as it would have been tons easier, cheaper and faster; but I didn't like the idea of possible delamination etc. I didn't want to have to be doing this again, so I figgured glass on glass is as good as it gets in terms of this type of repair/modification. The die is cast, and it is what it is; so right, wrong, or otherwise, it's getting wet this way.

I hoped that helps 'splain how I did it ;)

Chris
 

vdcruiser

Well-Known Member
Joined
Dec 15, 2009
Messages
503
Reaction score
194
Thanks a lot Chris, I bet that was lot of work trying to grind those to shape. I thougt about making a mold from the outside strake. I wonder if that would work and maybe save a little time shaping. Thanks again. :thumbsup
 

Flat Broke

Well-Known Member
Joined
Oct 17, 2007
Messages
985
Reaction score
10
Thanks a lot Chris, I bet that was lot of work trying to grind those to shape. I thougt about making a mold from the outside strake. I wonder if that would work and maybe save a little time shaping. Thanks again. :thumbsup

I actually thought about doing that. My main concern was being able to pull a long enough section of straight strake at the same hull angle as the addition/repair area. The degree of the V transitions, and that would cause the part you're pulling from the mold to be higher at one end, than the other. On top of that, the part would be rigid as heck. If there was any difference between the area you were laminating into and the area the part was pulled from, you might have a noticiable gap. You could bed it with resin and mat, as you would if you had a perfectly fitting part, but there were just too many variables for me to justify taking the time to make the mold, vs just laying down glass and grinding.

It will be cool to see how 74 Spectra20 V-drive does his lengthening. He's got experts in his corner with awesome experience. I probably should have given them a call when I did mine.

Chris
 

74 spectra20 v-drive

74 spectra20 v-drive
Joined
Nov 27, 2008
Messages
2,080
Reaction score
2,969
Chris you did a beautiful job and you took a lot of time making it just right, it looks great:thumbsup!!! Kenny has done these several different ways from making a mold to using a waxed piece of wood extended from the existing strake and building up layers against it until he gets the height, there are a lot of ways to do the same thing. I will keep you posted and try to document how we do it. I am thinking I will get on these next week, I have a killer week at work and will not have any time until then.:grumble:
 

Flat Broke

Well-Known Member
Joined
Oct 17, 2007
Messages
985
Reaction score
10
Chris you did a beautiful job and you took a lot of time making it just right, it looks great:thumbsup!!! Kenny has done these several different ways from making a mold to using a waxed piece of wood extended from the existing strake and building up layers against it until he gets the height, there are a lot of ways to do the same thing. I will keep you posted and try to document how we do it. I am thinking I will get on these next week, I have a killer week at work and will not have any time until then.:grumble:

Thanks for the kind words. I'm just as bad off for time, and it's killing me not to be able to do something as simple as paint the trailer so I can get the boat right side up again. I'm dying to step foot back inside the hull and make vroom vroom noises :)

On the waxed wood idea, I actually took it a whole step further. I made a form/fixture if you will, out of formica that you laid on the hull with a formica faced edge that would accomplish the same thing. I left enough room to stack cinder blocks on the form/fixture so it wouldn't move durring lamination. Then when I laid the finished product up on the boat I had one of those moments... How the hell was I going to lay the glass by working over the fixture? :headscratch: I wasn't going to sit on the keel the whole time, and at the height the inner strakes are at on my dolly, it wasn't working out. Sooo, That form got kicked to the curb.

After thinking about your post, a simple piece of 1" or 2" stock with a complementary angle cut into the hull side could have been bonded down with a couple drops of resin, and would have been easy to work around. Then when I was done, I would just break the wood off, and sand off whatever stayed bonded... DOH! Oh well, ya live you learn, and that's why these forums are so cool. :thumbsup

Chris
 
Top