WELCOME TO RIVER DAVES PLACE

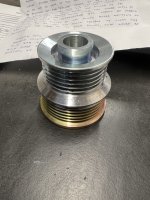
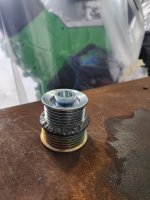
OK, which of you machinists want to help an idiot (me) out with making a small special part?

rivermobster

Club Banned
Joined
Dec 28, 2009
Messages
59,400
Reaction score
59,836
This is the easy part. the difficult the part is going to be figuring out the mounting of the supercharger. I know I am going to have to relocate the ignition coils and then will have to build mounts with some kind of tensioning adjustment

Someone with a 3D printer Could be your new best friend. You could fab all of that stuff outa plastic.

@RaceTec
 

rivermobster

Club Banned
Joined
Dec 28, 2009
Messages
59,400
Reaction score
59,836
This is the easy part. the difficult the part is going to be figuring out the mounting of the supercharger. I know I am going to have to relocate the ignition coils and then will have to build mounts with some kind of tensioning adjustment.

how much call could there really be for superchargers on 30 yr old 4 cylinders??

You tell me. You're the one that lives in Texas! 😁
 

Bigbore500r

Well-Known Member
Joined
Apr 28, 2014
Messages
18,180
Reaction score
38,051
How many hole saws to go through 5/16" of rolled steel?? I think I rather just pay somebody to spin it on a lathe real quick. It couldn't take but 15min for somebody who knows what they're doing. or I'm sure I could figure a lathe out, I just need to find one
Stay away from the rolled edge, and it probably isn't that bad. But if you have access to a machine shop....obviously that's you answer!
 

Shlbyntro

Ultra Conservative
Joined
May 27, 2018
Messages
7,744
Reaction score
22,577
Wheres the photo of this Danger Ranger?

Her name is Giselle and she was my Daily driver up until recently when I needed something practical with a rear seat. She's not really worth enough to sell and she's a good running spare truck so I might as well blow her up right?!
20230404_111658.jpg
20221129_182110.jpg
 

4Waters

Well-Known Member
Joined
Aug 28, 2016
Messages
34,137
Reaction score
86,561
Don't forget the double throw down head studs too.
Imagine that call to ARP.......

ARP...while still laughing....." your doing what"? You want what?" Lol
Actually people have been hotroding 2.3's for decades, in the mid to late 80s ford had the SVO Mustang and Turbo Coupe TBird the last year of those were 210hp. In the 90's there was a guy everyone called Turbo Joe at LACR, he had a pinto with a turbo 2.3 running mid 11's and it was his daily driver. ARP knows exactly what's needed.
 

coolchange

Lower level functionary
Joined
Jan 1, 2008
Messages
10,491
Reaction score
15,588
Tap tap tap. Huh. Gauge must be broken. No way I’m makin 32 pounds…
 

Shlbyntro

Ultra Conservative
Joined
May 27, 2018
Messages
7,744
Reaction score
22,577
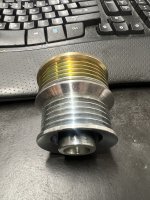
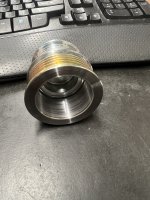
Step one accomplished , now to figure out how to "hold it" to bore it

that was fast!

My thought was leave the silver hub in the chuck of the lathe and use a cutting bit on the same kind of end fixture that's used for drilling center holes in various types of shafts. the meat that you would be cutting into on the gold hub is only about 1/4-5/16" thick.


eagerly awaiting its return 😊
20240103_212959.jpg
 

jetboatperformance

Well-Known Member
Joined
Jan 1, 2008
Messages
8,530
Reaction score
18,611
that was fast!

My thought was leave the silver hub in the chuck of the lathe and use a cutting bit on the same kind of end fixture that's used for drilling center holes in various types of shafts. the meat that you would be cutting into on the gold hub is only about 1/4-5/16" thick.


eagerly awaiting its return 😊 View attachment 1319697
Josh said step one was "cake" but he hasnt figured out how to hold it to bore (cut out) the center of the Gold side yet
 

RiverDave

In it to win it
Joined
Sep 13, 2007
Messages
126,180
Reaction score
164,376
Josh said step one was "cake" but he hasnt figured out how to hold it to bore (cut out) the center of the Gold side yet

You should be able to hold it on the outer lips or even that flange in the middle pretty easily? So long as you are taking small passes it should be ok?

RD
 

jetboatperformance

Well-Known Member
Joined
Jan 1, 2008
Messages
8,530
Reaction score
18,611
this wouldn't work with the proper bit? View attachment 1319703
You should be able to hold it on the outer lips or even that flange in the middle pretty easily? So long as you are taking small passes it should be ok?

RD
He machines crazy cool stuff everyday and doesnt think to much about it , this is different BC its somebody elses he says without some some soft jaws he was concerned about buggering up the outside of the pullies , He's back machining impellers till he decides how to approach it ... Thanks for the input :cool:

PS He's got material coming for soft jaws to protect the ribs
 
Last edited:

monkeyswrench

To The Rescue!
Joined
Sep 7, 2018
Messages
29,112
Reaction score
82,714
What I've done before, because I have no machining skills, is booger up the outer lip. When done, flat file or polish the fukered up areas. Usually it was aluminum though, trying to make stuff on hand fit a particular need.
 

RiverDave

In it to win it
Joined
Sep 13, 2007
Messages
126,180
Reaction score
164,376
He machines crazy cool stuff everyday and doesnt think to much about it , this is different BC its somebody elses he says without some some soft jaws he was concerned about buggering up the outside of the pullies , He's back machining impellers till he decides how to approach it ... Thanks for the input :cool:

PS He's got material coming for soft jaws to protect the ribs

I guess he could machine that taper into the soft jaws and then not worry about buggering up the outside edges.. I honestly think if he presses it back to the face of the chuck and grabs it, the buggering will be minimal.. Just be gentle with the boring bar and you're good.. Or put the side that needs to be bored towards the chuck and reach for it so long as the throat diameter is larger Than the bore size.

I wouldn't worry about it, but I run a 6 jaw buck chuck so it isn't as bad as a 3 jaw or 4..

RD
 

jetboatperformance

Well-Known Member
Joined
Jan 1, 2008
Messages
8,530
Reaction score
18,611
I guess he could machine that taper into the soft jaws and then not worry about buggering up the outside edges.. I honestly think if he presses it back to the face of the chuck and grabs it, the buggering will be minimal.. Just be gentle with the boring bar and you're good.. Or put the side that needs to be bored towards the chuck and reach for it so long as the throat diameter is larger Than the bore size.

I wouldn't worry about it, but I run a 6 jaw buck chuck so it isn't as bad as a 3 jaw or 4..

RD
6 Jaw is in his future ;)
 

Shlbyntro

Ultra Conservative
Joined
May 27, 2018
Messages
7,744
Reaction score
22,577
He machines crazy cool stuff everyday and doesnt think to much about it , this is different BC its somebody elses he says without some some soft jaws he was concerned about buggering up the outside of the pullies , He's back machining impellers till he decides how to approach it ... Thanks for the input :cool:

PS He's got material coming for soft jaws to protect the ribs

the silver hub won't be visible once the pulley is mounted to the alternator. If there were some shallow teeth marks in it nobody would ever be able to see them once I have it on the truck.
 

Shlbyntro

Ultra Conservative
Joined
May 27, 2018
Messages
7,744
Reaction score
22,577
I'm not proud of this. well actually I am, what I mean to say is I don't want to admit how much time I spent on this. all for a hanger for a single 1.5" boost gauge. They don't appear to exist so I had to make it.

Started with slicing and dicing a 2" gauge hanger.
20240122_092322.jpg


Then pie cut the edges and continued to cut pieces out of the bottom until it conformed around the cute smaller gauge.
20240122_121529.jpg


Then I welded the end shut. I tried to weld up everything but the steel is so thin I immediately started blasting holes in it on my lowest power setting. So I soldered in the gaps instead.
20240122_130525.jpg


Then sanded smoothish
20240122_132609.jpg


Then a light skim coat of filler since with solder you have to leave some material there for strength/bonding
20240122_155425.jpg


Then sanded, primed, painted.
20240122_160928.jpg
20240122_165337.jpg
20240123_090611.jpg


And the final product. All to have a little, baby, discrete boost gauge under the dash.
20240123_143106.jpg
 

Flatsix66

Well-Known Member
Joined
Mar 20, 2017
Messages
1,861
Reaction score
4,359
I'm not proud of this. well actually I am, what I mean to say is I don't want to admit how much time I spent on this. all for a hanger for a single 1.5" boost gauge. They don't appear to exist so I had to make it.

Started with slicing and dicing a 2" gauge hanger. View attachment 1325645

Then pie cut the edges and continued to cut pieces out of the bottom until it conformed around the cute smaller gauge.
View attachment 1325646

Then I welded the end shut. I tried to weld up everything but the steel is so thin I immediately started blasting holes in it on my lowest power setting. So I soldered in the gaps instead.
View attachment 1325647

Then sanded smoothish
View attachment 1325648

Then a light skim coat of filler since with solder you have to leave some material there for strength/bonding View attachment 1325649

Then sanded, primed, painted. View attachment 1325650 View attachment 1325651 View attachment 1325652

And the final product. All to have a little, baby, discrete boost gauge under the dash. View attachment 1325653
That picture series was painful to watch. Turned out nice though. 👍
 

ltbaney1

Well-Known Member
Joined
Oct 10, 2012
Messages
3,186
Reaction score
6,103
I'm not proud of this. well actually I am, what I mean to say is I don't want to admit how much time I spent on this. all for a hanger for a single 1.5" boost gauge. They don't appear to exist so I had to make it.

Started with slicing and dicing a 2" gauge hanger. View attachment 1325645

Then pie cut the edges and continued to cut pieces out of the bottom until it conformed around the cute smaller gauge.
View attachment 1325646

Then I welded the end shut. I tried to weld up everything but the steel is so thin I immediately started blasting holes in it on my lowest power setting. So I soldered in the gaps instead.
View attachment 1325647

Then sanded smoothish
View attachment 1325648

Then a light skim coat of filler since with solder you have to leave some material there for strength/bonding View attachment 1325649

Then sanded, primed, painted. View attachment 1325650 View attachment 1325651 View attachment 1325652

And the final product. All to have a little, baby, discrete boost gauge under the dash. View attachment 1325653
that turned out awesome! putty and paint make a sinner a saint.
 

monkeyswrench

To The Rescue!
Joined
Sep 7, 2018
Messages
29,112
Reaction score
82,714
@Shlbyntro , I've run into the same kind of issues. What I've done is make a template the outside shape out of plywood or my favorite, nylon cutting board, radius the edge. Drill a 1/4" hole center of where the will be, and bolt on a piece of 20g about a 1/2" oversize. Use the bolt to hold the parts in a vice, and smack the perimeter to form the metal over the radius. Hammer and block of wood, or cutting board piece with a radius works well.

The hole to hold them together becomes a pilot hole for a hole saw. Either you can make the top longer to drill mounting holes, or weld tabs. Loads of fun!
 

Shlbyntro

Ultra Conservative
Joined
May 27, 2018
Messages
7,744
Reaction score
22,577
@Shlbyntro , I've run into the same kind of issues. What I've done is make a template the outside shape out of plywood or my favorite, nylon cutting board, radius the edge. Drill a 1/4" hole center of where the will be, and bolt on a piece of 20g about a 1/2" oversize. Use the bolt to hold the parts in a vice, and smack the perimeter to form the metal over the radius. Hammer and block of wood, or cutting board piece with a radius works well.

The hole to hold them together becomes a pilot hole for a hole saw. Either you can make the top longer to drill mounting holes, or weld tabs. Loads of fun!

sounds equally time consuming 😅

definitely worth while if needing to make more than one
 
Last edited:

monkeyswrench

To The Rescue!
Joined
Sep 7, 2018
Messages
29,112
Reaction score
82,714
sounds equally time consuming 😅

definitely worth while if needing to make more than one
I've done kind of the same for exhaust exits on car bodies. Beat them over a half-assed buck so they would be symmetrical. In the boat world, not a lot of hand formed metal. Shaping stainless will make you cuss...and make expensive scrap :oops:
 

RiverDave

In it to win it
Joined
Sep 13, 2007
Messages
126,180
Reaction score
164,376
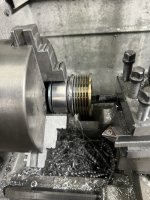
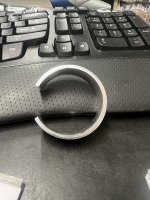
He made a "band" from aluminum shim stock to protect the serp belt grooves and to grip it and even then it was tough to "drill" so he finished it with a small boring bar

So he made a kind of collar and then band sawed it in 1/2 or something?

RD
 

Bigbore500r

Well-Known Member
Joined
Apr 28, 2014
Messages
18,180
Reaction score
38,051
This could have been making boost.....exploded.....rebuilt.....and making boost again if ya'll weren't so fancy
 

Shlbyntro

Ultra Conservative
Joined
May 27, 2018
Messages
7,744
Reaction score
22,577
Theres only one other way and I'm not giving up my air conditioning. This is Texas!
 
Last edited:
Top