WELCOME TO RIVER DAVES PLACE

Monkeys with wrenches, Chickens with electricity, and other things that don’t make sense-A day in the life of an off-grid solar installer

The Chicken

off-grid solar installer
Joined
Jan 5, 2016
Messages
189
Reaction score
1,692
A week or so ago, we finally got to see a lightning system in action at night we designed for a local ranchers pond cabin.
I feel like the down wash lighting on the outside turned out pretty good.
Thought you guys would enjoy it.
IMG_6628.jpeg


IMG_6631.jpeg


IMG_6636.jpeg


IMG_6637.jpeg
 

The Chicken

off-grid solar installer
Joined
Jan 5, 2016
Messages
189
Reaction score
1,692
This past week had us waiting on some paperwork and funding for the next round of work, as well as waiting on some job materials that we’d ordered to show up.
The delay in our work schedule actually comes at a perfect time, as October has traditionally been the month Denise and I take off with my sister and her husband for our annual camping trip. We’ve missed a number of years recently, so we were happy to make this trip-and we needed a few days off too!
First, the Mud Taxi was in dire need of some attention, so I had a couple days worth of work to do on it. I finally finished the windshield washer project that @monkeyswrench and I have been working to put together over the last month or so. And it came in handy on this trip for sure! I’ll have to do a follow up post on that.
Another item that really needed attention was the mud taxi’s auxiliary fuel tank that resides between the frame rails under the floor. Because the explorer gets such terrible fuel mileage, and comes with a fairly small factory gas tank, years ago we had found a spot on the vehicle to install a custom built gas tank that holds about 8 gallons. It is perfect for extending the vehicles range when exploring Far off places that are nowhere near gas stations.
This gas tank needed a new gasket installed on the filler cap, as gasoline had completely destroyed the old rubber gasket. And-as I would soon find out the hard way, the fuelline from its fuel pump to the transfer port had gone completely rotten, making it less of a fuel line and more of a soaker hose.😬😬
Here’s what the auxiliary fuel tank looks like all put back together and it’s leaky fuel lines repaired.
IMG_6812.jpeg


IMG_6815.jpeg


The fuel pump that is dedicated to the auxiliary gas tank pumps fuel up to an AN port that is located next to the factory fuel filler behind the door. Here you can attach a short piece of hose to either fill another vehicle or put the hose in the factory, filler neck, and trans fill the vehicle.

IMG_6813.jpeg


After a bunch of maintenance and then packing the poor mud taxi over full of camping gear, it was ready to go and so were we. Unfortunately, the mud taxi is really geared toward traveling in the dirt and is no longer really well suited due to its age for extended freeway travel. So it has become a little bit of a trailer queen.
IMG_6818.jpeg


On this trip, we would also be taking one of our ranch dogs – Hulk-to go camping with us. Hulk is a girl dog and earned that name when she was born Green. That’s another story for another day, but it turns out that Hulk really likes to go camping and travels surprisingly well for a dog that is used to roaming free. She’s great company.
Hulk weighs in at nearly a hundred pounds, so I’m not really sure how it is that she fits in the tiny space allotted to her in the truck, and I really don’t understand how it is that she’s comfortable, but she seems comfortable and loves going with us and pouts whenever she doesn’t get to go. Seeing as I’m a big pushover when it comes to her, we take her whenever we can. 😄😄🤷‍♂️
IMG_5427.jpeg


And now, here are random pictures of our little adventure!

IMG_6822.jpeg


IMG_6829.jpeg


IMG_6828.jpeg


IMG_6840.jpeg


IMG_6843.jpeg


Here is a cool old cabin/tack shed/corral ruin site:

IMG_6852.jpeg


IMG_6844.jpeg


IMG_6848.jpeg


IMG_6854.jpeg


IMG_6859.jpeg


I’ve got some more pictures I’ll add later when I get a chance.
 

Cooter01

Well-Known Member
Joined
Apr 1, 2023
Messages
340
Reaction score
450
Looks like a great camping trip! I look forward to getting a rig like mud taxi for exploring, can be some cheap fun!
 

The Chicken

off-grid solar installer
Joined
Jan 5, 2016
Messages
189
Reaction score
1,692
Road Warrior meets Little House On The Prairie! That looks like a good area you found. Was that a spring, or water coming out of an old mine maybe?
It was a spring.
Had an old pipe stuck in it that looked like it might have once been used in conjunction with a little dam to gravity feed spring water to the cabin or shed or maybe even the corrals.
Pretty cool!
 

The Chicken

off-grid solar installer
Joined
Jan 5, 2016
Messages
189
Reaction score
1,692
Off road camping trip, continued.
First, let me show you what happens when I’ve had a couple beers, and I realize my lime has some funny bumps on it, and then me and my equally tipsy and even more artistic sister start running in the same groove. 😄😄
Here’s what most people would see.
IMG_6883.jpeg


We’ll, we saw this…

IMG_6885.jpeg


Which turned into this-

IMG_6886.jpeg

IMG_6890.jpeg


LOFL. The Limefish would spend the rest of the trip as a dashboard mascot. 😄😄
IMG_6897.jpeg

IMG_6907.jpeg
 

The Chicken

off-grid solar installer
Joined
Jan 5, 2016
Messages
189
Reaction score
1,692
And a few more trip pictures because I know some of you here like off roading and pretty places.

IMG_6872.jpeg


IMG_6900.jpeg


IMG_6903.jpeg


IMG_6902.jpeg


IMG_6905.jpeg

IMG_6906.jpeg

IMG_6918.jpeg

IMG_6925.jpeg


IMG_6928.jpeg

IMG_6935.jpeg

IMG_6933.jpeg


Here’s Hulk eating dinner with her name-matching green light up night time necklace. 😄😄
IMG_6937.jpeg


And finally, there’s one more cool thing I’d like to share about this trip.
Where we go, it’s up in the mountains at around 7,500’ elevation.
And in a number of places, it is very easy to find lots of fossils just laying around.
Here’s the interesting thing-these fossils are of prehistoric sea creatures that lived on the sea floor.
I’m no geologist, but the internet tells me these fossils are of sea scallops, sponges, tube worm-like creatures and fossilized impressions of primitive creatures’ burrows in the sea bed.
And they are somewhere between 250-500 million years old!
It’s hard to fathom that span of time, and just how much our planet has moved and changed over that period of time.
And it’s crazy to me to be holding the remnants of what was once a living creature that’s that old.
IMG_6949.jpeg


We found this long unused campfire ring.
Almost every single rock used to build the ring is a fossil.
I wonder if whoever built and used the ring had any idea that their camp fire was surrounded by the fossilized remains of creatures hundreds of millions of years old?
IMG_6936.jpeg
 

callbob

semi flaccid member
Joined
Jan 9, 2008
Messages
3,065
Reaction score
3,095
Those roof top tents seem to be really popular with the offroading crowd. I am afraid I might have a beer too many one night and get up to pee, (which at my age may be twice a night at least) and either forget I was that high up or trip on the ladder getting out. I think I'll stay with the motorhome and pull the jeep. Great pictures btw and looks like a great area.
 

The Chicken

off-grid solar installer
Joined
Jan 5, 2016
Messages
189
Reaction score
1,692
This week we are once again doing a lot of things that don’t look like off-grid solar installations. 😄😄🤷‍♂️
I have been buried in the office most of the week dealing with paperwork, estimates, and other such unavoidable evils.
I suspect that many of you here have the same problem I do-more and more, I have to do other peoples work for them, or stay on top of them constantly to make sure they are doing their jobs, or carefully double check their work for accuracy in ways I never used to have to do. I’m talking about vendors, service providers, sales people, etc. it’s downright frustrating and disappointing at how much time it sucks out of my week. And even more frustrating because I’m spending so much time doing other people work, I now struggle to do my own and as a result fall behind on my responsibilities to our customers.
I feel it bears mentioning here because I suspect a lot of us are fighting this same battle these last couple years.
Ugg.
Anyway, enough of that.
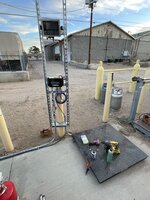
One thing we did do this week was something I used to do quite a bit of-propane reseller installation. We wrapped up a somewhat elaborate installation of an explosion proof scale at this particular reseller installation we started several months ago( the scale was added to the scope of work and took quite some time to show up at the job).
We had to build a little strut structure to mount the power supply and display, and do some more rigid conduit work to tie in the high voltage side of the scale.


IMG_6988.jpeg

The scale itself had rather poor connection diagrams and instructions and ended up being quite the time consuming installation.

After a long day of getting everything in place, connected and functioning-combined with the headaches a defective shunt-trip breaker caused us-we wrapped up the installation long after the sun went down as the moon was coming up

IMG_6989.jpeg


IMG_6991.jpeg
 

Attachments

  • IMG_6987.jpeg
    IMG_6987.jpeg
    2.1 MB · Views: 0

The Chicken

off-grid solar installer
Joined
Jan 5, 2016
Messages
189
Reaction score
1,692
A few days ago, we managed to squeeze in an installation of a custom off grid home’s main and sub panels for one of our customers who have been building their dream home.
We installed the solar power system a couple years back, and now the house is finally complete enough to get wired.
The night before, we spent a couple hours unloading and loading the truck and double checking all the parts to make sure we had everything to get the job done on board.
As the sun was setting, we completed preparing everything and decided we had earned a drink. It’s that time of year again where the sunsets are often beautiful.
IMG_7057.jpeg

We left our shop long before the sun was even thinking about coming up and made the first leg of the trip eastward to the Prescott area in the dark.
About halfway there, the sky started changing colors and it was a beautiful morning.
Shaky picture Denise took ( hey-we were in a vehicle that’s literally called a “Freightshaker”-what do you expect?!😄😄) but it’s still pretty.
IMG_5739.jpeg


We got to the job site just after sunup. It was a clear, cold morning at about 36 degrees.
IMG_7058.jpeg


While it was still cold out, we set the 200A sub panel in the house that was nice and warm.
IMG_7059.jpeg


Then we went outside to hang the main panel, where we got an unpleasant suprise-the cold clear morning had changed into a hot still day with temperatures to almost 90 degrees and an intense sun. 😬 Typical Arizona high desert. 😄😄
Once the panels were set, it was time to unload the big spool of wire and the tugger, both of which are too heavy to move by hand , so the crane was put into action.
IMG_7093.jpeg


Yes, that’s a pirate chicken flag you see on the crane. 🏴‍☠️ 😄😄🤷‍♂️
IMG_7060.jpeg


Here’s the main panel all made up, with a 225a rated lug in kit that feeds the sub panel.
IMG_7096.jpeg


Here’s Denise adding a circuit for a GFI outlet just under the panel.
Yes, she’s really that short.
And yes, that panel is really that high. 😄 The guy that was supposed to do the grading around the house flaked on the homeowner, and the dirt is currently about 8-10” low here. ( Coincidentally, we will be dragging our skid steer right by here in a couple weeks. 🤔🤔)
IMG_7097.jpeg


Here is the makeup in the 400A panel that feeds the house and other buildings on the property.
Yes, you can have a 400A service for your totally off-grid property.
This panel wasn’t supposed to have a meter socket, but we installed it at the height of COVID and this was the only panel I could find-and I had to go to ridiculously great lengths to even get this one. 🙄
IMG_7099.jpeg


We finally wrapped up the job after sunset and snapped a picture as we were getting ready to leave. By the time we got home some two hours later in the dark, it had been a pretty long 14 hour day. But everything was powered up and the homeowner is happy because she now has some power outlets in the house to use for construction!
IMG_7102.jpeg
 

RichL

Well-Known Member
Joined
Jan 14, 2017
Messages
3,090
Reaction score
3,241
Curious why the subpanel is set so high vertically or if that's just a camera thing?
 

rightytighty

Well-Known Member
Joined
Dec 20, 2007
Messages
820
Reaction score
1,930
Would you be willing to recommend a good supplier/brand for a ground mount system and another for the panels? I'm going to retire next year and would like to add a 12KW system at our place. I will hire an electrician for the panel/permit and tie in, but I can handle the ground mount install and panel install and get the wire to a junction box. I don't need seasonal tracking etc. Just wanna set it and forget it, but have easy access for cleaning and panel replacement etc.

Wish I was in your area. :(
 

The Chicken

off-grid solar installer
Joined
Jan 5, 2016
Messages
189
Reaction score
1,692
Curious why the subpanel is set so high vertically or if that's just a camera thing?
The subpanel in the house DOES appear really high, LOL.
I think it might be a combination of camera angle, and the fact that Denise is 4’-12” tall. 😄😄
I usually set the main breaker around 5’-6” to -6’ above finished floor or above grade. Code dictates that it can’t be above 6’-7”.
This one’s just under 6’. I’m 5’-11”, and I hate working on panels that are set low, so I get to pick ( to a certain extent) what height the panel is set at. Also, these customers are taller as well, so this height should be comfortable for them to live with.
 

The Chicken

off-grid solar installer
Joined
Jan 5, 2016
Messages
189
Reaction score
1,692
Would you be willing to recommend a good supplier/brand for a ground mount system and another for the panels? I'm going to retire next year and would like to add a 12KW system at our place. I will hire an electrician for the panel/permit and tie in, but I can handle the ground mount install and panel install and get the wire to a junction box. I don't need seasonal tracking etc. Just wanna set it and forget it, but have easy access for cleaning and panel replacement etc.

Wish I was in your area. :(
I’m a big fan of Northern Arizona Solar for system components including ground mounts. They are great to deal with, have a knowledgeable staff to make sure you get the right parts, and only carry quality components/brands. No junk. They ship world wide and have been in this game since the ‘70’s.
Tamarack makes solid, quality ground mounts with their sturdy 3.1 rail system.
I’m currently happy with Sunmodo ground mounts as a very cost competitive ground mount/rail mount solution that includes EVERYTHING you need to install.
Speaking of everything-keep in mind many ground mount systems require you to locally source schedule 40 pipe to complete the structure, and that is a significant additional cost, so be aware when price shopping.
 

The Chicken

off-grid solar installer
Joined
Jan 5, 2016
Messages
189
Reaction score
1,692
It’s been a crazy busy time lately.
Which is actually normal.
Last week, we did a project that has been 5 years in the making.
When @wash11 and Amy got their house, one of the things that really needed upgraded was their kitchen lighting. It consisted of two tiny 40 watt can lights and was dark as a cave and terrible.
We were going to do a full lightning makeover-but then life, budget, and later Covid got in the way, and for one reason or another, it just never happened.
Boy, was I tired of trying to pour drinks in the dark!😄😄
Finally a couple of weeks ago, after getting tired listening to me bitch and using Joel’s crappy lighting as an excuse for my even crappier cocktail pouring skills, he finally said “Fine. What will it take to fix the lighting?”
I simply said”Just turn us loose and stand back.”
And that was that.
It’s a testament to our relationship that he didn’t ask any more questions, and just turned the whole thing over to us and trusted our judgment to make it all good.
Here’s what it was. Two little lights, and a skylight that actually works good when it’s sunny-but for some reason goes really dark once the sun goes down. 😄😄🤷‍♂️
IMG_7111.jpeg


Knowing we were about to make a truly epic mess between drywall dust and blown in insulation, we put on some protection. 😄😄
IMG_7112.jpeg


About 2 hours of layout work and double checking measurements resulted in a lot of blue tape on the ceiling to help us visualize the lighting layout before we started making holes.
IMG_7114.jpeg


We have some handy tools for helping to figure this out.
IMG_7113.jpeg


After as much double checking as possible, we broke out the hole saws and proceeded to wreck havoc on Joel’s ceiling. 😄🙄
IMG_7121.jpeg


Here’s Denise fishing around in insulation for the wire and glow rod I’m sending her way from another hole. She really enjoys this part. 😄😄
IMG_7125.jpeg


Here we both are elbow deep in Joel’s ceiling. 😄😄
IMG_7129.jpeg


The mess is hard to comprehend if you can’t see it in person, but here’s an idea of what it looks like. 😬
IMG_7130.jpeg


The above picture just doesn’t do justice to how big a mess opening up a blown insulation ceiling and then fishing wires around actually makes.
I don’t care what you do, shit just gets everywhere. It’s just a disaster.
And it was right at this point that Joel and Amy, who had been out on meat deliveries, came home after a long day on the road to find their kitchen destroyed.
They took one look at the mess, shook their heads, and excused themselves to their bedroom and closed the door. 😄😄
An hour or so later, we had all the wires fished, the fixtures installed, and then began the cleanup effort.
Most of the mess rolls up in the plastic we covered everything in, but inevitably there’s a lot of stuff that needs swept, vacuumed, mopped and dusted.
The concept we had for the new lighting setup was a two pronged approach. We wanted really bright lights with good color rendering for kitchen task lighting, but we also wanted some softer lighting for times when the harsher task lighting is just over powering-mood lighting, if you will.
I’m a big believer in installing more lights than you might think necessary to minimize shadows and give you the ability to have maximum light output, and putting those lights on a dimmer so the light can be fine tuned to fit the occasion. To that end, we set 8 can lights set at 4000K for a near-daylight lighting effect, with a Lutron dimmer to set the lights anywhere from “Holy shit that’s bright!”, to “It’s midnight and I need to sneak a snack. “
For the mood light, we chose to hang three small minimalist pendants with amber coated LED Edison bulbs at a soft and warm color temperature of 2100K. It was important to have small fixtures here, so as not to overwhelm the small space and ceiling that isn’t really that high, yet provide inviting warm light to the kitchen and living room spaces. These fixtures are also controlled by a Lutron dimmer, and as the bulbs can be tuned from surprisingly bright to barely lit, they are capable of being dialed in to suit just about any mood. I personally really love how these turned out and how they look and work.
Anyway, without further ado-here’s how it all turned out.
IMG_7132.jpeg


IMG_0081.jpeg


IMG_0080.jpeg


IMG_0082.jpeg


We got this done just ahead of some drywall repairs and painting that’s about to happen, so that’s when the hole left by the original little can light ( currently covered in blue tape to keep the insulation in) will be filled back in.
And there you have it-another day in the life of an off-grid solar installer that has nothing to do with off-grid solar!😄😄
Well, that’s not quite fair-this house is off-grid solar powered, so that counts, right?
 

The Chicken

off-grid solar installer
Joined
Jan 5, 2016
Messages
189
Reaction score
1,692
Last week, we headed back up to the camp on Mingus Mountain for another week of work.
We had loaded up both trucks for the run up the hill the day before, and in the pre dawn hours, we fired both trucks up and hit the road.


IMG_7146.jpeg


The sunrise found us on the last portion of our trip east on I-40 before we turned south on the 89.
IMG_5805.jpeg


My first task was to tear into a part of the camps old electrical system that I had mentioned before To really assess how to make it better, safer, and something that at least resembles code compliance. It’s a doozy.
IMG_7149.jpeg


IMG_7150.jpeg


IMG_7153.jpeg


IMG_7158.jpeg


IMG_7159.jpeg


Once I spent a day tearing this mess and more apart and mapping it all out, I built a plan and parts list to remedy it, and sent the parts list off to be filled by our wholesale house.

Then it was on to the next task-removing some old outdated solar panels off of the roof of one of the buildings
IMG_7204.jpeg


As usual, there was some rather unpleasant looking wiring.
IMG_7205.jpeg


And some, uh, creative wiring. 🙄
IMG_7207.jpeg


I doubt this roof jack ever really sealed well. 🙄
IMG_7212.jpeg


Once that mess was removed, it was on to the next task.
And with that we were back in the lighting retrofit business, as the lower camp need a bunch of lighting repairs and upgrades.
Here’s one of about ten little cabins we did.
Before:
IMG_7190.jpeg


After complete swaps to new LED fixtures:
IMG_7194.jpeg


Then there was this gem that lights their amphitheater/fire pit area:
IMG_7222.jpeg


IMG_7225.jpeg


We got rid of the indoor rated junction boxes and fittings and replaced the little worn out fixtures with something way better.
IMG_7228.jpeg


These work great and really light up this pretty spot.
IMG_7230.jpeg


IMG_7232.jpeg


IMG_7240.jpeg


Then there were these ball field lights.
IMG_7244.jpeg


There was a lot to not like here, the least of which were all the angry hornets that were unhappy with their winter slumber spot being destroyed and their being awakened. 😬😬

After swatting and squashing hornets, we removed the indoor rated boxes and old metal halide fixtures and replaced them with hornet-proof outdoor boxes and fittings, and nice new LED fixtures. They work great!
IMG_7249.jpeg


And by that time, the long week was over, and late Friday afternoon we drug our tired asses home for a little rest.
 

mjc

Retired Neighbor
Joined
Jan 3, 2008
Messages
12,337
Reaction score
9,867
@The Chicken , what kind of fresh hell is this? In roofing, mechanical stuff was called a "spaghetti farm"...stuff with ac ducts, or the dreaded laundromat buildings. This though? This is something out of TJ or the Philippines :oops: That one small roof deck has 5 or so power heads coming out of it!
But nobody died. Maybe.
 

The Chicken

off-grid solar installer
Joined
Jan 5, 2016
Messages
189
Reaction score
1,692
@The Chicken , what kind of fresh hell is this? In roofing, mechanical stuff was called a "spaghetti farm"...stuff with ac ducts, or the dreaded laundromat buildings. This though? This is something out of TJ or the Philippines :oops: That one small roof deck has 5 or so power heads coming out of it!
Yeah, this one’s, uh,cute. 🙄
It’s the proverbial onion-we just keep peeling and crying. 😄😄😬
 

The Chicken

off-grid solar installer
Joined
Jan 5, 2016
Messages
189
Reaction score
1,692
The very fact that this camp, with quite possibly every wrong wiring method conceivable hasn't burned to the ground 🔥, or filled a graveyard with innocent youth ☠️, is proof positive, the NEC simply isn't necessary. 🤷‍♂️ Codes, we don't need no stinkin codes 👎
To be fair, this section of the camp is the original buildings dating back to the 50’s.
It was built in the middle of nowhere, with largely donated parts , donated time, and volunteers who ment well. 🤷‍♂️
It doesn’t make it right, but it gives you perspective.
I’m pretty sure whoever laid out the wiring must have been an old farm boy” Ground, neutral, same thing-whatever!” 🥶😄😬
And there will be more on that to come.
 

monkeyswrench

To The Rescue!
Joined
Sep 7, 2018
Messages
29,567
Reaction score
84,499
Ground and neutral aren't the same :oops:

Well now, that explains some things🤣
 

DLC

Well-Known Member
Joined
Jan 18, 2013
Messages
11,071
Reaction score
16,726
And from the looks of it, some nice equipment. How about a shop tour?


I’m only in Page 4 ..

Shop tour
Property tour
I saw a hot tub in one of the pics….

Thinking B&B during summer for a quick get away….. trailer - rentals !

LoL

How about a little life summary…..

How did you get where you are?


Absolutely ! Loving the thread !

Jack of all trades to get by !

Much O Gracious !!

I’d like to buy a beer or 3 !!
 

Taboma

Well-Known Member
Joined
Apr 4, 2008
Messages
15,606
Reaction score
22,524
To be fair, this section of the camp is the original buildings dating back to the 50’s.
It was built in the middle of nowhere, with largely donated parts , donated time, and volunteers who ment well. 🤷‍♂️
It doesn’t make it right, but it gives you perspective.
I’m pretty sure whoever laid out the wiring must have been an old farm boy” Ground, neutral, same thing-whatever!” 🥶😄😬
And there will be more on that to come.
I've always found that the conflict of emotions that results from these types of electrical restoration projects is directly proportional to the owner's budget and expectations.
Hopefully in this case, those will be in agreement with a result that you can leave feeling good about and not haunted by the possibility of future litigation. 🤞
 

The Chicken

off-grid solar installer
Joined
Jan 5, 2016
Messages
189
Reaction score
1,692
I've always found that the conflict of emotions that results from these types of electrical restoration projects is directly proportional to the owner's budget and expectations.
Hopefully in this case, those will be in agreement with a result that you can leave feeling good about and not haunted by the possibility of future litigation. 🤞
Very well said, indeed.
 

The Chicken

off-grid solar installer
Joined
Jan 5, 2016
Messages
189
Reaction score
1,692
This is it.
We have pretty much reached the end of our adventure at the camp up on Mingus mountain.
This will be our final week of work there. Things are starting to freeze over up there, their budget is used up, and we have other responsibilities calling us.
And what a week it promises to be. We are up against it-the push is on to get this last phase of work completed and get our gear off the mountain. And it will be a push! There’s tons of work we need to complete: demo out a large portion of questionable electrical panels and wiring, replace it with new gear installed correctly, add another sub panel and feeder conduit/wiring, patch together a double handful of messed up branch circuits, complete some more lighting renovations, and add a piece of restaurant equipment. Good thing we’ve got a large crew of two of us!😄😄😬
Our first hurdle of the week: we got word late last week that the forest service is closing the only access road in to this place every day this week from 7am to 7pm. So not only do we need to get here extra early-we’re basically locked in once we get here, and if we need to make some sort of emergency parts run-not happening. Great.
The good news was we would have the entire place to ourselves the whole week, so there would be no interruptions.
So once again, our Sunday was largely spent loading up the service truck and getting the equipment trailer ready to retrieve our skiddy and Joel’s favorite scissor lift.
IMG_7278.jpeg


Monday morning, 2:55am: the alarm went off disappointingly early. We had one hour to get up, wake up, load up our last minute food items, and hit the road in order to beat the road closure.
Denise and I stumbled around grumping and bitching about lack of sleep, how dark and cold it was, and wondering why the fuck we have not won the lottery yet. Somehow, we got out shit together and got out of the yard right on schedule.
We stopped at the end of the dirt road for one last vehicle and load check.
IMG_7279.jpeg


Nothing had rattled loose from the Freightshaker, so we strapped in and pointed the ol girl at the I40 and headed East.
I rowed the 10 speed through the gears, dumped it into overdrive, and let the miles unroll behind us in the cold darkness of the early morning.
We stopped briefly for fuel, then headed south and finally began the steep climb up the mountain with a faint tinge of color finally starting to paint the sky ahead of us. We reached Camp at what I’d call first shooting light, unloaded our food and gear, and then dove right into the week’s adventures.
Our first task was changing out a bunch of light fixtures in the bath houses, and that fought us every step of the way with wiring issues that needed fixing before the new fixtures could be installed, awkward light locations, and just general fuckery. It took us an agonizing half a day to R&R 8 fixtures. 😬🙄 I hated all of it so much, I didn’t even take a single picture. 😄😄
Then we moved our whole operation to another section of camp to completely rewire a little bbq gazebo.
We had some company for this.
IMG_7283.jpeg


IMG_7286.jpeg


They seemed completely unaware that thanksgiving was just around the corner and they were maybe in danger. 😄😬
Here’s the little gazebo once we were done with it.
75245893763__622DC620-2400-4E1E-BB5D-5C0F2B826A33.jpeg

IMG_5933.jpeg


By the time we wrapped that up, it was 6:30 at night and we were beat. We retreated to the trailer for a much needed beverage and some sleep.
IMG_5918.jpeg


While Monday was a success, the truth is those two tasks were actually supposed to have been completed last week, and despite our efforts, we were starting the week already a day behind.
The next several days are going to be a grind.
 
Last edited:

The Chicken

off-grid solar installer
Joined
Jan 5, 2016
Messages
189
Reaction score
1,692
Tuesday morning it was time to finally tackle the snake pit of wiring and subpanels that infested the camp’s original generator shack, which had ceased to house a generator decades ago and had become a storage shed and home to an electrical nightmare. The plan we came up with was to delete all the hodge-podge subpanels, remove as much as the poor wiring and overhead circuit drops as possible, and replace all that with a new bigger subpanel on that shack, and add a new large sub panel to the adjacent building. Seeing as a lot of the overhead drops were actually branch circuits from one building to another ( yikes!) this second new panel would now handle branch circuits duties for that structure.
You’ve seen a few pictures of this before. Here’s how it looked just before we began the removal process.
IMG_7289.jpeg


IMG_7290.jpeg

The more you look, the more entertaining it gets. 😬
Here’s the creative free air feeders to the first of 4 sub panels crammed in there. 🙄
IMG_7291.jpeg


Seems legit. 🤷‍♂️
IMG_7292.jpeg


Those yellow Romex cables actually feed circuits from their panel of origin and through this panel, again with no cable connections, and with the worst wiring termination devices yet invented installed as a bonus. And icing on the cake is the use of very wrong wire colors here and there. 🙄
IMG_7293.jpeg


IMG_7294.jpeg


As if all that wasn’t entertaining enough, when I disconnected one of these circuits from their power source, I got a nasty surprise-sparking wires! AC voltage present between a ground and neutral. Not really surprising considering, but always unpleasant to deal with.
IMG_7295.jpeg


Found this cute razor blade damaged UF cable conductor. It had somehow never faulted out after decades of being in an over stuffed panel. Kinda amazing.
IMG_7296.jpeg


Some more creative free air feeders from one panel to another. Don’t worry Boss, we used supports on those wires so it’s ok!😄😄🙄
IMG_7297.jpeg


The roof got even more entertaining once I got up on it. I’ll just let the pictures do the talking.
IMG_7298.jpeg


IMG_7299.jpeg


IMG_7300.jpeg


We had this mess pretty much removed by lunch.
Then came the challenge of putting Humpty back together again.
Hanging gear on rough rock walls is a challenge that requires some patience, skill, and creativity. And you have to be willing to overlook things that aren’t perfectly plumb or level.
After spending some time with a single jack, chisel, and an SDS drill, I was able to tune up the rock faces enough to get a reasonably good mounting surface for the new panel and junction box. There was nothing I could do for the previously poorly installed PVC sweep, I just had to live with its crookedness and shallow install depth. 🤷‍♂️
All-in-all, I think it came out pretty darn good.
IMG_7302.jpeg


By the time we spliced and landed the feeders, and pulled in and landed all the branch circuits, it was after 6 pm and pretty dark. Everything re-energized without issues, and that put about a quarter of the lower section of camp back in business.
IMG_7303.jpeg


Oh yeah-the mess from inside has been replaced with something I think looks and performs much better.
IMG_7304.jpeg


It had been another long day, but we managed to get done what needed to be accomplished, and that felt good. Hopefully we can keep up the pace, momentum, and progress in the coming days.
 

The Chicken

off-grid solar installer
Joined
Jan 5, 2016
Messages
189
Reaction score
1,692
Wednesday morning greeted us with a dusting of snow, reminding us that we needed to keep up the pace and GTFO before it was too late.
For some reason I woke up at about 12:30 after only about 3 hours of sleep, and even though I was super tired, I just couldn’t get back to sleep.
By the time we headed out of the trailer to work I was already exhausted and feeling the burn and I knew I was in for a long and uncomfortable day.
But the clock was ticking and the push was on, and I did my best to soldier on and be quick and productive.
Burning the candle at both ends and grinding it out was way easier when I was younger. I swear I’m too old for that shit now-it hurts. 😄😄🤷‍♂️
The temperature was a few degrees warmer than the last few days at 25 degrees -but a persistent wind made it feel 20 degrees colder and just sucked the warmth out of us. We are definitely NOT cold weather people. 😄😄
We started the day by trying to get our PVC pipe and glue warm enough to use with a propane heater. Once it was useable, Denise began building the last section of underground conduit.
IMG_7313.jpeg


I started my day having issues getting stuff to bolt up properly because apparently just because you buy 90 degree brackets, doesn’t mean they are actually 90 degrees. Shit like this really chaps my hide because it makes my job so much more difficult for no good reason. 🙄
IMG_7311.jpeg


Then I had to undo some more mess on the other buildings roof while Denise prepped things on the ground and took care of some loose ends.
IMG_7315.jpeg


IMG_7316.jpeg


IMG_7317.jpeg


I didn’t know this, but if you use enough caulk on an indoor box, it makes it an outdoor box!😄😄🌮
IMG_7320.jpeg


Here’s some stuff some old timers might recognize-old tube and knob wiring. Cool, but sketchy. We will leave as much as we can for decorative purposes, and because I think it looks cool in old buildings-but the stuff’s pretty much a time bomb.
IMG_7318.jpeg


IMG_7322.jpeg


IMG_7319.jpeg


IMG_7327.jpeg


I had to get in the attic to investigate where some of the old cloth covered wiring led to so I’d know how to delete it, and discovered more fuckery in some junction boxes.
IMG_7324.jpeg


After that, we worked late into the evening getting new feeder conduit hung, and a new panel mounted.
IMG_7330.jpeg


IMG_5959.jpeg


IMG_7331.jpeg


IMG_5963.jpeg


And with that, the day’s a wrap.
I’m going to see about dinner and catching up on sleep, and hopefully kick ass tomorrow!
 
Last edited:

callbob

semi flaccid member
Joined
Jan 9, 2008
Messages
3,065
Reaction score
3,095
wow just wow. I get tired and worn out just watching this thread. Amazing work sir and ma’am
 

The Chicken

off-grid solar installer
Joined
Jan 5, 2016
Messages
189
Reaction score
1,692
Thursday morning was crisp and cold, but thankfully the wind had died down.
We started by pulling in about a hundred feet of 4/0 aluminum feeders in three different pulls.
All done totally by hand, all in awkward and difficult to pull in locations.
But before we could even do those wire pulls, we had to thaw out our frozen water based wire pulling lube. 🥶🥶😄😬
IMG_7335.jpeg

Then we cut some holes in the building and pulled in about 100’ of 1/0 SER cable through an attic, which is no fun, and reminded me I’m getting too old for attic crawls. 😄😄
Then most of the rest of the day was spent splicing 4/0 feeders in their junction boxes and landing them in the panel.
The SER cable ( big grey cable coming out the top center of this panel) feeds this pre-existing sub panel, which needed a ground buss replacement, bond removal, and some other massaging before we could hook it back up.
IMG_7336.jpeg


The pile of electrical trash from the junk we have removed has gotten pretty impressive.
IMG_5979.jpeg


I spent a good deal of time up on a ladder installing another conduit run for branch circuits.
Working overhead and upside down on ceilings has got to be one of the most taxing jobs in this trade. 🙄
IMG_5980.jpeg


Sorry you have to look at me from my best side there. 😄😄
By the time six pm rolled around, all the big wire was landed, the panels were all heated up, and most of the big tasks were completed.
The punch list is getting pleasantly small with basically just fixing up all the remaining branch circuits now-but that’s a full day’s work if it all goes well, and tomorrow is our last day.
Will we manage to punch this through and load up our crap Saturday morning, or will we stumble on the last day?
Tomorrow we find out if we’re heros or zeros. 😄😄😬😬
 

The Chicken

off-grid solar installer
Joined
Jan 5, 2016
Messages
189
Reaction score
1,692
Friday was a flat out race to the finish line.
Did we make it?
Well, pretty much-there is one 10’ run of conduit with wiring we need to do still, and that’s it.
Seeing as Saturday is clean up and load up day, we will address that real quick first thing in the morning and I’ll call it a win. 😄😄🤷‍♂️
The day wasn’t without its challenges beyond just the killing pace and hours.
Up in the attic, where I had to make some splices to put everything back together again-but wanted to touch as little existing electrical as possible because I just know anything I open up will need attention, the two j boxes I did have to open didn’t disappoint. 🙄
This old cloth covered cable, with its wires just sorta wrapped around each other and taped together with no other wire termination device had to go. It’s amazing these didn’t come loose and burn.
IMG_7349.jpeg


Nice loose wire nuts with a neutral conductor barely connected in this box. 😬
IMG_7348.jpeg


Here’s Denise prepping for a wire pull for a bunch of branch circuits. 😍
IMG_7353.jpeg


The dining hall where we were doing most of the last of the work pretty much looks like a bomb of electrical parts and tools went off inside. 😄😄
IMG_7355.jpeg


The camp director showed up for the first time all week, looked at what was going on, and said” I’ll leave you guys alone. “ 😄😄 Thank you!
IMG_7354.jpeg


I didn’t really have time to take many pictures, but here are a few I got throughout the day of stuff as it was coming together.
IMG_7359.jpeg

IMG_7350.jpeg

IMG_7351.jpeg


There was more-much more-going on that I didn’t have time to take pictures of. Let’s just say that we were extremely busy running around patching things back together, fixing issues, and generally wrapping up.
At the last hour, a totally unexpected issue caused us about an hour’s delay, which is why that last conduit didn’t get done. We finally energized that little bbq gazebo to test its outlet and lights, and noticed a problem with the wiring. We connected our wiring to the existing marked overhead wiring, and the wiring we demoed matched as well. Turns out that this thing has had its hot and neutral reversed since it was built apparently. 😬😬😬
So we had to do some remedy work there. But once that was fixed, we finally got to see it all lit up!
Here it is with the ambiance lighting Edison bulbs in jelly jar fixtures.
IMG_6002.jpeg


And we had also installed little flood lights for task lighting for their portable cooking equipment.
IMG_7361.jpeg


We finally got to see those ball field lights in action at night-they’re bright!👍☀️☀️
IMG_7364.jpeg


Once the power was restored to the dining room, that got all lit up and tested too.
IMG_7366.jpeg

IMG_7365.jpeg


Then we discovered this really cool wooden 4-H sign on the chimney is actually back lit!
It looks so cool!
IMG_7367.jpeg

And by then it was well after 7 pm and time to quit and clean up!
IMG_6005.jpeg


Once we finally made it back to the trailer, it was time for celebratory shots of a job well done!
IMG_7370.jpeg


It’s Saturday morning as I write this, and now it’s time to go out and get this whole mess loaded up and on the road because the next job is waiting for us.
 

monkeyswrench

To The Rescue!
Joined
Sep 7, 2018
Messages
29,567
Reaction score
84,499
Having been up to that camp, and seeing how remote and "old school" it really is, it is real neat to see it lit up and modernized. It also amazes me none of that burned :oops: If a fire started there, it could be hours before anyone could get there...and if a fire were to start, it would probably be when stuff was in use...with people there.

It had to be pretty chilly up there. When I got home it was 36 at around 8. Guessing it was probably knocking on the high 20's for you two🥶
 

The Chicken

off-grid solar installer
Joined
Jan 5, 2016
Messages
189
Reaction score
1,692
Saturday was clean up and load up and leave the job day.
The first order of business was that short conduit run/circuit install I mentioned. It was just one stick of conduit, although it was in a tricky spot and needed a couple 😄😄 bends in it.
IMG_7376.jpeg


Once that was installed, we pulled in the circuit, made the cord for its equipment, tested the equipment-which tested fine-and that was the completion of the job!
Then it was on to packing everything up, no small task. 😬
Here’s what the Freightshaker looked like in the early morning.
IMG_7373.jpeg


IMG_7374.jpeg


IMG_7375.jpeg


In addition to putting all that stuff away, there was LOADS of tools, hardware and parts that had to be removed from the buildings and put back on the truck.
This is our last look at the completed job as we left those buildings for the last time.
IMG_7379.jpeg


IMG_7384.jpeg


IMG_7392.jpeg


IMG_7393.jpeg


IMG_7394.jpeg


One funny thing about a well laid out and well installed electrical system-if you did it right, most of the system is pretty much invisible to all but a few people who are in the know about such things-usually other electricians. It’s sorta bitter sweet that what little you can see belies the mountain of work it took to install it. 🤷‍♂️

Once we got that truck loaded up and the buildings cleaned out, it was time to start the F-350 and hook it to our office trailer. The Ford wasn’t happy about the cold weather, it’s worn out glow plugs(😬😬) or the fact that it hadn’t been started in weeks. Enter the trusty Noco jump box.
IMG_7377.jpeg


While Denise handled getting the Ford connected to the trailer and getting that rig ready for travel, I had to connect to our equipment trailer with the Freightshaker and load up our lift and skiddy with all its buckets.
Around that time we got a much welcome visit from our friends, neighbors and RDP celebrities @wash11 and his wife Amy, who had made the trip to come check out what we’d been up too all this time, look at the beautiful camp, and help us get the last of everything loaded and off the mountain. I sincerely meant to get more pictures of their visit, and our departure, but I only got one crappy picture as we were halfway out the 7 miles of dirt road. I was so busy and behind schedule that there just wasn’t even a few seconds to take some fun pictures. And for us, load checking everything very carefully is serious business that I can’t have any distractions while doing when we are in our final load out phase.
Here’s our one exit picture.
IMG_7398.jpeg


Oops!😄😄🤷‍♂️

From here, we had intended to drop both trailers at the next job, but some last minute developments combined with how late it was getting had us change plans at the last second and we drug the whole convoy back to the shop for a couple days of unloading, maintenance, and reloading before cycling out to the next job in a few days.
We finally made it home Saturday evening around 7:30 pm. It had been a grueling long, but successful week. Everyone involved was super happy with what work we had gotten done for them, and that’s always a great feeling.
I think they were sad to see us finally leave.
Stay tuned, I don’t think we’ve seen the last of this place. 😊
 
Last edited:

Uncle Dave

Well-Known Member
Joined
Sep 7, 2008
Messages
9,847
Reaction score
10,974
Great write ups. Thanks really.

On the first project it looks like 3 Sol Ark 15's. I like everything about these on paper except the standby load. How have they been for you?
Is there a per panel scheme like solar edge implemented with these , or is it a big unified array under MPPT algo?

I'm an outback and enhpase guy myself but am intrigued by these, I've also played with a few victrons and midnight solar setups that were pretty sweet

That looked like at least a 24K genset.
From memory the individual input on each Sol Arks is like 19, how do you split this load when the system is under genset power, is there a battery bank in the first one?

Best sir!

UD
 
Last edited:

The Chicken

off-grid solar installer
Joined
Jan 5, 2016
Messages
189
Reaction score
1,692
Great write ups. Thanks really.

On the first project it looks like 3 Sol Ark 15's. I like everything about these on paper except the standby load. How have they been for you?
Is there a per panel scheme like solar edge implemented with these , or is it a big unified array under MPPT algo?

I'm an outback and enhpase guy myself but am intrigued by these, I've also played with a few victrons and midnight solar setups that were pretty sweet

That looked like at least a 24K genset.
From memory the individual input on each Sol Arks is like 19, how do you split this load when the system is under genset power, is there a battery bank in the first one?

Best sir!

UD
I believe the 15Ks were designed primarily with grid-tied applications in mind given their full 200 amp rated pass-through ability, but the fact is they also make an excellent off-grid inverter for larger applications with their continuous AC output of around 63amps and three separate MPPT trackers on board. It makes them one of, if not the largest inverter/all-in-one package out there, and SolArk has one of the best track records/lowest RMA rate of anyone that I know of.
Perhaps oddly, I have no experience with Solar Edge, so I can't speak to anything there, but like I stated, each 15K has three separate MPPT trackers that operate independently of each other, which can be handy in a case like this install where partial shading is a factor at certain times, and we laid out the solar panel strings and MPPT circuits to leverage the separate channels and minimize shading losses.
And again perhaps oddly, I have no experience with Enphase, but I have installed the other brands you mention. I know Outback has been the staple of the off-grid world for so long and I of all people should be an avid Outback fan-but I'm just not. I feel like their products are dated and they have failed to keep up with emerging technologies. Although I can't deny that there are a lot of old Outback systems out there still running great. I am a Victron fan-but really only like them for mobile installations. Their array of products is dizzying and highly adaptable, which makes them very well suited for mobile installations, but IMHO adds unnecessary expense and takes up extra space in a stationary building installation. That's where all-in-one inverter/charger/MPPT units, and the SolArks in particular (and the 12K most of all) really make a difference is on the cost of installation. The amount of wall space and supporting electrical and specialty gear you would need to install a 240volt, 60+ amp per phase Outback or Victron runs up the cost of the install and the amount of space needed, whereas you can hang one SolArk15K with a minimal amount of outboard overcurrent protection devices/enclosures and no other specialty gear like communications hubs make the SolArk one of, if not the most cost effective inverters to install. Sometimes people don't see that value right away when they are just shopping by price per watt or amp, and it's not until they have to buy a bunch of supporting gear, and all the labor to install that extra gear, that the SolArks worth really becomes apparent. Additionally, SolArk has a great cloud-based monitoring platform and great tech support.
For both AC output, and AC inputs (generator or grid) we simply use off the shelf electrical panels and breakers to combine the inputs or outputs to or from the inverters.
The largest generator on that install was a 24Kw, but the existing building wiring only allowed for a total of about half of it's output to ever be utilized, as all the generator wiring that stayed in place in the generator room was wired and fused at only 60 amps. The battery bank that consists of 30 5.1 KwH rack mount batteries feeds a DC buss that feeds all three inverters.

Hopefully this answers all your questions. Thanks for following along!
 

Uncle Dave

Well-Known Member
Joined
Sep 7, 2008
Messages
9,847
Reaction score
10,974
I believe the 15Ks were designed primarily with grid-tied applications in mind given their full 200 amp rated pass-through ability, but the fact is they also make an excellent off-grid inverter for larger applications with their continuous AC output of around 63amps and three separate MPPT trackers on board. It makes them one of, if not the largest inverter/all-in-one package out there, and SolArk has one of the best track records/lowest RMA rate of anyone that I know of.
Perhaps oddly, I have no experience with Solar Edge, so I can't speak to anything there, but like I stated, each 15K has three separate MPPT trackers that operate independently of each other, which can be handy in a case like this install where partial shading is a factor at certain times, and we laid out the solar panel strings and MPPT circuits to leverage the separate channels and minimize shading losses.
And again perhaps oddly, I have no experience with Enphase, but I have installed the other brands you mention. I know Outback has been the staple of the off-grid world for so long and I of all people should be an avid Outback fan-but I'm just not. I feel like their products are dated and they have failed to keep up with emerging technologies. Although I can't deny that there are a lot of old Outback systems out there still running great. I am a Victron fan-but really only like them for mobile installations. Their array of products is dizzying and highly adaptable, which makes them very well suited for mobile installations, but IMHO adds unnecessary expense and takes up extra space in a stationary building installation. That's where all-in-one inverter/charger/MPPT units, and the SolArks in particular (and the 12K most of all) really make a difference is on the cost of installation. The amount of wall space and supporting electrical and specialty gear you would need to install a 240volt, 60+ amp per phase Outback or Victron runs up the cost of the install and the amount of space needed, whereas you can hang one SolArk15K with a minimal amount of outboard overcurrent protection devices/enclosures and no other specialty gear like communications hubs make the SolArk one of, if not the most cost effective inverters to install. Sometimes people don't see that value right away when they are just shopping by price per watt or amp, and it's not until they have to buy a bunch of supporting gear, and all the labor to install that extra gear, that the SolArks worth really becomes apparent. Additionally, SolArk has a great cloud-based monitoring platform and great tech support.
For both AC output, and AC inputs (generator or grid) we simply use off the shelf electrical panels and breakers to combine the inputs or outputs to or from the inverters.
The largest generator on that install was a 24Kw, but the existing building wiring only allowed for a total of about half of it's output to ever be utilized, as all the generator wiring that stayed in place in the generator room was wired and fused at only 60 amps. The battery bank that consists of 30 5.1 KwH rack mount batteries feeds a DC buss that feeds all three inverters.

Hopefully this answers all your questions. Thanks for following along!

Thanks, I never thought the Sol Arks were expensive for that they offered as long as they actually worked "like the brochure".
The Sol Ark and the Skybox/ Mojave were really the first tranformerless designs built of such large current and I've rarely been rewarded being early.
Ive been waiting to be able to talk to some one that went down this road to get some real world feedback.

I wondered how user/ installer friendly the Sol arks code is, and it sounds like they've done a good job.

My experience with outback mainly goes to their mobile all in one units while a bit old have performed fantastically under hard and hot working conditions in mobil grooming and RV applications, are easy to install and manage the floating neutral ground problem and switching all onboard. They offer great support the one time a board blew in 10 years.

One of the first questions I asked was where are the spares located and whats RMA turn around time?
Solar edge is the most installed central inverter up in my area, They developed a unique per panel systems of " optimizers", but Ive never been overly impressed with them and with back up and RMA's coming out of israel Id be worried about being down - every one here has some kind of shut off problem and I've notice what looks like a tendency to slightly undersize them.


So with 3 units you have a total of 9 zones - is there a limit to how few panels can make up a zone or do they have to be even, or close to even?
For example I have one partially shaded panel you can see is waking up later than everything else this morning - could I make one panel its own zone?

Thanks again great thread and work on your end.


Screenshot 2024-11-12 at 7.39.59 AM.png
 

Wedgy

Well-Known Member
Joined
Jan 18, 2020
Messages
10,564
Reaction score
16,177
Good work you two. Pace yourselves, safety first.
Love the stories!!!
 

The Chicken

off-grid solar installer
Joined
Jan 5, 2016
Messages
189
Reaction score
1,692
Thanks, I never thought the Sol Arks were expensive for that they offered as long as they actually worked "like the brochure".
The Sol Ark and the Skybox/ Mojave were really the first tranformerless designs built of such large current and I've rarely been rewarded being early.
Ive been waiting to be able to talk to some one that went down this road to get some real world feedback.

I wondered how user/ installer friendly the Sol arks code is, and it sounds like they've done a good job.

My experience with outback mainly goes to their mobile all in one units while a bit old have performed fantastically under hard and hot working conditions in mobil grooming and RV applications, are easy to install and manage the floating neutral ground problem and switching all onboard. They offer great support the one time a board blew in 10 years.

One of the first questions I asked was where are the spares located and whats RMA turn around time?
Solar edge is the most installed central inverter up in my area, They developed a unique per panel systems of " optimizers", but Ive never been overly impressed with them and with back up and RMA's coming out of israel Id be worried about being down - every one here has some kind of shut off problem and I've notice what looks like a tendency to slightly undersize them.


So with 3 units you have a total of 9 zones - is there a limit to how few panels can make up a zone or do they have to be even, or close to even?
For example I have one partially shaded panel you can see is waking up later than everything else this morning - could I make one panel its own zone?

Thanks again great thread and work on your end.


View attachment 1449765
Ahh yes, the transformerless thing... You don't get something for nothing. The one drawback of the SolArk-and other transformerless inverters too-is they don't like load imbalances, and they can be sensitive to high current surges. I rarely have issues with either as our systems are typically designed with to be balanced and with enough overhead capacity to avoid these problems. But it is worth noting that it can be a problem and to design accordingly. Load imbalances-if they can't be avoided-can usually be addressed with a balancing autotransformer. The only time I've had high current surge issues is with deep well pumps or air compressors on systems where people were advised to go with larger inverters or different pumping solutions but didn't. There are outboard solutions to some of those issues too-like soft starts-but the results are not always satisfactory and it's better to just make sure you have enough inverter to begin with and be done with it.
On the SolArk "zone" question:
Yes there is a minimum number of panels you can have on a string. The answer to that question first involves a little digging into the SolArk MPPT specs.
First of all, the MPPT on the SolArks are 500 volt DC. This is considerably higher voltage than what most people are used to and it has a lot of advantages, and a few drawbacks. The advantages are higher switching/charging efficiency, lower current PV circuits allowing #10 or even #12 wire for nearly all applications-saving signifigantly on wire and conduit costs, and the higher voltage allows very long PV circuit runs with little to no voltage drop-again saving on wire and conduit costs, as well as opening up better possibilities for array placement at longer distances from the inverters. The drawbacks are you need typically a minimum of 5-6 panels in a string to get the voltage up where you want it(typical string count is 8 panels, depending on temperature compensation values for your climate)-this is only a drawback if you are dealing with shading issues like the sorta orphaned panel you describe above. The MPPT doesn't even wake up until an input voltage of 125VDC is produced by the panels, and that is going to equate to 3 or 4 panels minimum with todays PV panels. This high voltage scheme is also not well suited to mobile applications, IMHO, as variable shading or PV panel angles on RV or Boat roofs favor shorter strings and thus lower voltage MPPTs-at the price of needing more, smaller MPPT chargers for more zones. This is an area where Victron shines with their wide array of small to medium MPPT units that can be stacked in a moblie system to deal with 1 to 3 panel PV strings to optimize charging with less than ideal roof or shading conditions. (For example, our work trailer has only 10 panels, but due to the roof and panel orientation, we have four MPPT chargers. A high voltage, high panel count string arrangement would not perform well in a scenario like that)
 
Top