WELCOME TO RIVER DAVES PLACE

72? Hondo Revival & Questions :)

warpt71

Lower River Lover
Joined
Sep 25, 2008
Messages
3,658
Reaction score
3,576
And on that note, lol. This thing had a fixed center plate - ordered the bits to set it up to move with the control rod. When I was measuring the current cav plate levers so I knew what to get, I found out there are 3 different lengths (measuring from the center line of the control rod to the center of the eye), from L to R there is one at 1.750, three at 1.50 and the last two are 1.250"
Is there a reason they would be different? To compensate for something the boat was doing? I've set up numerous vehicle suspensions, so maybe to counter engine torque? I got nothing, al the hardware looks the same, so assuming it was ran this way at some point?

The different length levers are to account for the torque of the prop when launching. The longer levers should be on the passenger side. My flat is all even across the back and the Runner bottom is staggered, longest being on the right rear and shortest being on the left rear. I can measure them all this week if you need specifics.
 

rider68

Active Member
Joined
Mar 22, 2019
Messages
44
Reaction score
47
I got the steering shaft/wheel all back together properly and installed the gauges and switches; polished and reinstalled the throttle pedal with a new cable & proper bolts - I've come to realize whoever worked on this thing before me literally threw it back together; missing or incorrect parts, pieces and bolts be damned.
Nice to have a little piece of this basket case back together somewhat properly.

Sourced a new timing cover, water inlets, 3/8 motor plates & brackets; I'm going to get at that this weekend to get the engine sitting where it needs to be for the drive shaft angles to be correct.

I'm in the process of replacing the seals in the gearbox, rudder bushing and prop shaft.....
My current prop shaft seal uses a single lip seal that's just pressed in, with a grease fitting in it. I was just going to replace the seal and put it back together, but then I came across the one on D21's site - multiple seals retained with a snap ring.
Since I'm new to this thing I don't want to mess with things just for the sake of it, but this seems like a better setup, No?
Has anyone had a single seal decide to walk out of the housing? Any reason not to go with the multiple seal unit?

Once the engine is sitting right, I'll sling it off the trailer to reinstall all the plates and seal all the bolts, as well as rework the bunks to keep the boat centered on the trailer, and get pics of the bottom of the hull for those who were curious about it.
Thanks for all the info so far :)
All of D21 products is good stuff. I have used phils products on my daycruiser and my hondo. I have the same hull that you have. Im currently redoing the rigging right now. I plan on drag racing. I just built new cav plates. The center plate should be adjustable like the current plate you have. What is your engine and v-drive location measuring from inside the transom.
 

Speedyzee

Active Member
Joined
Dec 1, 2022
Messages
30
Reaction score
23
The different length levers are to account for the torque of the prop when launching. The longer levers should be on the passenger side. My flat is all even across the back and the Runner bottom is staggered, longest being on the right rear and shortest being on the left rear. I can measure them all this week if you need specifics.
Thanks for that info - mine are backwards to your setup; so when I have the rod off to machine for the 3 centre levers, I'll reassemble it with the longest on passenger to shortest on driver. Nothing on this thing is right/easy. My buddy who was repairing the fuel tanks just found out they're rotten and full of pin holes, one more thing to add to the list, lol.
 

Speedyzee

Active Member
Joined
Dec 1, 2022
Messages
30
Reaction score
23
All of D21 products is good stuff. I have used phils products on my daycruiser and my hondo. I have the same hull that you have. Im currently redoing the rigging right now. I plan on drag racing. I just built new cav plates. The center plate should be adjustable like the current plate you have. What is your engine and v-drive location measuring from inside the transom.
So my centre plate was rigid, but I'm setting it up to run off the control rod with the others. The engine is on the wrong mounts and is slightly too far forward (drive shaft slip yoke is bottomed out) - I'm working on putting the proper motor plates back in, but as it sits, inside of transom to front of block face is 36" and transom to the lower edge (closest part) of the V-drive centre plate is 94"
 

warpt71

Lower River Lover
Joined
Sep 25, 2008
Messages
3,658
Reaction score
3,576
So my centre plate was rigid, but I'm setting it up to run off the control rod with the others. The engine is on the wrong mounts and is slightly too far forward (drive shaft slip yoke is bottomed out) - I'm working on putting the proper motor plates back in, but as it sits, inside of transom to front of block face is 36" and transom to the lower edge (closest part) of the V-drive centre plate is 94"

36" and 96" have always been good starting numbers. Not that you want to move the v-drive lol
 

Speedyzee

Active Member
Joined
Dec 1, 2022
Messages
30
Reaction score
23
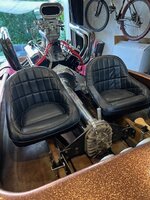
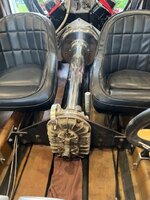
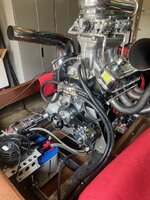
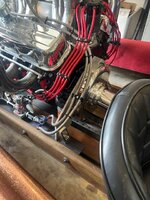
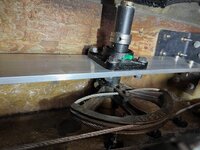
Closer to getting wet, lol. Got the engine on the new plates so the driveshaft angle is in check, alternator setup figured and D21 bits installed - my freight forwarder lost one of my sketchy paddles (lol love the name), but hopefully it shows up sometime. Found out the original fuel tanks were rotted thru in several places, so the new ones just showed up, fabbing mounts this weekend. New yoke and bunk brackets for the trailer are on the bench and next on the list. I know there's a whack of info on setting up the plates out there, but would anyone be kind enough to direct me to the best place to look? Our season is short and any good info would be appreciated - I've set up the center plate to run off the control rod, and it has an up and down pedal, no lockout. This thing was a basket case, so I'm starting from scratch, lol. Thanks for any info :)
IMG_9351.JPG IMG_9352.JPG IMG_9365.JPG IMG_9366.JPG
 

TonyFanelli

Well-Known Member
Joined
Sep 7, 2023
Messages
2,406
Reaction score
8,756
Closer to getting wet, lol. Got the engine on the new plates so the driveshaft angle is in check, alternator setup figured and D21 bits installed - my freight forwarder lost one of my sketchy paddles (lol love the name), but hopefully it shows up sometime. Found out the original fuel tanks were rotted thru in several places, so the new ones just showed up, fabbing mounts this weekend. New yoke and bunk brackets for the trailer are on the bench and next on the list. I know there's a whack of info on setting up the plates out there, but would anyone be kind enough to direct me to the best place to look? Our season is short and any good info would be appreciated - I've set up the center plate to run off the control rod, and it has an up and down pedal, no lockout. This thing was a basket case, so I'm starting from scratch, lol. Thanks for any info :)
View attachment 1405842 View attachment 1405843 View attachment 1405844 View attachment 1405845
What's the cooling fan for?
 

Speedyzee

Active Member
Joined
Dec 1, 2022
Messages
30
Reaction score
23
What's the cooling fan for?
The engine oil cooler - I've seen a lot of pics of boats with a water to oil cooler, but this thing was a basket case with nothing. Not sure if it's needed, but I build custom cars/trucks and I use these all the time. Fan's on a temp switch for 180 - have to see if it ever runs. I'm still wrapping my head around all these tiny water lines these boats run, not used to an endless cool water supply, lol.
 

TonyFanelli

Well-Known Member
Joined
Sep 7, 2023
Messages
2,406
Reaction score
8,756
The engine oil cooler - I've seen a lot of pics of boats with a water to oil cooler, but this thing was a basket case with nothing. Not sure if it's needed, but I build custom cars/trucks and I use these all the time. Fan's on a temp switch for 180 - have to see if it ever runs. I'm still wrapping my head around all these tiny water lines these boats run, not used to an endless cool water supply, lol.
Awesome thank you!
 

warpt71

Lower River Lover
Joined
Sep 25, 2008
Messages
3,658
Reaction score
3,576
motor plates look really good!

start with the plates even with the hull bottom, just get it on the water and get the feel for what the pedals do to the attitude of the boat. Lots of people will say to cut off the up pedal because thats how lots of guys got in trouble back in the day. Im not cutting mine out for what its worth. The idea of the up was to overcome the force of the water sucking the plates back down at high speeds. More spring pressure was a better solution for controlling the plates that riding the up and flying the nose. I could probably talk this through better that I can type it................
 

Speedyzee

Active Member
Joined
Dec 1, 2022
Messages
30
Reaction score
23
Thanks man - over next winter I'd like to tear everything out and polish/re-anodize to make her look fresh again.

So what you're saying is with everything static, plates level.
Pushing on the left (down) pedal should keep the nose down under accel, then transitioning to no pedal (on the springs for higher speeds)?

Hopefully have it in the water early August and I'll see how it works...
Never ran one of these before; can't wait :)
 

warpt71

Lower River Lover
Joined
Sep 25, 2008
Messages
3,658
Reaction score
3,576
Thanks man - over next winter I'd like to tear everything out and polish/re-anodize to make her look fresh again.

So what you're saying is with everything static, plates level.
Pushing on the left (down) pedal should keep the nose down under accel, then transitioning to no pedal (on the springs for higher speeds)?

Hopefully have it in the water early August and I'll see how it works...
Never ran one of these before; can't wait :)

In a perfect world, yes, once the boat is set, you should be able to be off of the plates completely. Every boat is different and the water is constantly changing unlike a road surface. I would say that you never really come off the down, and you will always have your foot covering it. You may not be applying any force, but your left foot is there to catch the boat if it gets out of shape.

Im going to try and link some videos of very skilled drivers running the pedals down the track


These are all modern boats and they have only a down pedal. These arent river or lake boats either. Lots of spring pressure and lots of horsepower!
 

Sharp Shooter

The "anti-yuppie"
Joined
Oct 4, 2007
Messages
7,729
Reaction score
20,425
Just seeing this thread. Warpt is correct, you have a 1st gen Hondo Runner bottom. Mouzer should know better. Have you coin tapped all along your floor and under the hull? Glass looks a little scary in the photos.

@Clank123 needs to look at this.
 

Speedyzee

Active Member
Joined
Dec 1, 2022
Messages
30
Reaction score
23
Just seeing this thread. Warpt is correct, you have a 1st gen Hondo Runner bottom. Mouzer should know better. Have you coin tapped all along your floor and under the hull? Glass looks a little scary in the photos.

@Clank123 needs to look at this.
I'm not sure what you mean by coin tap. I've done some glass/wood repair in other boats and would def not claim to be an expert. I'm used to using a light soft faced hammer to tap hull, stringers etc. and listen for a hollow sound instead of a solid thud - that the same idea? If so; I've done that to this turd - just a little hollow at the transom around the drain plug holes. If I survive this season I plan on repairing those spots. Let me know where else you think I should be checking more carefully - thanks :)
 

Speedyzee

Active Member
Joined
Dec 1, 2022
Messages
30
Reaction score
23
In a perfect world, yes, once the boat is set, you should be able to be off of the plates completely. Every boat is different and the water is constantly changing unlike a road surface. I would say that you never really come off the down, and you will always have your foot covering it. You may not be applying any force, but your left foot is there to catch the boat if it gets out of shape.

Im going to try and link some videos of very skilled drivers running the pedals down the track


These are all modern boats and they have only a down pedal. These arent river or lake boats either. Lots of spring pressure and lots of horsepower!
Thanks man - I've had to get used to the steering wheel in the Mustang not having any effect under certain conditions, lol. Looking forward to seeing what this thing can do.
 

Sharp Shooter

The "anti-yuppie"
Joined
Oct 4, 2007
Messages
7,729
Reaction score
20,425
I'm not sure what you mean by coin tap. I've done some glass/wood repair in other boats and would def not claim to be an expert. I'm used to using a light soft faced hammer to tap hull, stringers etc. and listen for a hollow sound instead of a solid thud - that the same idea? If so; I've done that to this turd - just a little hollow at the transom around the drain plug holes. If I survive this season I plan on repairing those spots. Let me know where else you think I should be checking more carefully - thanks :)

Sounds like you’re good I think…? You can use a lot of things to check for that dreaded thud. A thud with a coin is no bueno. You want a solid tap indicating it’s solid in that area. I use a quarter. sometimes there’s water between the glass and wood. Floors and stringers are the first place to check and cracking isn’t great either. Great boat! You’ll need a good prop and correct plate setting which you may already be set up with.
 
Last edited:

Clank123

Well-Known Member
Joined
Dec 15, 2018
Messages
1,985
Reaction score
14,172
Mornin!
Sharp Shooter alerted me to your thread.
After reading through all the responses, looks like, for the most part, you got some pretty good direction!
Super cool that you got one of the first generation/attempts by Hondo at a runnerbottom.
I will tell you that the installation is 100% a factory Hondo set up from that era.
That alone is super cool!
What you did on the plates and engine mounting looks real good and should work well . How far forward is the engine from the transom? Maybe I missed it in the thread.
Remember, the down pedal is your friend!
Great video of the proper use of it on the one video of Mr. Scarlotta.
Wish I could get more people to stage their boats that way. It’s the way I have always taught it.
Just take and cut that up pedal off at the gearbox before it takes a chunk out of your calf. At the very least cut the pad back to the upright and round the corners.

Anyway, now the fun begins.
Get that thing wet and enjoy it.
PM with a phone number me if there is anything I can help ya with when it comes to set up and driving.
If you’re any where close to Carlsbad CA let me know.
I’d love to go over it bolt by bolt with ya!
Dave
 

Speedyzee

Active Member
Joined
Dec 1, 2022
Messages
30
Reaction score
23
Sounds like you’re good I think…? You can use a lof thinks to check for that dreaded thud. A thud with a coin is no bueno. You want a solid tap indicating it’s solid in that area. I use a quarter. sometimes there’s water between the glass and wood. Floors and stringers are the first place to check and cracking isn’t great either. Great boat! You’ll need a good prop and correct plate setting which you may already be se

Mornin!
Sharp Shooter alerted me to your thread.
After reading through all the responses, looks like, for the most part, you got some pretty good direction!
Super cool that you got one of the first generation/attempts by Hondo at a runnerbottom.
I will tell you that the installation is 100% a factory Hondo set up from that era.
That alone is super cool!
What you did on the plates and engine mounting looks real good and should work well . How far forward is the engine from the transom? Maybe I missed it in the thread.
Remember, the down pedal is your friend!
Great video of the proper use of it on the one video of Mr. Scarlotta.
Wish I could get more people to stage their boats that way. It’s the way I have always taught it.
Just take and cut that up pedal off at the gearbox before it takes a chunk out of your calf. At the very least cut the pad back to the upright and round the corners.

Anyway, now the fun begins.
Get that thing wet and enjoy it.
PM with a phone number me if there is anything I can help ya with when it comes to set up and driving.
If you’re any where close to Carlsbad CA let me know.
I’d love to go over it bolt by bolt with ya!
Dave
Thanks man;

Trying to get it back to looking the way it should.
Transom to front engine plate is 35" - judging from the marks on the driveshaft slip splines, that's pretty close to where it was originally.

I will take you up on the call offer once I see how it works; I'm sure I'll have questions.
As far as the personal look-over; super cool of you to offer, but I'm in Ontario Canada - I was surprised this thing found it's way up here; would love to know it's story :)

Putting the fuel tanks in this weekend; going away the next, but hopefully mid-August I'll get it in the water.
 

Clank123

Well-Known Member
Joined
Dec 15, 2018
Messages
1,985
Reaction score
14,172
Thanks man;

Trying to get it back to looking the way it should.
Transom to front engine plate is 35" - judging from the marks on the driveshaft slip splines, that's pretty close to where it was originally.

I will take you up on the call offer once I see how it works; I'm sure I'll have questions.
As far as the personal look-over; super cool of you to offer, but I'm in Ontario Canada - I was surprised this thing found it's way up here; would love to know it's story :)

Putting the fuel tanks in this weekend; going away the next, but hopefully mid-August I'll get it in the water.
Awesome!
Amazing it ended up in Canada!
Be fun to talk with you.
Let us know how the water test goes!

PS…glad you got rid of that Ford Blue on the engine!😂
 

Speedyzee

Active Member
Joined
Dec 1, 2022
Messages
30
Reaction score
23
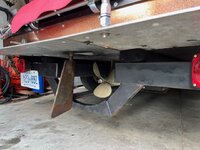
The last thing for me to get together was the rudder setup - it's a mix of parts; the top bushing plate was worn out, so I built the flat bar and used a bearing for the top. The bearing has a lock on it to locate the rudder vertically, then I added a safety collar & built a sleeve to take up the space to the cotter key in the top of the rudder shaft, so there's no way it can slip and drop the key way below the seals; look legit? Yes the glass on the inside of the transom is in bad shape, the wood is solid, so this winter I'm going to pull it back apart and repair the glass.

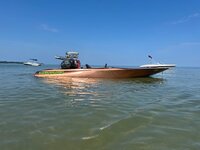
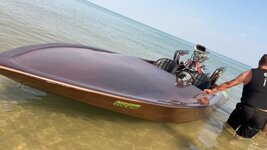
Got it in the water couldn't be happier - vid is a short one of the first run. Took a little getting used to, but eventually got it up to around 60 or so (GPS on phone) and it goes straight and responds to the down pedal quickly (I wasn't sure if I had the plates set up correctly.

Going to swap the oil in the Casale for some Lucas (it's noisy - I'm going to go thru it this winter, just want to try to quiet it down for now) and hope for calm water next weekend so I can see what it will really do, lol Thanks for all the help so far guys :)


IMG_9647.JPG IMG_9649.JPG IMG_9662.JPG IMG_5532.JPG
 

lenmann

Well-Known Member
Joined
Apr 13, 2013
Messages
1,696
Reaction score
3,519
The last thing for me to get together was the rudder setup - it's a mix of parts; the top bushing plate was worn out, so I built the flat bar and used a bearing for the top. The bearing has a lock on it to locate the rudder vertically, then I added a safety collar & built a sleeve to take up the space to the cotter key in the top of the rudder shaft, so there's no way it can slip and drop the key way below the seals; look legit? Yes the glass on the inside of the transom is in bad shape, the wood is solid, so this winter I'm going to pull it back apart and repair the glass.

Got it in the water couldn't be happier - vid is a short one of the first run. Took a little getting used to, but eventually got it up to around 60 or so (GPS on phone) and it goes straight and responds to the down pedal quickly (I wasn't sure if I had the plates set up correctly.

Going to swap the oil in the Casale for some Lucas (it's noisy - I'm going to go thru it this winter, just want to try to quiet it down for now) and hope for calm water next weekend so I can see what it will really do, lol Thanks for all the help so far guys :)


View attachment 1422265 View attachment 1422267 View attachment 1422268 View attachment 1422272
View attachment 1422269
Hah! The only thing I couldn't see in the video was the big ol' grin on your face! Congrats on getting her wet.
 

Speedyzee

Active Member
Joined
Dec 1, 2022
Messages
30
Reaction score
23
Hah! The only thing I couldn't see in the video was the big ol' grin on your face! Congrats on getting her wet.
Lol; thanks man - def was happy to see her back where she belongs....
 

Sharp Shooter

The "anti-yuppie"
Joined
Oct 4, 2007
Messages
7,729
Reaction score
20,425
Hey great job getting it on the water and running!

Rudder looks odd hanging down like that and you can get a substantial amount of performance in the future with a prop change!!

Happy for you! Boat looks awesome!!
IMG_5330.jpeg
 

warpt71

Lower River Lover
Joined
Sep 25, 2008
Messages
3,658
Reaction score
3,576
Hey great job getting it on the water and running!

Rudder looks odd hanging down like that and you can get a substantial amount of performance in the future with a prop change!!

Happy for you! Boat looks awesome!!
View attachment 1422359

It also looks like it's still missing the center plate that makes the runners.

Very cool to see another old Hondo back on the water 👍👍
 

Speedyzee

Active Member
Joined
Dec 1, 2022
Messages
30
Reaction score
23
Hey great job getting it on the water and running!

Rudder looks odd hanging down like that and you can get a substantial amount of performance in the future with a prop change!!

Happy for you! Boat looks awesome!!
View attachment 1422359
I was wondering about that - the rudder was one out of another parts boat I had. I can machine the key way a little further down and then tuck it up; you recommend having it almost touching the bottom of the rudder stuffing box? And the prop was off another boat - suggestions for something better?
 

poncho

Well-Known Member
Joined
Dec 20, 2007
Messages
5,935
Reaction score
10,187
Congratulations on getting on the water, for me it's a couple of trips before I know I'm not going to sink or catch on fire. 🤪
It's cool when a new member comes on here and gets after it and we get to see you out enjoying it.
 

Sharp Shooter

The "anti-yuppie"
Joined
Oct 4, 2007
Messages
7,729
Reaction score
20,425
I was wondering about that - the rudder was one out of another parts boat I had. I can machine the key way a little further down and then tuck it up; you recommend having it almost touching the bottom of the rudder stuffing box? And the prop was off another boat - suggestions for something better?

Rudder should be all the way up in there. Get a Menkins 2 blade propeller for a drag boat with the size and pitch to go with your horsepower and gearing.

DSC03055.JPG


KJS_0826.jpg
 

Speedyzee

Active Member
Joined
Dec 1, 2022
Messages
30
Reaction score
23
This is what my 75 Hondo steering components looked like. All original from Hondo.

View attachment 1422919
Thanks for the pic man :) Now I see that the shorter rudder stuffing box I found in the box of stuff was the original. It was worn too bad to use, so I used the other one I had, which is taller and explains why the pulleys don't quite line up with the quadrant (it's a little too high) the cables drag a little on the quadrant, but it works for now. My original top plate was cast and shaped like yours, but had a bronze bushing in it instead of a bearing. At the very least, I'm going to machine the key way in the rudder shaft lower so I can move the rudder up to the bottom of the box. It does seem to steer ok as it is, but I'd like to get it back to the way it was built & I won't have to worry about dragging the rudder over speed bumps if it's tucked up where it should be :)
As for the prop change, I get that HP and gearing are important; I'm going to yank the tired iron this winter and bore/stroke/roller cam it to get some more jam out of it & figure out what gears are in the box when I pull it to polish and reseal it.
Someone told me to just get it up to the rev limiter and see how fast it's going - if it's not fast enough; add more pitch. If it won't go any faster after that, add more HP until it does. Lol. For now I'm just happy she floats and makes noise :)
 

warpt71

Lower River Lover
Joined
Sep 25, 2008
Messages
3,658
Reaction score
3,576
Its not just moving the rudder up, the stuffing box needs to be cut so its flush with the plate as well, it looks like its currently below by about an inch. All of these fine tuning adjustments will only make it a better boat. You have made more progress in 5 months than I have in 5 years! Keep it up
 

AngrySailor

Active Member
Joined
Dec 1, 2024
Messages
29
Reaction score
25
I'm in Ontario Can - a little town you've never heard of; Lucan, lol. My shop is in London.
I got out of Ontario over ten years ago. All I can tell you is have your paperwork and safety gear in order because the police were waiting for me at the boat ramp EVERY TIME I took my Hondo out...
 
Top