WELCOME TO RIVER DAVES PLACE

72? Hondo Revival & Questions :)

Speedyzee

Active Member
Joined
Dec 1, 2022
Messages
30
Reaction score
23
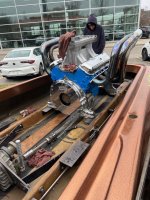
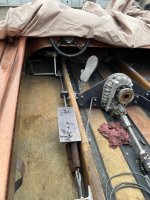
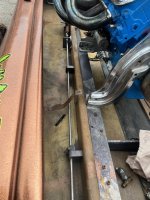
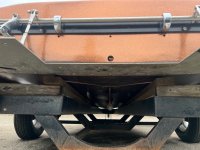
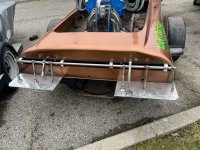
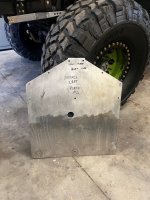
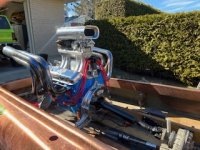
Tried a search and didn't come across my particular scenario. New to me Hondo Flat - be nice; I'm new to these, so my questions may be dumb to pros, but I love anything loud and fast enough to do something stupid in, lol. The price was right (?) and I'm trying to come up with a plan to get it back together. Gotta BBC, not running, but so far checks out ok (I'm a car guy and run a shop, so engine work is no biggie). The boat looks like it's built from a pair of boats; the engine mounts are sketch and I will obv be building better blocks. The cavitation plates setup seems to be built from 2 different setups - the boat currently has the two plates as pictured, but there is a third center plate that came off the hull. The cav pivot bar (?) has no cams/clevis for the center plate. So my question is what's the diference between a full plate and just outbaord plates like on the boat currently? Was the open center setup off a jet? Do I need to come up with the proper parts to add the center plate back in? Looing to make a fun/fast run-around, not a racer or corner cutter. I know I've got a lot to learn about setup, and even running something like this, but curious about this plate thing before I can go any further. Thanks for any info or suggestions :)
 

Attachments

  • IMG_8500.JPG
    IMG_8500.JPG
    713.6 KB · Views: 145
  • IMG_8499.JPG
    IMG_8499.JPG
    705.8 KB · Views: 141
  • IMG_8498.JPG
    IMG_8498.JPG
    762.4 KB · Views: 137
  • IMG_8497.JPG
    IMG_8497.JPG
    1.2 MB · Views: 151
  • IMG_8496.JPG
    IMG_8496.JPG
    1.8 MB · Views: 153
  • IMG_8502(1).JPG
    IMG_8502(1).JPG
    662.3 KB · Views: 137

warpt71

Lower River Lover
Joined
Sep 25, 2008
Messages
3,668
Reaction score
3,598
Im going to say that you have an early Hondo runner bottom, like a '71-72 era. Yes it is missing some plate hardware. I can also tell that the bunks are in the wrong position on that trailer. The center plate is also the blast plate and will fill in that void above the prop. It should come out past the transom the same distance as the runner plates do and they should all be tied to the control rod running left to right. Adding 4 more turnbuckles shouldn't be a big issue. When making the center plate, be mindful of the grain of the aluminum, it needs to run front to back. Those motor mounts don't look the worst, but there are some other ways to do it.

I have 2 Hondos so ask away and Ill try to be as helpful as possible.

Welcome BTW :D:D:D
 

coolchange

Lower level functionary
Joined
Jan 1, 2008
Messages
10,686
Reaction score
16,026
Some of the first runner bottoms had a fixed center plate. I see three holes below the cav rod plate. I’ve seen Sangers rig that way, but not a Hondo.
 

warpt71

Lower River Lover
Joined
Sep 25, 2008
Messages
3,668
Reaction score
3,598
1710541188214.png

1710541206537.png

1710541224962.png

1710541243943.png

1710541266844.png


I got tired of opening your pics lol
 

Speedyzee

Active Member
Joined
Dec 1, 2022
Messages
30
Reaction score
23
I'll use smaller pics next time - my bad, lol.

I added one more pic however - it's of the center plate - it came with the boat, is the same length as the others and has three clevis holes in it.

So was it rigid, as the holes in the platre line up with the three in the transom?

What's the best way to do this - machine the control rod to set up the center plate to move with the outers, or have it rigid?

As I said, this is all new to me :)

As for the bunks, am I correct to assume the inner ones are the problem and should be under the stringers? If not, where do you recommend? Fab work is no problem, and yes I'll get them wrapped once the boat comes off the trailer. I run an auto shop - planning on using a couple of thick straps under the hull to each side of a hoist as as sling to lift it off the trailer - no issue with that?

First things first - gathering up a pair of carbs and a few other pieces to get the engine cranked up; if it's good, the plates are next.

You said ask away :)
Thanks for the info and your time so far; where I am there's not many of these things to look at for info, lol.
 

warpt71

Lower River Lover
Joined
Sep 25, 2008
Messages
3,668
Reaction score
3,598
Thats defiantly the plate that you need!
1710543897250.png


If it were mine, I would machine the cav rod to accept at least the 3 turnbuckles that are there, or make a new plate with 4. I find it hard to believe that it was set up as a fixed plate but it appears that it could be the case with all the holes lining up. You want all 3 plates to move together.

The bunks should sit in the runners, right at the center edge. The center of the boat, what I call the belly, should be between the bunks. I can shoot you a pic of mine later when Im home. Slinging it wont hurt anything. I used a cherry picker to the bow eye with a soft strap and a forklift under the plates one time.

What part of the country are you in?
 

Speedyzee

Active Member
Joined
Dec 1, 2022
Messages
30
Reaction score
23
Ok, so I'll plan to machine the rod for the three turnbuckles and plug the unused holes in the transom.

Pics of your trailer bunk location would be appreciated :)
On the trailer note - there's currently nothing for a bow stop block :( Planning on adding one above/below the eye to support the front of the hull - it's currently just hanging out in the breeze....

I'm in Ontario Can - a little town you've never heard of; Lucan, lol. My shop is in London.

Thanks again man
 

warpt71

Lower River Lover
Joined
Sep 25, 2008
Messages
3,668
Reaction score
3,598
@Speedyzee

I'll get you some pics when the sun comes back out tomorrow, I need to uncover the boat after today's rain anyways. For now, here's a pic of my plates

Screenshot_20240315-204258.png


And a link to my project


Dana757

Well-Known Member
Joined
Oct 26, 2017
Messages
1,269
Reaction score
3,597
You should really consider making a new center plate and using 4 turnbuckles. There is a lot of load right there. Never broken an outer turnbuckle but have broken a few in the center. Adding another transom bearing right in the center helps too. I did that after noticing the bar was bending in the center.
 

Speedyzee

Active Member
Joined
Dec 1, 2022
Messages
30
Reaction score
23
Warpt71 - that is quite the build :) I'm going to have to deal with over spray in the boat at some point (why can't people just mask s**t off?) Lol.

Both of you mentioned running 4 turnbuckles on the center plate;
I've been looking at countless pics on the good 'ol interweb since I started the thread (trying to learn, not just ask), and have noticed a lot of boats have more turnbuckles than this turd, lol. I'm new to boats, but understand the concept of physics and force (broken more than a few suspension parts on the truck in the background of the pic with the center plate until I got her sorted out). I'm assuming the more power the setup has, the more force will be put on the plates to keep it under control? Wouldn't be a big deal to TIG the center hole shut and drill a pair of new ones to get 4 in there.

Again; thanks for the advice guys - I enjoy helping people out with custom car/truck stuff when I can (shop owner), but this floating death machine stuff is new to me :)
 

Sawtooth

Thanks for everything Dad
Joined
May 8, 2009
Messages
729
Reaction score
561
Warpt71 the pictures of speedyzee’s Hondo do not appear to be a runner bottom, it is level/flat all the way across from side to side. The center does not hang lower nor do the outside edges indicating a “runner bottom”. At least that’s how I see it on my phone anyway. It looks like it should have two plates (left & right) split in the center like an old school true flat, but again maybe my eyes just aren’t seeing the steps from center pad to outside runners 🤷🏼‍♂️.
 

poncho

Well-Known Member
Joined
Dec 20, 2007
Messages
6,010
Reaction score
10,446
Warpt71 the pictures of speedyzee’s Hondo do not appear to be a runner bottom, it is level/flat all the way across from side to side. The center does not hang lower nor do the outside edges indicating a “runner bottom”. At least that’s how I see it on my phone anyway. It looks like it should have two plates (left & right) split in the center like an old school true flat, but again maybe my eyes just aren’t seeing the steps from center pad to outside runners 🤷🏼‍♂️.
I thought the same thing till I opened this on a laptop and zoomed in, definitely has a relief in the center, the bunk placement makes it hard to see..
Unless what I'm seeing is a relief for the blast/center plate?

1710541206537.png
 
Last edited:

Sawtooth

Thanks for everything Dad
Joined
May 8, 2009
Messages
729
Reaction score
561
I thought the same thing till I opened this on a laptop and zoomed in, definitely has a relief in the center, the bunk placement makes it hard to see..
Ok yeah between my scratched up readers and my small phone screen it didn’t look like a runner, especially the same as the picture of wrapt71 boat he posted, I can see that one good 🤣.
 

poncho

Well-Known Member
Joined
Dec 20, 2007
Messages
6,010
Reaction score
10,446
Ok yeah between my scratched up readers and my small phone screen it didn’t look like a runner, especially the same as the picture of wrapt71 boat he posted, I can see that one good 🤣.
I was looking for the dropped chines at the outer edges that's why I questioned what I was seeing too. 👍
 
Last edited:

warpt71

Lower River Lover
Joined
Sep 25, 2008
Messages
3,668
Reaction score
3,598
Warpt71 the pictures of speedyzee’s Hondo do not appear to be a runner bottom, it is level/flat all the way across from side to side. The center does not hang lower nor do the outside edges indicating a “runner bottom”. At least that’s how I see it on my phone anyway. It looks like it should have two plates (left & right) split in the center like an old school true flat, but again maybe my eyes just aren’t seeing the steps from center pad to outside runners 🤷🏼‍♂️.

It's definitely an early Hondo runner. It's also a straight deck so likely it's a pre '73 hull. The transom is one level plate but there is a relief behind the strut that accepts the center blast plate that will hang lower than the runners. These hulls didn't have full length outer chines, they stop at the plate. Also if you look inside the hull around where the tank brackets are, you can see the hull steps back down. True flats are flat in this area. Also, the bunks on this boat are right on the step and covering it. The bunks need to be moved out words a couple inches I believe.

I have seen these hulls set up 2 different ways with the plates. One solid top plate with the center bolted underneath and 3 individual like this boat and modern runner bottoms. Biggest difference between this boat and my newest is the t-deck and the outer chines running full length.

There was a boat that ran with NJBA called Big Red 1, it is a early runner like this and ran really really good! If you do some looking around it's all red metal flake with white or silver scallop target's down the deck.
 

warpt71

Lower River Lover
Joined
Sep 25, 2008
Messages
3,668
Reaction score
3,598
I was looking for the dropped chines at the outer edges that's why I questioned what I was seeing too. 👍

You're not going to find the drop chines at the transom like my boat. This one stops at the plate because the plate runs the full width of the hull.
 

Speedyzee

Active Member
Joined
Dec 1, 2022
Messages
30
Reaction score
23
Ok; this is why I'm here :)
So it's not a true flat, but a runner bottom? No ownership - but the info on the previous owners license says it's a 78(?) I don't know if there's any VIN/ID on the hull, or where to look for it if there is.....
So I need to move the inner bunks outwards to let the steps ride inside them?
The current setup would explain why the damn thing wouldn't stay between the fenders (despite being strapped at the back) on the long drive home..... that and nothing at the front other than a winch line.
I saw the front bow catch linkage (?) in one of your posts - would that be a better way to go as opposed to the current winch and adding a pair of bow stop blocks?
Thanks guys :)
 

warpt71

Lower River Lover
Joined
Sep 25, 2008
Messages
3,668
Reaction score
3,598
Ok; this is why I'm here :)
So it's not a true flat, but a runner bottom? No ownership - but the info on the previous owners license says it's a 78(?) I don't know if there's any VIN/ID on the hull, or where to look for it if there is.....
So I need to move the inner bunks outwards to let the steps ride inside them?
The current setup would explain why the damn thing wouldn't stay between the fenders (despite being strapped at the back) on the long drive home..... that and nothing at the front other than a winch line.
I saw the front bow catch linkage (?) in one of your posts - would that be a better way to go as opposed to the current winch and adding a pair of bow stop blocks?
Thanks guys :)

Yes, it's a runner bottom. HIN #'s weren't required until '73 and I believe that your hull is a year or 2 earlier than that, you probably won't find any numbers on the hull. My '71 doesn't have any numbers that I have ever found. My newest boat is an '81 and that HIN is clear as day
PXL_20240316_182853849.jpg


And yes, I would move the bunks outside to let the center runner ride between.
PXL_20240316_182447379.jpg
PXL_20240316_182645436.jpg
PXL_20240316_182510332.jpg
PXL_20240316_182655202.jpg


Ad for the bow, I prefer floater bars and of those I prefer the V style over a single arm from the center tube. The single arms will still move around a little side to side where the V's really stay put.
PXL_20240316_182316659.jpg
PXL_20240316_182303875.jpg
PXL_20240316_182251627.jpg


Keep asking and I'll keep answering, it keeps me interested and motivated on my own project 😁👍👍
 

poncho

Well-Known Member
Joined
Dec 20, 2007
Messages
6,010
Reaction score
10,446
It's definitely an early Hondo runner. It's also a straight deck so likely it's a pre '73 hull. The transom is one level plate but there is a relief behind the strut that accepts the center blast plate that will hang lower than the runners. These hulls didn't have full length outer chines, they stop at the plate. Also if you look inside the hull around where the tank brackets are, you can see the hull steps back down. True flats are flat in this area. Also, the bunks on this boat are right on the step and covering it. The bunks need to be moved out words a couple inches I believe.

I have seen these hulls set up 2 different ways with the plates. One solid top plate with the center bolted underneath and 3 individual like this boat and modern runner bottoms. Biggest difference between this boat and my newest is the t-deck and the outer chines running full length.

There was a boat that ran with NJBA called Big Red 1, it is a early runner like this and ran really really good! If you do some looking around it's all red metal flake with white or silver scallop target's down the deck.
That boat was a beast, they made it run very well.


Last edited:

Speedyzee

Active Member
Joined
Dec 1, 2022
Messages
30
Reaction score
23
Thanks for all the info guys :) I'll def have more questions to ask

Next is to get it up and running and see what kind of shape the engine's in....
 
Last edited:

Flat freak

Well-Known Member
Joined
Feb 10, 2022
Messages
189
Reaction score
836
Here’s a photo of what I was told was one of the first Hondo Runner bottoms. It’s sitting in front of Stu Sutherland’s shop. He’s been threatening to cut it up for about two years now. I’ll bet if someone asked him real nicely, he’d give it to you . Yes it’s a bummer it’s a crappie photo or you could see that the chines do stop early
IMG_6438.jpeg
 
Last edited:

warpt71

Lower River Lover
Joined
Sep 25, 2008
Messages
3,668
Reaction score
3,598
Here’s a photo of what I was told was one of the first Hondo Runner bottoms. It’s sitting in front of Stu Sutherland’s shop. He’s been threatening to cut it up for about two years
now. I’ll bet if someone asked him real nicely, he’d give it to you . Yes it’s a bummer it’s a crappie photo or you could see that the chines do stop early

Thats a great example of what we are talking about and looking at!
 

Speedyzee

Active Member
Joined
Dec 1, 2022
Messages
30
Reaction score
23
Gathered up enough parts and wired it to get it running. Sounds pretty good - oil pressure is good and no death rattles up to 5 grand, so that's a win. Sending the control rod out to be machined for the additional cams/turn buckles for the centre plate. What do you guys recommend to seal the thru hull bolts? I'm a mechanic and we use Permatex Right Stuff a lot - any reason this wouldn't work, or what would be better? When I have the boat off the trailer I'll get the bunks moved to where they should be and fab up a front yoke to get rid of the winch set up. This boat didn't come with a prop, so I'm borrowing the one off my other flat project, it's a three blade (that boat runs the same gear ratio and had a big-block Ford in it, but I have no idea if it was set up properly or not), just to try it out - are there numbers/info on the prop that will tell me more about it? I'm replacing the stuffing box, control rod and rudder seals, the strut bushing looks ok. Thanks for the help so far :)
IMG_8617.JPG IMG_8734.JPG IMG_8735.JPG IMG_8736.JPG
 

MOUZER

The Legend
Joined
Mar 23, 2009
Messages
3,115
Reaction score
5,969
SANGER true flat missing center cav hardare by this pic...but what would i know..
1714350266973.png
 

Speedyzee

Active Member
Joined
Dec 1, 2022
Messages
30
Reaction score
23
1 pc plate thats been cut not a runner bottom View attachment 1366512
A'right - I don't know anything about these things but I'm trying to learn. Is it a Sanger or a Hondo? Don't care TBH but would like to know - with enough HP It'll get me closer to the man either way. Found a bunch of parts in one of the boxes the PO gave me - at one point the center plate was rigid mounted with three turn buckles into the holes in that pic. Lifted the hull off the trailer enough to center it so I could get the prop on it (12 x 15 three blade if that means anything) and I don't see the outer chines or steps in the transom for the plates as in the pics of the boat above. I'm going to have my buddy machine the rod to mount the three turn buckles to control the center plate and go from there. Once I have it slinged off the trailer I'll post pics of the bottom of the hull so someone can tel me what this turd is, lol. No suggestions as to what is the best sealant for all the damn bolts that go thru the bottom of the hull? Right stuff it shall be then. Bought and wired up a bilge pump in case I got that wrong, lol.
 
Last edited:

Sawtooth

Thanks for everything Dad
Joined
May 8, 2009
Messages
729
Reaction score
561
For the thru hull hardware sealing I would recommend 3M 4200 sealant. Whatever you do don’t use 5200 as you or anyone else will never ever ever never ever get the hardware off again, it’s permanent, like destroy the fiberglass permanent.
I have seen many boats and even taken apart a few that just used clear silicone to seal things up that seemed to do the job. You could also use a product called MarineTex, it’s a two part material you mix together and is pretty permanent as well.
 

warpt71

Lower River Lover
Joined
Sep 25, 2008
Messages
3,668
Reaction score
3,598
Im still saying its an early Hondo Runner bottom, not a Sanger at all.

I looked at your motor pics and that drive shaft angle looks wrong. Not saying it wont work, but it may not be ideal. I guess theres plenty of angle there to keep the needle bearings moving though lol
 

Speedyzee

Active Member
Joined
Dec 1, 2022
Messages
30
Reaction score
23
Im still saying its an early Hondo Runner bottom, not a Sanger at all.

I looked at your motor pics and that drive shaft angle looks wrong. Not saying it wont work, but it may not be ideal. I guess theres plenty of angle there to keep the needle bearings moving though lol
I've set up more than a few drive lines in road/off road vehicles and I get the equal angle requirement; Yup; those needles will def be moving around in it's current setup, lol. In one of my original posts I mentioned that the engine didn't come out of this boat originally and the mounts were a little sketch at best :) I have to pull the engine to reseal and paint; I'm going to make new angle plates and trim the motor plates as needed to get things more in line :) Side note: I'm having a hard time finding a shaft cover - kinda surprised it would be hard to find, but have already had my right hand whacked around the top of the shaft; so not taking that chance again, lol.
 

Speedyzee

Active Member
Joined
Dec 1, 2022
Messages
30
Reaction score
23
For the thru hull hardware sealing I would recommend 3M 4200 sealant. Whatever you do don’t use 5200 as you or anyone else will never ever ever never ever get the hardware off again, it’s permanent, like destroy the fiberglass permanent.
I have seen many boats and even taken apart a few that just used clear silicone to seal things up that seemed to do the job. You could also use a product called MarineTex, it’s a two part material you mix together and is pretty permanent as well.
Thanks for the advice - I don't want to have to reseal all those holes again; would rather do it right the first time :) As this is my first experience with a vintage/cool/flatty etc. it originally kinda blew my mind that there was no bilge in this thing - all those bolts go directly to the wet side, lol.
 

Speedyzee

Active Member
Joined
Dec 1, 2022
Messages
30
Reaction score
23
Some of the first runner bottoms had a fixed center plate. I see three holes below the cav rod plate. I’ve seen Sangers rig that way, but not a Hondo.
A late response; but I finally went thru the last basket this thing came in and found three turnbuckles attached anchor plates (?) that were cut to fit under the cav rod plate and bolt thru those three holes in the transom. Got a friend who's going to machine the control rod to mount them to it once I get it put back together :)
 

coolchange

Lower level functionary
Joined
Jan 1, 2008
Messages
10,686
Reaction score
16,026
A late response; but I finally went thru the last basket this thing came in and found three turnbuckles attached anchor plates (?) that were cut to fit under the cav rod plate and bolt thru those three holes in the transom. Got a friend who's going to machine the control rod to mount them to it once I get it put back together :)
I knew that was the set up just don’t feel like arguing about it lol! I never said it was a Sanger. Just I never saw a Hondo done that way. Either way will work just depends on your set up. If you’re not sure it’s a Hondo pic of the deck will help. Some builders scribed numbers inside the transom. Some of the earliest runners were built by just dropping a piece of ply in the mold to make the tunnel.
 

Speedyzee

Active Member
Joined
Dec 1, 2022
Messages
30
Reaction score
23
I knew that was the set up just don’t feel like arguing about it lol! I never said it was a Sanger. Just I never saw a Hondo done that way. Either way will work just depends on your set up. If you’re not sure it’s a Hondo pic of the deck will help. Some builders scribed numbers inside the transom. Some of the earliest runners were built by just dropping a piece of ply in the mold to make the tunnel.
I'm not one for arguing about anything, so don't blame ya; wasn't my intention; was just saying what I found :) Whatever the old turd is I'm keen to get it back up and running and see what it'll do.
 

warpt71

Lower River Lover
Joined
Sep 25, 2008
Messages
3,668
Reaction score
3,598
I've set up more than a few drive lines in road/off road vehicles and I get the equal angle requirement; Yup; those needles will def be moving around in it's current setup, lol. In one of my original posts I mentioned that the engine didn't come out of this boat originally and the mounts were a little sketch at best :) I have to pull the engine to reseal and paint; I'm going to make new angle plates and trim the motor plates as needed to get things more in line :) Side note: I'm having a hard time finding a shaft cover - kinda surprised it would be hard to find, but have already had my right hand whacked around the top of the shaft; so not taking that chance again, lol.
Look up D21 enterprises for a driveshaft cover


coolchange

Lower level functionary
Joined
Jan 1, 2008
Messages
10,686
Reaction score
16,026
I'm not one for arguing about anything, so don't blame ya; wasn't my intention; was just saying what I found :) Whatever the old turd is I'm keen to get it back up and running and see what it'll do.
Not the intent of my post. Felt some thought I said it was a Sanger.🤔😁
 

warpt71

Lower River Lover
Joined
Sep 25, 2008
Messages
3,668
Reaction score
3,598
Screenshot_20240514-075830~2.png


Hondo shaft log, I was told those were factory installed items. It's not a Sanger lol
 

DUN

Well-Known Member
Joined
May 12, 2020
Messages
695
Reaction score
1,899
Floor mount foot pedal screams Hondo as well.
 

69hondo

Well-Known Member
Joined
Nov 8, 2010
Messages
3,356
Reaction score
7,875
I see what you guys are saying but the plates are flush with the bottom of the boat. even the center section is flush with bottom of the boat. it looks like the center plate goes on over that small section of plate and into the blast area. outside plates are adjustable and center is fixed. 🤷‍♂️
 

Speedyzee

Active Member
Joined
Dec 1, 2022
Messages
30
Reaction score
23
So now that I'm looking at making a better set of engine mount angle brackets, what warp said about the driveshaft angle being wrong (and I know that it is), is rattling around the back of my mind. I found a few pics of boats with the same old school Edelbrock plates as I have, & I realized they used an angle bracket to bolt to the inside of the stringers, allowing the engine to sit much lower. I knew this engine came out of another boat, so it probably bolted in as intended. In the sake of not wanting to start all over with new plates and having to come up with a way to mount the cam driven water pump, I think I'm going to machine the front and rear plates width down enough to get them to slide down between the current stringer plates and make new drop down angle brackets to mount them to the rails. Since I'm going to dick around with it, I'm curious as to how big an effect the center of gravity/engine height is going to have on how this thing handles. Will it matter enough to worry about, or should I just be concerned with getting the mill low enough to reduce the driveshaft angle? I have a sneaking suspicion that this thing is going to be a handful on a good day, but wanted to ask :)
 

warpt71

Lower River Lover
Joined
Sep 25, 2008
Messages
3,668
Reaction score
3,598
So now that I'm looking at making a better set of engine mount angle brackets, what warp said about the driveshaft angle being wrong (and I know that it is), is rattling around the back of my mind. I found a few pics of boats with the same old school Edelbrock plates as I have, & I realized they used an angle bracket to bolt to the inside of the stringers, allowing the engine to sit much lower. I knew this engine came out of another boat, so it probably bolted in as intended. In the sake of not wanting to start all over with new plates and having to come up with a way to mount the cam driven water pump, I think I'm going to machine the front and rear plates width down enough to get them to slide down between the current stringer plates and make new drop down angle brackets to mount them to the rails. Since I'm going to dick around with it, I'm curious as to how big an effect the center of gravity/engine height is going to have on how this thing handles. Will it matter enough to worry about, or should I just be concerned with getting the mill low enough to reduce the driveshaft angle? I have a sneaking suspicion that this thing is going to be a handful on a good day, but wanted to ask :)

You may be able to flip the stringer rails to get the motor lower. Id try that before trying to hang the motor mounts below it. I dont believe that height will really upset the handling of the boat, its not going to be running around single pin buoy turns.
 

warpt71

Lower River Lover
Joined
Sep 25, 2008
Messages
3,668
Reaction score
3,598
I see what you guys are saying but the plates are flush with the bottom of the boat. even the center section is flush with bottom of the boat. it looks like the center plate goes on over that small section of plate and into the blast area. outside plates are adjustable and center is fixed. 🤷‍♂️

if the bunks were in the correct position you would see the runner steps much better. from the top, its going to look just like our old Hondo's, the bottoms are in fact very different. another clue is look at the gunnel tank brackets. there is clearly a step in the floor at the outside edge. Your 69 and my 71 are completely flat in this area.
 

69hondo

Well-Known Member
Joined
Nov 8, 2010
Messages
3,356
Reaction score
7,875
if the bunks were in the correct position you would see the runner steps much better. from the top, its going to look just like our old Hondo's, the bottoms are in fact very different. another clue is look at the gunnel tank brackets. there is clearly a step in the floor at the outside edge. Your 69 and my 71 are completely flat in this area.
LOL I keep looking at all the pics and going back and forth. I wish there was a pic with the "bunks" moved but yeah you maybe right. The pic of the shaft log also kind of gives a runner bottom inside floor look. MY TR2 copy hull was similar to this inside.

Definitely a different setup thats for sure.
 

coolchange

Lower level functionary
Joined
Jan 1, 2008
Messages
10,686
Reaction score
16,026
So now that I'm looking at making a better set of engine mount angle brackets, what warp said about the driveshaft angle being wrong (and I know that it is), is rattling around the back of my mind. I found a few pics of boats with the same old school Edelbrock plates as I have, & I realized they used an angle bracket to bolt to the inside of the stringers, allowing the engine to sit much lower. I knew this engine came out of another boat, so it probably bolted in as intended. In the sake of not wanting to start all over with new plates and having to come up with a way to mount the cam driven water pump, I think I'm going to machine the front and rear plates width down enough to get them to slide down between the current stringer plates and make new drop down angle brackets to mount them to the rails. Since I'm going to dick around with it, I'm curious as to how big an effect the center of gravity/engine height is going to have on how this thing handles. Will it matter enough to worry about, or should I just be concerned with getting the mill low enough to reduce the driveshaft angle? I have a sneaking suspicion that this thing is going to be a handful on a good day, but wanted to ask :)
You need an angle finder on you drive plate and duplicate that angle on the flywheel. Then you need to set your offset of the engine and v drive coupler to get your degree of driveshaft angle. THAT determines where your engine height sits.
Those edelbrock mount were made to mount between the stringers with L brackets.
 

Speedyzee

Active Member
Joined
Dec 1, 2022
Messages
30
Reaction score
23
Yup; that's the same idea I use to set up drive lines in the vehicles I've put together. If I'm going to mess with it; might as well do it right. Looking for a marine timing cover and bell housing, so I can build new front and rear engine plates to get the engine at the correct height while still landing on top of the stringer angles. Been looking for pics of the original engine mount set up in a BBC Hondo, but no luck yet; if anyone has pics they could share, I'd appreciate seeing them :)
 

warpt71

Lower River Lover
Joined
Sep 25, 2008
Messages
3,668
Reaction score
3,598
Find a used Glenwood or similar type of timing cover. My Hondo actually used a Moon cover. Use 3/8 or 1/2 plate to make your mounts.

Also, Look through D21's site, he sells those plates precut and drilled. Both the from and flywheel sides.
 

Speedyzee

Active Member
Joined
Dec 1, 2022
Messages
30
Reaction score
23
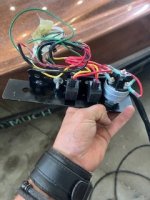
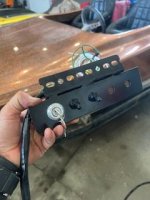
I got the steering shaft/wheel all back together properly and installed the gauges and switches; polished and reinstalled the throttle pedal with a new cable & proper bolts - I've come to realize whoever worked on this thing before me literally threw it back together; missing or incorrect parts, pieces and bolts be damned.
Nice to have a little piece of this basket case back together somewhat properly.

Sourced a new timing cover, water inlets, 3/8 motor plates & brackets; I'm going to get at that this weekend to get the engine sitting where it needs to be for the drive shaft angles to be correct.

I'm in the process of replacing the seals in the gearbox, rudder bushing and prop shaft.....
My current prop shaft seal uses a single lip seal that's just pressed in, with a grease fitting in it. I was just going to replace the seal and put it back together, but then I came across the one on D21's site - multiple seals retained with a snap ring.
Since I'm new to this thing I don't want to mess with things just for the sake of it, but this seems like a better setup, No?
Has anyone had a single seal decide to walk out of the housing? Any reason not to go with the multiple seal unit?

Once the engine is sitting right, I'll sling it off the trailer to reinstall all the plates and seal all the bolts, as well as rework the bunks to keep the boat centered on the trailer, and get pics of the bottom of the hull for those who were curious about it.
Thanks for all the info so far :)
 

Speedyzee

Active Member
Joined
Dec 1, 2022
Messages
30
Reaction score
23
Found out I was short shipped one engine mount foot, so decided to get a look at the rudder situation....

I have parts from this and another boat and am going thru them to find the best to use. First off; how much free play is too much between the brass stuffing box and rudder? With the best rudder and stuffing box together I still have a good 0.045" of slop - that too much? That stuffing box uses 2 lip seals, not a packing. I ask since it's going to be a PIA to remove the stuffing box after the plates are all reinstalled.

And on that note, lol. This thing had a fixed center plate - ordered the bits to set it up to move with the control rod. When I was measuring the current cav plate levers so I knew what to get, I found out there are 3 different lengths (measuring from the center line of the control rod to the center of the eye), from L to R there is one at 1.750, three at 1.50 and the last two are 1.250"
Is there a reason they would be different? To compensate for something the boat was doing? I've set up numerous vehicle suspensions, so maybe to counter engine torque? I got nothing, al the hardware looks the same, so assuming it was ran this way at some point?
 
Top