WELCOME TO RIVER DAVES PLACE

1979 22DC Schiada V Drive - Build Thread

stepdecks

Active Member
Joined
Dec 19, 2020
Messages
38
Reaction score
222
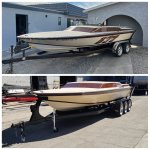
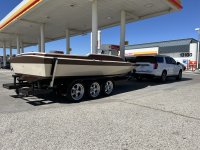
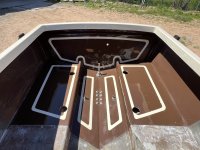
Around December @Outdrive1 twisted my arm (which didn't take a lot of twisting) into buying this cream puff 22! It was indoor stored for most of it's life and almost all original with a history of ski racing in Lake Arrowhead (The Cumming's boat per @025). The boat showed as it probably did brand new in 79', came rigged with stainless underwater gear, 10* Casale/T400 drivetrain and a High Compression 468 BBC, Exterior wise it showed Gel 9/10, pristine Packlon Wood Grain with no hazing, interior that was very nice and definitely usable, OG brown carpet, etc. Sitting on a Original Competitive Trailer w/ 17" Torq Thrust! - Enjoy the OG pics at time of purchase before the snowball started rolling down hill and headed for downtown! Lol

tempImagehXAgsX.jpg

tempImagedIwL8i.jpg
tempImageLY4iOw.jpg
tempImageD1I8Ep.jpg
tempImageKbeO9B.jpg
 
Last edited:

stepdecks

Active Member
Joined
Dec 19, 2020
Messages
38
Reaction score
222
After hours of possession the disassembly started! Initial plans were too just get the boat stripped and off to RSS Gel Work (Steve Vossemeyer, MurderVector) for full interior and exterior fiberglass and gel resto!

The worst part - trying to remove frozen hardware that hadn't been touched since original install after years of rust and corrosion, definitely made patience and tool selection/availability a virtue!


tempImagexvXX5M.jpg


The point where I could finally see the potential with the windshield and transom rail gone! Finally could see the clean lines we all love, next up was pulling the motor, drivetrain, plumbing and wiring harness

tempImageasUHgx.png

tempImaget7jJ3y.png
tempImageJSgPxa.png
tempImageRFYiQb.png


Finished Product! - Empty and Ready for Lalo to get his hands on it!

tempImagerFU5gJ.png
tempImageERgrJ9.png
tempImageK1D6Jo.png
 

stepdecks

Active Member
Joined
Dec 19, 2020
Messages
38
Reaction score
222
Once arrived in Hesperia @ Lalo's we went over what began a basic list of to-do's and "blue taping" of holes to be filled and bouncing ideas of gel work and interior/exterior plans! Those plans consisted of:

- Full Capping
- Filling all dash holes except for the gauges and steering for a clean dash look
- Filling the old exhaust holes as future exhaust plans will be above the waterline/swimstep... shotgun style maybe? TBD!
- Interior structure wood and fiberglass as needed and definitely where needed
- Gel/Buffed floors and transom
- Removing the old fridge in front of passenger area

tempImageGTiEEb.png
tempImageTUWBbQ.png
tempImageBLNfaQ.png
tempImageniYHUX.png
tempImage8AwQkN.png
tempImages5d7IT.png


After a week of progress, I swung by with new plans and ideas and inspirations from countless conversations and bad influence from friends like @jstnoc !!
So I decided to lower the cap line 6" for a more substantial look and removed the black pins. Also to wrap the bottom line around the transom which would be the same color as the rest of the boat, as the wood grain was going away. I know, I know "keep it OG" but it'll be tasteful I promise!


tempImageXUEZFp.png
tempImageOi2IXZ.png
tempImagepUf0HI.png
tempImageWFJHn5.png
 

stepdecks

Active Member
Joined
Dec 19, 2020
Messages
38
Reaction score
222
While Lalo was doing his thing it was time to start making headway on the hardware; chroming/polishing what was still useable and machining new brackets, plates, etc for what isn't going to be used or changing. I was careful as possible pulling the transom hardware apart as I wanted to reuse as much of it as possible to keep the character of the boat. Everything went to polish including the trans!

tempImagen3nqF0.png

tempImageGcFpZZ.png
tempImageZyRdX9.png
tempImagel8n1kW.png
tempImagePyCuKA.png


Trans Before & Almost After (Haven't had time to go pick it up)

tempImage6pqIh0.png
tempImageZlXQjb.png


Gas Tanks went to Pogue Fabrication to have 3/4 Bungs welded in and then went off to powdercoat, the color didn't come out as sampled but oh well, we'll find a solution to cover them up down the road...

Before & After(s)

tempImagevcpYzu.png
tempImageYB7TU6.png
 

stepdecks

Active Member
Joined
Dec 19, 2020
Messages
38
Reaction score
222
With everything making headway it was time to make more progress elsewhere... Trailer time! So of course I called my buddy Nick Valore (@cj222) of MadSkillz Custom Fabrication in Pomona, CA, who in my opinion is ground zero for custom trailers and refurb!

This old "Flexie Flyer" Competitive Trailer showed up as bare bones as it gets and we immediately got to planning and bringing a vision to life!
I wanted:

- First and foremost, it's a Schiada, so it was missing a 3rd axle. Haha!
- Straight Fenders, No Steps! (because cool factor)
- Longer Rear Steps with frenched LED light bar tail lights, and 3rd brake
- Custom bowrest and winch post
- Powdercoat, lights, wiring, full refurb, etc!

tempImage6nVRLd.png


Everyday of this build there was progress being made. Nick's work ethic and craftsmanship is second to none and with the same amount of effort in the communication department made this process painless and quite enjoyable to watch it come to life - messages were exchanged through-out the day and into the wee hours of some nights!

IMG_5608.JPG
IMG_5615.JPG
IMG_5616.JPG
IMG_5612.JPG
IMG_5610.JPG


With Stainless 10' fenders being impossible to source we fell back onto ordering 9" x 102" galvanized fenders (Pacific Trailers stocks them) and shortening them to fit the wheel spacing. Not having steps means that Nick had to fabricate stand offs with backing plates to accommodate the "floating fenders"

IMG_5611.JPG


I didn't want any lights on the trailer other than tails so the marker lights will be mounted on the front and back bottom on the fenders, I sourced these Peterbilt Marker Lights from Raney's Truck Parts online, 6" LED!

IMG_5609.JPG


And, by that night we were on the ground on all SIX and halfway there!

image000001.jpg
 

stepdecks

Active Member
Joined
Dec 19, 2020
Messages
38
Reaction score
222
While Nick was doing his thing, Lalo made extensive headway on the exterior and it came out killer! He went above and beyond, respraying all of the almond and clearing the wood grain. We decided to go a couple shades darker on the brown to a chocolate color vs the lighter brown it was. Loving the look of no pins also!

tempImage2qm7qw.png
tempImageRxNGo4.png
tempImageh3KyTn.png


At this time I was able to pull it for a week so Nick could mate it to the trailer for his final adjustments on the bunk height and set up the bow rest/winch post set up!

tempImagegtUylJ.png
tempImageS1m1a6.png
tempImagecPhdSc.png
 
Last edited:

stepdecks

Active Member
Joined
Dec 19, 2020
Messages
38
Reaction score
222
Back to the trailer porn!

Later that night Nick had it positioned on the trailer and new bunk height measured and mocked

IMG_5623.JPG
IMG_5625.JPG
IMG_5622.JPG
IMG_5617.JPG


The Next Day - We had a bow rest!
I was so indecisive and I finally told nick to do his thing and surprise me, he build a v rest to the angle of the bow (to obviously be carpeted upon final assembly)

IMG_5619.JPG
IMG_5620.JPG
IMG_5621.JPG


I later told him to make sure he added his own touch on it which has become what we'd call his signature gusset on the bow rest.

IMG_5618.JPG

IMG_5624.JPG


With all that done...it was time for powdercoat and I chose gloss black because I feared trying to match one of the 2 colors on the boat and being a shade or 2 off in either direction lol... and I'm glad I did!

image000002.jpg

IMG_5626.JPG
IMG_5627.jpg
 
Last edited:

lenmann

Well-Known Member
Joined
Apr 13, 2013
Messages
1,696
Reaction score
3,519
Great to see a build thread around here and the progress to date is down right beautiful. Nicely done sir!
 

Outdrive1

Outdrive1 Marine Sales https://www.outdrive1.com/
Joined
Dec 19, 2007
Messages
33,559
Reaction score
30,782
Looks great Kyndle. Thanks for taking care of her
 

Outdrive1

Outdrive1 Marine Sales https://www.outdrive1.com/
Joined
Dec 19, 2007
Messages
33,559
Reaction score
30,782
You didn’t fill in the dash…… Putting gauges back?
 

poncho

Well-Known Member
Joined
Dec 20, 2007
Messages
5,923
Reaction score
10,138
Back to the trailer porn!

Later that night Nick had it positioned on the trailer and new bunk height measured and mocked

View attachment 1345206 View attachment 1345208 View attachment 1345205 View attachment 1345200

The Next Day - We had a bow rest!
I was so indecisive and I finally told nick to do his thing and surprise me, he build a v rest to the angle of the bow (to obviously be carpeted upon final assembly)

View attachment 1345202 View attachment 1345203 View attachment 1345204

I later told him to make sure he added his own touch on it which has become what we'd call his signature gusset on the bow rest.

View attachment 1345201
View attachment 1345207

With all that done...it was time for powdercoat and I chose gloss black because I feared trying to match one of the 2 colors on the boat and being a shade or 2 off in either direction lol... and I'm glad I did!

View attachment 1345212
View attachment 1345214 View attachment 1345216
I'm a huge fan of decking the forward portion of these trailers instead of doing the wet feet circus act on frame rails, not to mention it looks killer. 👍

Beautiful boat and trailer.
 

stepdecks

Active Member
Joined
Dec 19, 2020
Messages
38
Reaction score
222
You didn’t fill in the dash…… Putting gauges back?
Yeah I decided to keep it classy, to better match the boat. So 2 5/8’s black face livorsi’s with chrome mega bezel will look close to period correct and still update the boat at the same time - also saved $15k from not going motec lol maybe one day if I put an efi deal in it
 

One2go

Well-Known Member
Joined
Jan 1, 2017
Messages
581
Reaction score
823
Love the Thread. Going to be bad ass !
 

Eliminator21vdrive

Well-Known Member
Joined
Jul 5, 2016
Messages
2,233
Reaction score
4,737
While Nick was doing his thing, Lalo made extensive headway on the exterior and it came out killer! He went above and beyond, respraying all of the almond and clearing the wood grain. We decided to go a couple shades darker on the brown to a chocolate color vs the lighter brown it was. Loving the look of no pins also!

View attachment 1345194 View attachment 1345195 View attachment 1345196


At this time I was able to pull it for a week so Nick could mate it to the trailer for his final adjustments on the bunk height and set up the bow rest/winch post set up!

View attachment 1345197 View attachment 1345198 View attachment 1345199
It drives me nuts to see these bow down on trailer. I set mine up a little taller so i don't drag everywhere and FLAT on trailer.
 

BamBam

Well-Known Member
Joined
May 14, 2008
Messages
1,070
Reaction score
661
All is well. The 21 will get a new prop shaft seal and be back in the water soon
 

rivrrts429

Arch Stanton...
Joined
Jan 4, 2008
Messages
21,536
Reaction score
46,588
Amazing thread. Boat and trailer look great! Appreciate you sharing the journey. Really cool to see just how much moving parts it takes to achieve the goals.
 

HAP

Well-Known Member
Joined
Apr 2, 2017
Messages
90
Reaction score
52
What kind of driveline specs you running and how big are your gas tanks? All looks great too!

R,
HAP
 

HAP

Well-Known Member
Joined
Apr 2, 2017
Messages
90
Reaction score
52
Wow, that ought to give her some presence. You going 2 or 3 blade prop?

R,
HAP
 

stepdecks

Active Member
Joined
Dec 19, 2020
Messages
38
Reaction score
222
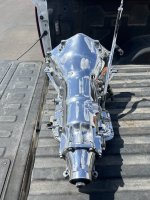
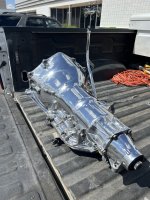
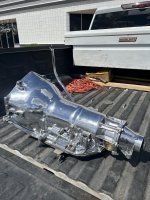
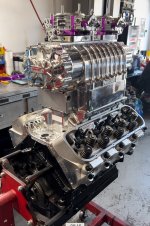
Finally had some time to pick up the trans from the polisher… waiting on gel and engine do to the dyno in the next couple weeks
 

Attachments

  • IMG_6028.jpeg
    IMG_6028.jpeg
    2.8 MB · Views: 73
  • IMG_6026.jpeg
    IMG_6026.jpeg
    2.5 MB · Views: 74
  • IMG_6025.jpeg
    IMG_6025.jpeg
    2.2 MB · Views: 73

vstdispatch

Well-Known Member
Joined
May 21, 2008
Messages
724
Reaction score
385
Back to the trailer porn!

Later that night Nick had it positioned on the trailer and new bunk height measured and mocked

View attachment 1345206 View attachment 1345208 View attachment 1345205 View attachment 1345200

The Next Day - We had a bow rest!
I was so indecisive and I finally told nick to do his thing and surprise me, he build a v rest to the angle of the bow (to obviously be carpeted upon final assembly)

View attachment 1345202 View attachment 1345203 View attachment 1345204

I later told him to make sure he added his own touch on it which has become what we'd call his signature gusset on the bow rest.

View attachment 1345201
View attachment 1345207

With all that done...it was time for powdercoat and I chose gloss black because I feared trying to match one of the 2 colors on the boat and being a shade or 2 off in either direction lol... and I'm glad I did!

View attachment 1345212
View attachment 1345214 View attachment 1345216

You must not be down with the brown huh???
 

Motoxxxloak

Well-Known Member
Joined
Aug 26, 2014
Messages
2,554
Reaction score
2,065

stepdecks

Active Member
Joined
Dec 19, 2020
Messages
38
Reaction score
222
If these are still at Rene's, they look great. I actually dig that color. Saw them today when I dropped my interior off.

Rest of the build looks great as well!
That’s awesome, I haven’t even seen them in person yet! 😂
 

stepdecks

Active Member
Joined
Dec 19, 2020
Messages
38
Reaction score
222
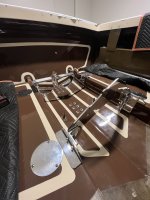
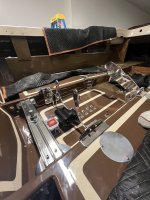
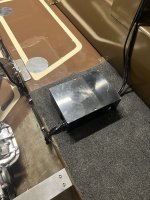
Small victories lately, but we’re going for it - got all of the motor mounts in, waiting on steering from Bergeron mean time we’ll move on to running gear, and drilling the dash for the gauge layout.

Who knows maybe lay carpet by the weekend - motor goes to dyno on Wednesday so we’re getting close!
 

Attachments

  • IMG_6620.jpeg
    IMG_6620.jpeg
    2 MB · Views: 156
  • IMG_6621.jpeg
    IMG_6621.jpeg
    1.8 MB · Views: 160
  • IMG_6615.jpeg
    IMG_6615.jpeg
    2.1 MB · Views: 158

stepdecks

Active Member
Joined
Dec 19, 2020
Messages
38
Reaction score
222
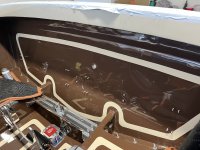
Progress!

Goes to @cj222 on Monday for inside transom bracket to mount the sea strainers and ski tow, and tailpipes!

Need to teak the swim step too, in the mean time
 

Attachments

  • IMG_7052.jpeg
    IMG_7052.jpeg
    2.3 MB · Views: 102
  • IMG_7031.jpeg
    IMG_7031.jpeg
    2.8 MB · Views: 104
  • IMG_7042.jpeg
    IMG_7042.jpeg
    2.2 MB · Views: 105

cj222

Well-Known Member
Joined
May 18, 2010
Messages
508
Reaction score
2,331
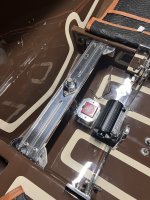
Been working away on this transom plate setup. Got it all machined with dual sea strainer mounts, ski tow mounting brackets, and a bezel for the top deck lid. Will send these off to polishing and start on the exhaust tailpipes next.
20240424_124547.jpg
20240424_124518.jpg
20240424_123742.jpg
20240424_123318.jpg
 

Backlash

Well-Known Member
Joined
Jan 14, 2011
Messages
14,610
Reaction score
28,527
This is merely a suggestion as I am not knocking your work in ANY way. You know how much I appreciate you and your talents.

I might try to reinforce that top gunnel somehow, just to be sure that ski pole doesn't move backwards away from the motor when under load. Ask me how I know. There was one on my 19' that was secured in a similar manner (At the base of the transom, that protruded through the top cap). It STILL moved enough that it elongated the hole in the top cap. The ski pole bent slightly, and it caused enough damage that I had to grind out quite a bit of fiberglass where the ski pole came up through the cap. My new ski pole mount will be different as I don't want to have the same problem a second time. Just a suggestion.

As always, thank you for the updates and the incredible work!!
 

cj222

Well-Known Member
Joined
May 18, 2010
Messages
508
Reaction score
2,331
This is merely a suggestion as I am not knocking your work in ANY way. You know how much I appreciate you and your talents.

I might try to reinforce that top gunnel somehow, just to be sure that ski pole doesn't move backwards away from the motor when under load. Ask me how I know. There was one on my 19' that was secured in a similar manner (At the base of the transom, that protruded through the top cap). It STILL moved enough that it elongated the hole in the top cap. The ski pole bent slightly, and it caused enough damage that I had to grind out quite a bit of fiberglass where the ski pole came up through the cap. My new ski pole mount will be different as I don't want to have the same problem a second time. Just a suggestion.

As always, thank you for the updates and the incredible work!!
Makes sense, thank you for the tip👍 I'm sure Kyndl is just using this as a grab handle lol
 
Top