WELCOME TO RIVER DAVES PLACE

16’ Mantra Tunnel Black Thunder

Fonz69

Well-Known Member
Joined
Jan 15, 2011
Messages
326
Reaction score
784
Well this next chapter begins with me testing out a handmade shoe for my Stealth after another successful racing season with UMPBA. I made a plan to drive the boat back to our dock and offered up rides to my family since we had some X85 fuel left in the drum.

Well I figured why not let both my sons take the wheel for some nice photos and give them a taste of the driving fun that I’ve known behind this alcohol guzzling boat.

Turns out the apple doesn’t fall far from the tree and both boys now want to go racing. When your kids take interest in your hobbies you really no choice but to fuel the fire before it goes out…right?

IMG_5071.jpeg

IMG_5080.jpeg


And so the search for the right boat begins, I found several OB powered ready to race boats that would be great for the JR racer or 65mph class but after showing them to my oldest it was a solid “no I want a jet boat that’s loud like yours“

We had a small budget to work with so our options were limited and everything we both would find meant driving out to the west coast, way over our budget or are too far gone to afford to save.

With some sponsorship help from his Grandparents we finally found a boat that looked promising. A 1986 16’ Mantra Tunnel down in Illinois.

Texts went back and forth and a plan was made to drive down and check out this prospect.

Some things were worse then I had thought however it was a diamond in the rough that just needs some freshening up to make it a reliable race boat. We negotiated a price and started the long drive home. He couldn’t wait to get behind the wheel so at our lunch stop this was his first shot.
IMG_5092.jpeg

And after we made it home his younger brother wanted to share in the excitement as he will someday take the wheel when he gets old enough.
IMG_5094.jpeg

Like I have done in my last 2 builds recorded on this forum I’ll do my best to update our progress. This will definitely be a work in progress so some things will just need to wait until we can afford to do them (sponsors are always welcome 😉) however it will always be our intention to make this build safe and reliable with what we have to work with. Hope everyone enjoys the build and he has already named it “Black Thunder”
 

Fonz69

Well-Known Member
Joined
Jan 15, 2011
Messages
326
Reaction score
784
The pump was supposed to be good to go however I discovered the impeller is shot when we looked at the pump in Illinois. The previous owner adjusted the price and threw in a better carburetor to help offset the known damage.
IMG_5108.jpeg

Did a quick compression test and it seemed to be decent.
IMG_5118.jpeg

Off with the headers.
IMG_5116.jpeg

Out with the seats.
IMG_5120.jpeg

IMG_5121.jpeg


IMG_5123.jpeg

Long day of hard work, they look tired 😴
IMG_5122.jpeg

IMG_5117.jpeg

Time to pull the motor!
IMG_5132.jpeg

IMG_5134.jpeg
 

Fonz69

Well-Known Member
Joined
Jan 15, 2011
Messages
326
Reaction score
784
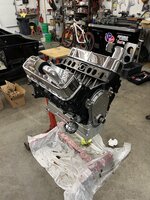
A little digging into the motor shows things aren’t always what they appear…. The previous owner was told it was a fresh build with forged internals. Hmmm not so much. Found a 2 bolt main cast gm crank with speed pro pistons and some Chinese red rockers. Well it did run so we’ll have to make this work.
IMG_5135.jpeg

IMG_5125.jpeg

Heads are gm large oval 241s
IMG_5168.jpeg

Unfortunately an old edelbrock rectangular port intake does not help air flow, otherway around would be fine but this will be replaced now by a rpm air gap manifold.
IMG_5167.jpeg
 

Fonz69

Well-Known Member
Joined
Jan 15, 2011
Messages
326
Reaction score
784
Was able to dig around online and found a post of a past owner in the 90’s when this old girl was in her prime. 😎
IMG_1278.jpeg

The original trailer is still here and we still have the original back seat.
 

Romans9

Well-Known Member
Joined
Sep 18, 2023
Messages
1,224
Reaction score
5,607
Very cool!

You cannot go back and make memories, you have to make them now, good job dad!
 

Fonz69

Well-Known Member
Joined
Jan 15, 2011
Messages
326
Reaction score
784
Post up what parts you need! I’m not sure about a sponsorship, but there’s a LOT of us with a LOT of shit laying around that would be happy to donate to put a new hot boater on the water!
I’m going to reach out to David and Duane at HiTech Performance also but big ticket pump item would be finding a nice used AA impeller. I have a new standard wear ring but the impeller the boat came with is toast!

Really need a flywheel cover and a safety loop or shield for the driveline too!

Anyone has anything decent please let us know. Thanks!
 

Fonz69

Well-Known Member
Joined
Jan 15, 2011
Messages
326
Reaction score
784
Put a few more hours in the shop today.
Boys went to town removing parts while I started the clean up and tear down of the motor.
IMG_5185.jpeg

IMG_5186.jpeg

Definitely had the wrong intake you can see the rectangle port gaskets stuck on the oval port heads 🤦🏻‍♂️
IMG_5188.jpeg

Goal to pull the pump was tougher than expected. Had to drill out the back two loader bolts and there was probably about 3 tubes of silicon around the race plates 😅
IMG_5190.jpeg

Motor rails coming out. Plan on making new ones since the motor will move forward some with the Jetaway.
IMG_5191.jpeg

New intake came in yesterday so doing a dry run to see how things line up.
IMG_5192.jpeg

Pumps out, shoe will have to wait until it’s flipped over only 1 out 4 bolts came out and I bet the others will be real fun to remove.
IMG_5193.jpeg

Getting closer each day.
IMG_5194.jpeg
 

Fonz69

Well-Known Member
Joined
Jan 15, 2011
Messages
326
Reaction score
784
Motor is about 90% complete now.
IMG_5224.jpeg

Cleaned off the cheap paint that just melted off with carb cleaner😳
Fresh coat of etching primer and engine black.
IMG_5227.jpeg

IMG_5223.jpeg

New timing cover since the old one had one of the pan nuts missing so someone smashed a nyloc nut and silicone 🤦🏻‍♂️
IMG_5230.jpeg

Had to machine down the cam button to accommodate the new cover.
The oil pump drive shaft sleeve had sheered off and was rattling around at the bottom of the pump. When I pulled the oil pan and seen the stellar weld job on the pickup I knew looking closer would be important.
IMG_5217.jpeg

New HV Melling pump with matching pickup for the new 10q Champ Oil pan. Figured some of these upgraded parts just made sense to try and keep this questionable motor alive.
IMG_5229.jpeg

Champ pans are made in WI and I’ve used them before with good success and they are not terribly overpriced like some pans can be. They come with trap doors and a crank scraper built in.
IMG_5231.jpeg

Picture above is during cleaning with the scraper off.
IMG_5232.jpeg

Pan with Moroso 1 piece gasket and stainless ARP hardware.
IMG_5233.jpeg

IMG_5234.jpeg

Dusting off my original set of HTP valve covers. Have to make some custom tower breathers because of the blower setup they were on last time I used them.
IMG_5237.jpeg

Went with the Edelbrock RPM Air Gap manifold and went through the Holley 850 carb.
At least this intake will actually match the heads….picture is mocking up.
IMG_5238.jpeg

So the headers that came with the boat will need to be re chromed so I brought down off the wall my set I used on the 582 motor in my boat. Sanded up his scoop, set the intake, distributor and wires. I’ll have some brackets to make for the coil and 6AL box but that can wait for now.
IMG_5289.jpeg

IMG_5290.jpeg

IMG_5291.jpeg
 

Attachments

  • IMG_5235.jpeg
    IMG_5235.jpeg
    2.2 MB · Views: 0

Fonz69

Well-Known Member
Joined
Jan 15, 2011
Messages
326
Reaction score
784
Mission to complete the hull stripping is almost complete!
IMG_5288.jpeg

Fuel tanks out!
IMG_5287.jpeg

Pulling all the wiring out, past projects have taught me even if you think it’s ok you better check it. I found my harness in my stealth rubbed across a bolt and chewed off the coating on all the wires in the same spot! It’s just not worth it so this boat will get new wires installed in a poly conduit.
IMG_5284.jpeg

Max hard at work removing pounds of silicon.
IMG_5216.jpeg

New wheel came in so had to quick mock it up before we removed the steering.
IMG_5259.jpeg

All out!
IMG_5294.jpeg

IMG_5295.jpeg

Checked out the boat cover, it’s original and was nice but unfortunately has shrunk and only snaps the first half before it won’t stretch anymore.
IMG_5296.jpeg
 

Fonz69

Well-Known Member
Joined
Jan 15, 2011
Messages
326
Reaction score
784
Time to figure out this loose bow eye problem.
IMG_5292.jpeg

Marked out the light then drilled holes under the light area to expose the loose eye nuts. It doesn’t seem to be damaged on the inside but will definitely need attention on the outside.
IMG_5293.jpeg

IMG_5315.jpeg

Up she goes!
IMG_5310.jpeg

So this would make it 450lbs with the intake, carpet, tank straps, horn rub rail and rigging so probably around a 420 lbs shell.
IMG_5311.jpeg

IMG_5312.jpeg

Now we’re rolling.
IMG_5313.jpeg

Note to self, wait for help, this was not my best of ideas to attempt myself. When it goes back over again there will be more people involved as the cherry picker had a mind of its own and caused me some more gray hairs lol.
IMG_5314.jpeg

Well somebody loves to beach this ol girl 😬
IMG_5317.jpeg

IMG_5318.jpeg

IMG_5316.jpeg

Will address the through bolt tank straps to make sure they don’t leak but thinking I’ll leave them thru hull still.
IMG_5319.jpeg

Have to address the water absorption issue, the bunks are rotted a
so that explains some of this.
IMG_5320.jpeg

We’ll time to fight with the shoe bolts and hope they will come out….I want to be able to adjust the hardware so now is the time to fight with it while she’s upside down.
 

Fonz69

Well-Known Member
Joined
Jan 15, 2011
Messages
326
Reaction score
784
Well after some drilling and broken tools the shoe is out. Looks like it was set when the intake was installed and never removed. Opening is 14 3/8” way larger then my stealth. At least now we can make adjustments as needed.
IMG_5341.jpeg

Old rusty tank straps need to go. Found some nice stainless ones online.
IMG_5342.jpeg
 

Fonz69

Well-Known Member
Joined
Jan 15, 2011
Messages
326
Reaction score
784
Quick refresh of the trailer started today. It’s in pretty good shape but needs wiring, lights, axle seals, bunks, fender panels and tires.
IMG_5347.jpeg

Using some composite material left over for the fender skirts. It’s aluminum skin with a plastic core.
IMG_5352.jpeg

Stainless hardware and spray glue with some new rug.
Trailer selfetch primer and gloss black for now.
IMG_5348.jpeg

New treated bunks and rug with stainless hardware through bolted so hopefully they stay in and not fall out like the old ones.
IMG_5349.jpeg

IMG_5350.jpeg

Panels worked out great long as my boy doesn’t crash into them loading the boat. Part of the reason I’m not going with a high dollar powder coat finish lol.
IMG_5353.jpeg

Well no more room in the shop so you stay outside. At least I can use this canopy I bought for the races and somehow never end up using anymore.
IMG_5354.jpeg

Now it’s back to boat bottom and a goal to get her back on the trailer before the big snow hits!
 

Fonz69

Well-Known Member
Joined
Jan 15, 2011
Messages
326
Reaction score
784
Sanding fiberglass my favorite past time… not really but it’s got to be done. Not going to go crazy with it but address some of the sponson gel cracking which is in line with the main bulkhead so I’m guessing some wave pounding and past owners popping wheelies led to what I’m seeing.
IMG_5364.jpeg

Ground out and added some glass back to the damage I found at the bow eye.
IMG_5365.jpeg

Max was back at silicon removal duty, his favorite 😅
IMG_5358.jpeg

Owen was helping save my lungs while we drilled out and countersunk better fasteners for the new stainless tank straps.
IMG_5359.jpeg

80 grit fun
IMG_5360.jpeg

IMG_5361.jpeg

Some filler for the intake holes to smooth things out.
IMG_5363.jpeg

IMG_5362.jpeg

Much larger opening than my Stealth. Might make a shoe to close that up some since we don’t need any overcharge issues. And might try an open loader I had instead of the old rusted V blocker.
IMG_5355.jpeg
 

Fonz69

Well-Known Member
Joined
Jan 15, 2011
Messages
326
Reaction score
784
Worked a 70hr week this week so not allot of progress made though was able to finish the keel mods, speed coat the keel and finish the crack repairs. Hope to shoot the black gel coat next Saturday.
IMG_5375.jpeg

Modified the keel to less of a V hull design. Only testing will prove if it works 🤷🏻‍♂️
IMG_5376.jpeg

These cracks are right in front of the main bulkhead so I’m sure everyone’s popping wheelies in this didn’t help matters. Had to grind them down and build it back up.
IMG_5402.jpeg

IMG_5403.jpeg

IMG_5405.jpeg

IMG_5406.jpeg

IMG_5408.jpeg

Touched up the scratches and more bow eye detailing.
IMG_5407.jpeg

Gel coat seal the keel work.
IMG_5409.jpeg

Final filling on the crack areas in the front.
IMG_5410.jpeg

IMG_5411.jpeg

Scuff up for speed coating.
IMG_5412.jpeg

IMG_5413.jpeg

Hope the keel works.
IMG_5415.jpeg
 
Top